Cài đặt Nginx và PHP-FPM on Centos
Cài đặt PHP
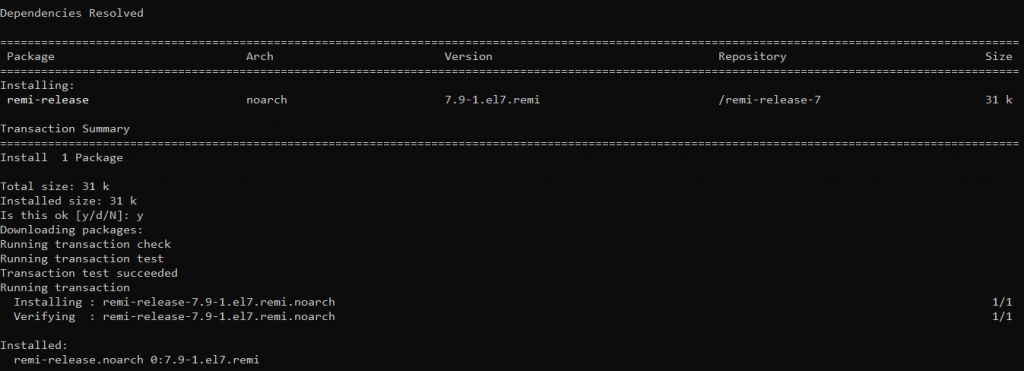
Bước 1: Cài đặt REMI Repository
sudo yum install http://rpms.remirepo.net/enterprise/remi-release-7.rpm
Bước 2: Tiến hành tìm kiếm các repo chứa bản PHP mà chúng ta cần
yum --disablerepo="*" --enablerepo="remi-safe" list php[7-9][0-9].x86_64
Chúng ta có thể thấy có rất nhiều bản PHP từ 7.0 tới 8.0 trong hình

Bước 3: Chẳng hạn ở đây tôi muốn cài PHP7.4 nên chúng ta sẽ kích hoạt repo tương ứng
sudo yum install yum-utils - y


sudo yum-config-manager --enable remi-php74

Bước 4: Tiến hành cài đặt PHP
sudo yum install php php-mysqlnd php-fpm

Bước 5: Kiểm tra phiên bản PHP xem đã cài đặt đúng chưa
php -v

Bước 6: Tiến hành chỉnh sửa file cấu hình của PHP
yum install nano -y

sudo nano /etc/php-fpm.d/www.conf
Tìm tới đoạn sau


Sửa Apache thành Nginx
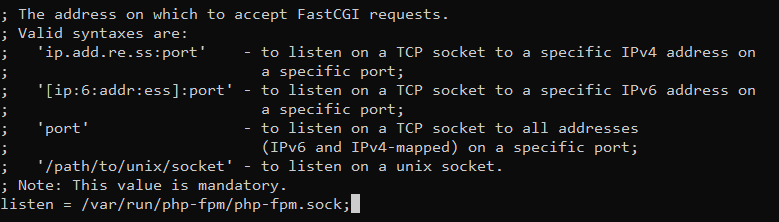
Tìm tới dòng listen =
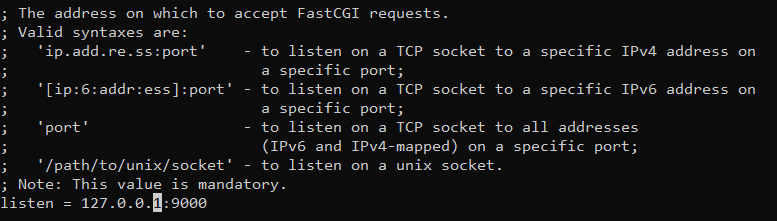
Và sửa thành:
/var/run/php-fpm/php-fpm.sock;
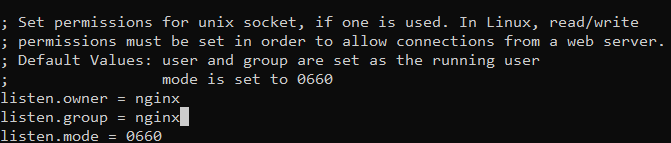
Tìm tới đoạn này
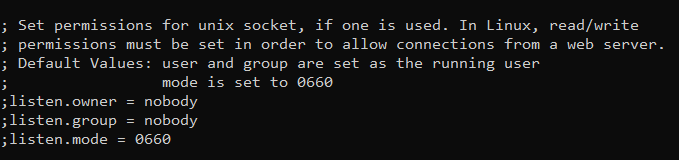
Sửa lại thành
listen.owner = nginx
listen.group = nginx
listen.mode = 0660
Cuối cùng lưu files lại
Bước 5: Tiến hành kích hoạt PHP-FPM
sudo systemctl start php-fpm
4. Cấu hình NGINX để xử lí file PHP
Bước 1: Mở file cấu hình NGINX
sudo nano /etc/nginx/conf.d/default.conf
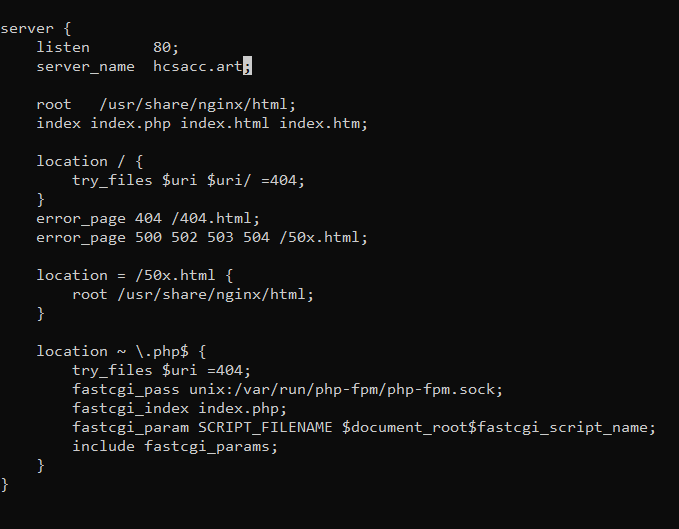
Dán vào đoạn cấu hình sau
server {
listen 80;
server_name domain hoặc IP của bạn;

root /usr/share/nginx/html;
index index.php index.html index.htm;

location / {
try_files $uri $uri/ =404;
}
error_page 404 /404.html;
error_page 500 502 503 504 /50x.html;

location = /50x.html {
root /usr/share/nginx/html;
}

location ~ \.php$ {
try_files $uri =404;
fastcgi_pass unix:/var/run/php-fpm/php-fpm.sock;
fastcgi_index index.php;
fastcgi_param SCRIPT_FILENAME $document_root$fastcgi_script_name;
include fastcgi_params;
}
}
Bước 2: Khởi chạy lại NGINX
sudo systemctl restart nginx
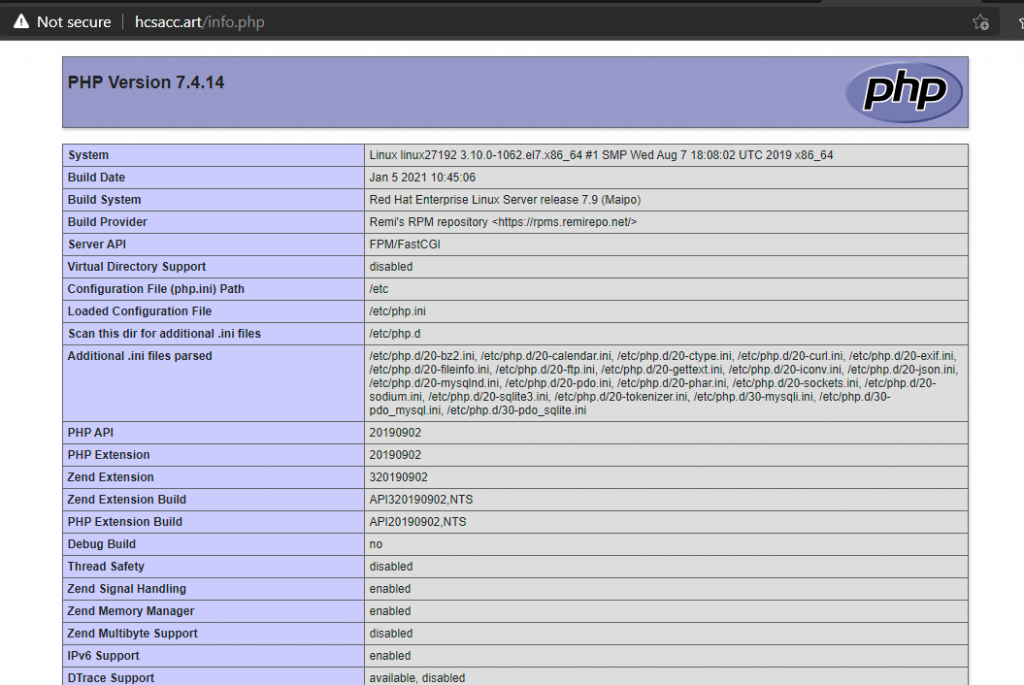
5. Kiểm tra PHP đã hoạt động hay chưa
Bước 1: Tạo ra một file info.php
nano /usr/share/nginx/html/info.php
Gõ nội dung sau vào
<?php

phpinfo();
Bước 2: Truy cập domain/info.php thấy như hình là thành công
As an important hormone, testosterone influences many bodily features, from
muscle mass to mood. This article delves into the relationship between masturbation and testosterone.
The importance of a holistic approach to hormonal health can’t be overstated.
Train and bodily activity have been shown to have
a constructive impact on testosterone levels, particularly resistance coaching and high-intensity interval training (HIIT).
In conclusion, the present scientific evidence on the hyperlink between common masturbation and testosterone ranges is proscribed and contradictory.
Whereas some research have discovered no important change in testosterone ranges after masturbation, others suggest that abstinence may actually enhance
testosterone ranges. It is important to strategy this matter with warning and depend on scientific evidence rather than anecdotal reviews or particular person experiences.
Scientific analysis suggests that there’s a temporary increase in testosterone
ranges immediately after ejaculation, followed by a brief lived decrease.
Frequent masturbation may result in barely decrease
testosterone ranges instantly after each orgasm, but these levels typically return to
normal inside a brief period. It is essential to notice that these fluctuations are thought of part of the body’s
natural hormonal regulation and usually are not indicative of
long-term declines. Masturbation is a pure
and customary exercise that always raises questions regarding its impact
on various features of well being, notably testosterone levels.
Subsequently, any potential effect of masturbation on testosterone levels could additionally be overshadowed by
these different elements. Masturbation, the act of self-stimulation to realize sexual pleasure, is a
normal and healthy a part of human sexuality.
It is a common apply that the majority adults interact in in some unspecified
time within the future of their lives. However, there are numerous misconceptions surrounding masturbation and its effects on the body, particularly in relation to testosterone levels.
A balanced diet wealthy in vitamins and minerals helps wholesome
testosterone ranges. Foods excessive in zinc, vitamin D, and omega-3 fatty acids are notably useful.
Most of the studies on masturbation and testosterone have been pretty inconclusive.
If you notice signs of low testosterone while
additionally experiencing difficulties in your relationship, contemplate therapy for
yourself or for you and your partner. Masturbation alone doesn’t trigger
hair weight loss steroid (Barbara), ED, or zits breakouts on your
face and back. These effects are more strongly linked to life-style selections, hygiene, and private relationships,
somewhat than to your T levels.
As we delve deeper into the complexities of sexual well being and hormonal balance, it’s important to recognize the intricate interaction between varied hormones and neurotransmitters.
Serotonin and testosterone, for example, have a complex relationship that influences temper and masculinity.
This connection highlights the necessity for a holistic strategy to understanding sexual health and hormonal
regulation. It’s essential to notice that the relationship between dopamine,
sexual exercise, and general well-being is complicated and may range considerably between individuals.
Testosterone is produced and released in each men and women, although the levels are much
higher in males. Additionally, the adrenal glands are answerable
for a small quantity of testosterone manufacturing in each sexes.
Symptoms of low testosterone can include low intercourse drive, continual fatigue, decreased bone and muscle
mass, decrease sperm counts, and erectile dysfunction (3).
However regardless of the overwhelming popularity of self-pleasure, some men steer clear.
For additional reading on sexual wellness and male health, take a glance at this comprehensive guide.
This placebo effect could make one really feel higher or worse about their testosterone levels,
regardless of actual physiological changes. The psychological impact of beliefs and expectations highlights the significance of
a balanced and knowledgeable strategy to sexual health.
The NoFap movement promotes abstinence from masturbation, asserting that it can improve testosterone ranges and overall vitality.
Whereas some people declare to experience increased
power and a greater temper, scientific analysis does not consistently assist these assertions.
The benefits reported by individuals are sometimes attributed to psychological components
rather than actual modifications in testosterone ranges.
Limited older research additionally counsel that short-term abstinence from sexual activity can increase testosterone ranges.
Another 2001 examine evaluated adjustments in testosterone ranges in men with erectile dysfunction after they received nonhormonal treatment.
Nonetheless, ejaculation on the seventh day
led to a temporary lower in testosterone ranges. This means that extended durations of abstinence may
lead to an increase in testosterone, but ejaculating during this time could momentarily decrease testosterone levels.
It can additionally be worth noting that testosterone levels naturally fluctuate throughout the day and can be influenced by various factors corresponding to stress, diet, and train.
Your healthcare supplier could ask you to quick for a few hours if
the check is being carried out alongside different blood tests.
Be certain to inform your supplier about any medications, dietary supplements, or medical situations you’ve, as these factors can influence your hematocrit
levels. Your bone marrow produces blood cells, and it
needs iron to make hemoglobin. If you’re low in iron, your physique can’t make enough hemoglobin in your purple blood cells.
This sort of anemia is common should you’re
pregnant of have lost lots of blood. If left untreated,
excessive hematocrit can result in complications corresponding to blood clots,
elevated danger of stroke or coronary heart attack,
and impaired circulation.
Every pink blood cell lives about one hundred twenty days and then ultimately ages,
dies, and is damaged down by the spleen [4].
These symptoms can sign polycythemia, a situation where the body produces too many red blood
cells. High and low hematocrit levels can be detrimental to a person’s health
and end result of steroids; Gail, from numerous situations
and life-style factors.
Be positive your doctor is aware of about all medicines, herbs, nutritional
vitamins, and supplements you are taking. This contains medicines that don’t
want a prescription and any illegal drugs you might use.
These embrace bleeding, an infection, bruising, and feeling
lightheaded. When the needle pricks your arm or hand, you might really feel a slight sting or ache.
Management is dependent upon the severity stage and cause of dehydration. For
mild instances of dehydration, rehydration could be achieved at home by growing
oral consumption of water and electrolytes
to help replenish lost fluids. Signs and symptoms could be monitored for improvement to ensure hydration achievement.
Speak to your well being care team about what your hematocrit check end result means.
By Amber J. TrescaTresca is a writer and speaker who covers digestive conditions, including IBD.
For instance, if test results level to a bone marrow drawback, a bone marrow examination could also be needed.
A sample of bone marrow is taken, usually from the hip,
to verify for lymphoma and comparable disorders. After being collected, the blood-filled microhematocrit tubes are rigorously placed in a centrifuge.
A lid is positioned over the tubes to secure their position while the centrifuge rotor spins.
They also transport carbon dioxide back to your lungs for exhalation. Adequate purple blood cell ranges are important for power,
cell perform, and general survival. Macrocytic anemia (high MCV) is
most often as a end result of decreased levels
of vitamin B12 or folate within the body.
This take a look at is a important diagnostic software for assessing overall health and figuring out situations like
anemia, dehydration, and polycythemia. In this detailed guide,
we’ll explore what the hematocrit test is, its purpose, uses,
regular ranges, preparation suggestions, test results interpretation, and regularly asked questions.
High hematocrit ranges, also referred to as polycythemia,
point out an abnormally high focus of pink blood cells within the blood.
This situation can signify a quantity of underlying issues, ranging from benign to critical health considerations.
Excessive hematocrit ranges could cause blood to turn out to be thicker, which may improve
the risk of blood clots, stroke, or heart assault.
The hematocrit check offers a snapshot of the proportion of purple blood
cells in your blood but does not identify the precise reason for irregular
levels. Further tests, similar to hemoglobin measurements or iron studies, could also be necessary for a extra comprehensive diagnosis.
For those who prefer help, we offer a “Data entry service” to assist you enter your data.
Merely connect an image or file of your lab test results, and a certified group member from our information entry team will add
the results for you. Our information entry forms provide
a straightforward, fast, and free way so that you
simply can enter the stories your self. Self-entry permits you to add
a limiteless variety of reports at no cost.
In The End, the choice between testosterone enanthate and cypionate is dependent upon personal desire, particular objectives,
and individual response. Some customers favor the marginally quicker onset of enanthate, while others appreciate the
longer-lasting effects of cypionate. Healthcare professionals often contemplate factors
such as injection frequency, patient compliance, and particular health circumstances when making
recommendations. When it comes to anabolic steroids, testosterone is considered one of
the most popular and broadly used compounds. Inside the realm of testosterone esters,
two of the most generally used types are testosterone enanthate and
testosterone cypionate.
“Most of the side effects the FDA is seeing for topicals correspond to those who are recognized from the accredited oral formulation. It’s not that there’s a new adverse aspect impact which are being reported,” mentioned Oro.
Nonetheless think testosterone therapy turns guys into roid-raging
health club rats? One of the most persistent myths
around TRT is that it makes men overly aggressive or “unnatural.” The reality?
Utilizing alcohol or tobacco with sure medicines
can also cause interactions to happen. Talk About with your healthcare skilled using
your drugs with meals, alcohol, or tobacco. The danger of these signs is extraordinarily small when testosterone therapy has
been prescribed by a specialist following cautious blood analysis.
A 2022 article notes that it’s harder for females to access testosterone therapy than it is for males.
Warnings on testosterone undecanoate mention the chance of pulmonary oil
micro-embolism with intramuscular injection and blood pressure elevation with the oral type.
Equally, subcutaneous testosterone enanthate carries a warning about raising blood stress, too.
Transdermal testosterone gels and options have warnings concerning the virilization of kids who are exposed to the product by touching
the applying website of the individual.
In men with low testosterone, testosterone replacement remedy (TRT) helps restore these ranges
to a healthy vary. TRT works by introducing exterior testosterone into the body—through injections, gels, or patches—which dietary supplements
what the body is no longer producing adequately.
One of the more important issues with testosterone injections is
their potential to have an result on heart health.
If side effects do occur, which is very uncommon, we are available to help you
handle them so you’ll have the ability to continue to
receive the advantages of optimal testosterone
ranges. If one chooses to bear hormone alternative
remedy, a part of their remedy will include preserving
the unwanted effects of testosterone injections to a minimum.
Appropriate studies on the connection of age to the
results of testosterone injection haven’t been performed in the geriatric
inhabitants. Nonetheless, aged sufferers are more probably to have
heart or prostate issues (including enlarged prostate), which how can I get steroids require warning in sufferers receiving
this medicine.
From a scientific perspective, each esters
are considered protected and efficient when used underneath medical supervision. It Is crucial to monitor
blood work, liver function, and prostate health during therapy.
Moreover, post-cycle therapy (PCT) is often beneficial to assist
restore pure testosterone production.
Studies have shown that enanthate reaches peak blood levels within hours after injection and maintains elevated ranges for about 2-3 weeks.
On the other hand, testosterone cypionate, with its longer
ester chain, reaches peak ranges slightly later, typically within hours, and maintains therapeutic levels for 3-4 weeks.
These pharmacokinetic profiles make each appropriate for weekly or bi-weekly
injections. When it involves fertility, there’s a hormone
referred to as Luteinizing Hormone (LH) and
Follicle Stimulating Hormone (FSH), these hormone signals become disrupted
with testosterone photographs. Because of this
FSH downregulation, it could turn into unimaginable to conceive or produce some actual
man gravy during intercourse. When it involves masculinity, bone mass, fats distribution, muscle mass, and drive are all essential for
men’s well being.
Our consultants weigh in on testosterone dietary supplements and reveal whether or
not they work to improve low T. “By enhancing weight problems, lowering peripheral fatty tissue, we reduce the aromatization of testosterone,” Dr.
Urdaneta explained, “so it is not converted into estrogen, and the signs improve.” Followers of
Chinese and Ayurvedic drugs will recognize the mixture of ingredients they’ll find in Quantity Tablets.
The firm definitely is one of many to look at for effective treatments
in Eastern drugs, but it goes the furthest to include a broad variety.
The draw back right here is the necessity for extra scientific evidence to support the
efficacy of a lot of its ingredients. However should you
favor botanicals to lab-derived parts, it could be a great place to start
out. Of the elements listed, only Tribulus terrestris and longjack appear in doses we’d think about likely to be effective.
The main energetic ingredient is D-aspartic acid which triggers an increase
in Luteinizing Hormone. While TestoFuel isn’t probably the most budget-friendly option, it’s best for
these looking for significant muscle features with out the unwanted facet effects of dana linn bailey before steroids, especially if
dealing with low testosterone ranges. TestoFuel has constructed a strong popularity
and is a well-known testosterone booster amongst bodybuilders
due to its capacity to assist produce larger, extra well-defined
muscle tissue. With the other ingredients, a number of
of the doses are substandard in comparability with successful small-scale
research. Different than the Tribulus terrestris, longjack, and ashwagandha,
much of Check Enhance Max’s ingredient profile is
substandard.
Also, with anti-aging dietary supplements, some components
require large sufficient doses that formulating a drink mix makes more sense than asking
a shopper to take half a dozen or extra drugs per
dose. Nonetheless, it’s exhausting to offer a definite answer on its efficacy for increasing testosterone ranges.
Nugenix places a focus on boosting bloodflow, which isn’t widespread in different testosterone boosting dietary
supplements. When it comes to optimizing testosterone, constructing lean muscle, and
bettering total vitality, Adaptophen stands in a league of its own. Not
Like rivals that rely on overhyped or underperforming formulation, Adaptophen is constructed on the
muse of clinically validated ingredients like
Tongkat Ali, coupled with clear practices and an unwavering dedication to high
quality.
TestoFuel testosterone booster, according to Dr.
Edward Group, DC, NP is a pure complement that intends to extend testosterone ranges within the physique.
It incorporates a potent combination of ingredients such as
D-aspartic acid, Vitamin D, and Zinc, which are identified to support healthy testosterone levels, muscular development, and vitality
ranges. Nugenix Complete T is a premium testosterone booster
designed to assist males regain their power, vitality, and efficiency naturally.
Nugenix Whole T is ideal for males trying to boost
their efficiency, whether in the gym or in their everyday life, with out
resorting to artificial hormones. TestoFuel is a
potent testosterone booster for bodybuilding that helps men maximize their performance in the fitness center.
Designed with ingredients like D-Aspartic Acid, Fenugreek, and Magnesium, TestoFuel
helps to naturally improve testosterone ranges, improve muscle mass, and enhance restoration. Ideal
for athletes and bodybuilders, TestoFuel presents a secure, pure method to assist testosterone levels for muscle gain and improved performance.
If every thing else is going great, a few of these compounds simply
won’t be as useful. These are useful in short bursts, after which you are
taking day off, and use them once more the next time you want the assist.
You’re in all probability not getting the standard and amount of sleep you need in your objectives.
Total, we highly recommend the Large Supplements PCT Stack for anyone trying to recuperate shortly and maintain their features.
The stack is efficient, convenient, and well-tolerated,
making it an excellent option for anyone seeking to optimize their performance.
We’ve consulted with a staff of nutritionists
and dieticians to ensure the products we function are of the best standard.
This helps us create essentially the most correct, authentic evaluation content for our readers.
The time it takes to see effects from testosterone-boosting dietary supplements can differ primarily based on a
selection of elements, together with the specific complement, dosage, and individual
physiology. Some folks might discover changes within the first week, whereas for others it could take a month or so.
It’s important to understand that dietary supplements are not an various
to a wholesome life-style and food plan, each of which can considerably affect testosterone levels.
The primary distinction between whole and free testosterone levels is
the kind of protein sure to the testosterone, referred to as the male intercourse hormone-binding globulin (SHBG).
When testosterones aren’t bounded to intercourse hormone-binding globulin, they are biologically
active and classified as free testosterone. Here Is a video from Shredded By
Science explaining how these testosterone boosting dietary supplements work.
I perceive that selecting the best testosterone booster
supplement can get complicated at instances, so listed here are things you have to look
into that will help you choose a good product. Sheer ALPHA by Sheer Power Labs is a trusted testosterone booster for males of all ages.
The product has been delivering excellent outcomes to many customers with its scientifically-proven components.
Sheer Alpha testosterone booster makes a lot of claims about
improving your sleep, lowering your stress ranges, raising your IQ score, and plenty of more (just kidding in regards to the IQ scores).
The greatest evidence thus far is their ability to promote intestine and coronary
heart well being, so they’re hardly a cure-all. That stated, if you are going
to take a probiotic supplement, the best strategy contains
picking the right pressure on your well being wants in the correct kind.
You’ll additionally want to select a supplement that’s backed by research and independently verified for quality and efficacy.
One of the standout ingredients in Nugenix Complete T
is L-Citrulline Malate, a compound recognized for enhancing blood circulate and enhancing exercise efficiency.
The key ingredient in TestRX, Zinc, has been shown to considerably impression testosterone ranges.
The powerful ingredient in Testodren, Protodioscin, a compound
found in Fenugreek, has been clinically confirmed to stimulate the manufacturing
of free testosterone within the physique. We goal to give
dependable info by evaluating a certain product for every week or
so and revealing neutral details about how properly it operates on completely different people.
We consider in delivering the most accurate information on product components, pros and downsides, and customer reviews,
thus we check the product on a wide range of users to make sure accuracy.
« Les présidents de membership de tir sont très vigilants, ils ne veulent pas de cow-boys ou de
Rambo. Au moindre doute sur le profil, on signale
à la préfecture », explique Yves Gollety. Pour Patrice Bouveret,
directeur de l’Observatoire des armements,
ce sentiment d’insécurité s’est développé après les attentats de 2015, mais aussi avec la baisse de la
confiance dans les forces de l’ordre.
De ce fait, les enchainements complexes d’exercices peuvent avoir un influence sur les performances ou la motivation des athlètes (en positif comme en négatif).
Le CrossFit est souvent décrit comme une activité « très dure » et « exigeante » par les individuals (Drum et
al., 2017). Il s’agit des armes destinées pour l’entrainement au tir sportif
et utilisées dans le domaine de la chasse.
Les mouvements de base du CrossFit comprennent des
exercices tels Est-ce que tu perds de la testostérone quand tu jouis ?
(Christal) les squats,
les fentes, les burpees, les pompes ou push-ups et les tractions ou pull-ups.
Ces mouvements fonctionnels sollicitent plusieurs
groupes musculaires et améliorent la pressure globale du corps.
Pour pratiquer le CrossFit, il est essential de disposer
de certains équipements de base.
L’amélioration de l’état psychologique ne semble pas être uniquement l’indicateur le plus représentatif de cette modalité d’entraînement.
Les notions de dépassement de soi, de motivation sont tout de même
recherchées lors du CrossFit. Dans certains cas, les traces d’éjecteurs ne s’observent seulement si la cartouche
a été tirée (nécessité d’une pression conséquente pour laisser
ce genre de trace sur le culot d’une douille). Certaines armes peuvent posséder deux éjecteurs,
laissant ainsi les traces de deux éjecteurs sur le culot des
douilles.
Ne vous entraînez pas tous les jours sans laisser votre corps
se régénérer. Intégrez des journées de repos dans votre planning
hebdomadaire et faites des étirements ou du yoga pour améliorer votre mobilité.
Vous pouvez aussi pratiquer des activités légères comme la marche pour activer la circulation sanguine.
Le CrossFit est un excellent moyen de progresser rapidement,
quel que soit votre niveau de départ. En intégrant des exercices fonctionnels dans
votre routine, vous renforcez non seulement votre corps,
mais vous améliorez aussi votre posture et votre mobilité.
Pour un débutant, cela peut sembler difficile au départ,
mais en suivant un programme progressif, vous gagnerez en pressure, en endurance et en confiance en vous.
Aux Etats-Unis, il est necessary de savoir, qui
a entrainé la mort de la personne. Ainsi, après le travail remarquable du médecin légiste définissant (si
cela est possible) quel est le projectile à l’origine
de la mort, il va s’agir de savoir quelle arme à tiré ce projectile.
C’est pourquoi l’hypothèse different une autre arme à feu peut être modifiée par exemple en un autre SIG P226 équipant les 10 policiers
présent au moment des faits. Les SARMs sont donc vendus comme sans effets
secondaires mais on n’en sait RIEN.
La sélectivité tissulaire des SARM est censée inhiber ces effets secondaires
; cependant, dans la réalité, nous les voyons toujours se produire (par ce mécanisme indirect).
Les participants non professionnels ont l’obligation de fournir une déclaration sur l’honneur de non-participation à plus de 2
ventes au déballage dans l’année civile. Généralement un exemplaire pré-rempli vous est donné par l’organisateur au
moment de l’inscription. Celui-ci doit tenir un registre des exposants présents lors
de son événement. Il vous demandera également une photocopie de votre
pièce d’identité et une photocopie de la carte grise de votre véhicule si
celui-ci se trouve sur le lieu de la manifestation.
L’expert en arme à feu interprète ses
observations en fonction de ses connaissances, de son expérience,
puis formule ses conclusions pour une identification ou
une exclusion. Ces observations se font principalement sur les stries
présentent sur les impressions de champs du projectile.
Suivant le kind de percussion (annulaire ou
centrale), ont observe des formes du percuteur hémisphérique, circulaire, ou
elliptique. Cette particularité est due à l’abaissement du canon lors de
l’ouverture de la culasse dont le mécanisme permet de
faire descendre la douille vers le bas. L’impression de la tête de culasse sur le culot de la douille est causée par la grande
pression exercée lors du tir.
Le stéroïde est une classification générale des composés organiques solubles en matière de graisse naturellement
présents et produits dans le corps humain. Ils sont responsables
d’un massive éventail de développement physiologique tels que la croissance reproductive, la régénération des tissus, la synthèse calorique, and so forth.
Cela dit, la testostérone ne devient qu’une des nombreuses hormones stéroïdes, en particulier
du groupe androgène. Il est principalement sécrété dans les testicules masculins et les ovaires
féminins, effectuant l’anabolisme (i.e. croissance
musculaire et osseuse, synthèse des protéines) et androgènes (i.e.
Développement de propriétés masculines) Fonctions.
Au lieu de cela, on peut utiliser un SERM tel que le Nolvadex,
qui aide à bloquer l’activité œstrogénique directement dans le tissu mammaire.
L’anadrol est fortement œstrogène, ce qui entraîne une rétention d’eau importante et une gynécomastie potentielle chez les utilisateurs.
Bien que le cardio soit peut-être la dernière chose qu’un bodybuilder souhaite faire lorsqu’il prend du volume, il protégera son cœur,
ce qui sera bénéfique à long terme. L’Anadrol
provoque une augmentation rapide des enzymes AST et ALT, qui sont toutes deux des marqueurs de
stress hépatique.
Examinons maintenant les différents types de testostérones synthétiques
et leurs caractéristiques, effets, avantages et effets secondaires individuels.
Nous examinerons la forme injectable de testostérone, qui est
en général le sort de testostérone le plus couramment (et le
plus utile) supplémenté. Lorsque la production endogène de testostérone fait défaut pour une
raison donnée, elle nécessite une certaine quantité de supplémentation au moyen de testostérone
exogène (c’est-à-dire synthétique) afin de contrer
ou de guérir de telles carences. Il s’agit d’un cycle de gonflement courant qui combine deux des stéroïdes les plus puissants pour gagner de la masse musculaire.
L’ajout de Dianabol améliorera considérablement les features de muscle et de drive.
La plupart des hommes souffrant de déficience en cette hormone consomment trop d’aliments nocifs
et trop de glucides. Vous devez vous débarrasser de ces calories
vides et vous recharger en graisses saines.
Idéalement, vous devriez maintenir votre consommation totale de fructose en deçà de 25 grammes par jour.
Cela est particulièrement vrai si vous avez une résistance à l’insuline et que vous souffrez d’un excès de poids, d’hypertension artérielle, de
diabète ou d’un taux de cholestérol élevé.
Si un individu est en surpoids, perdre des kilos en excès peut
améliorer son niveau sanguin, selon une étude présentée lors de la réunion 2012 de la Société endocrine internationale.
Le Cycle Testo et Deca pour débutants (Lesley) de stéroïdes est conçu
pour permettre à l’utilisateur d’exploiter les avantages des stéroïdes
tout en minimisant les effets secondaires indésirables.
Les cycles typiques durent entre 6 et 12 semaines et impliquent l’utilisation de plusieurs stéroïdes différents pour maximiser les
gains de masse musculaire et de pressure. L’un des puissants ingrédients de Prime Male est le D-AA-CC,
un acide aminé naturel qui stimule l’hypothalamus en vue de libérer l’hormone lutéinisante (LH).
La recherche a montré que la LH pouvait augmenter la manufacturing hormonale des testicules.
Ainsi, des niveaux de testostérone plus faibles affectent le
fonctionnement de votre corps et une meilleure humeur.
Il est également essential de noter que même si vous arrêtez le traitement à la testostérone,
vous devrez peut-être encore prendre des médicaments pour gérer les conditions sous-jacentes qui ont conduit à un faible taux de testostérone en premier lieu.
Tous les quelques mois, vous rencontrerez votre médecin pour faire vérifier votre taux de testostérone et voir remark vous allez.
Si tout se passe bien et que vos niveaux de testostérone sont là où
ils devraient être, alors vous continuerez simplement le traitement à la testostérone comme d’habitude.
La thérapie de remplacement de la testostérone (TRT) est un traitement populaire
pour les faibles niveaux de testostérone, mais ce n’est pas un stéroïde anabolisant ou un stéroïde.
Continuez à lire les informations supplémentaires sur les injections de testostérone, y compris leurs
avantages, leurs utilisations, leur fonctionnement et d’autres détails.
De nombreux produits de testostérone commercialisés en ligne ne sont
pas approuvés par la FDA et peuvent être contrefaits, contaminés
ou autrement dangereux. En fait, la FDA a émis plusieurs avertissements sur les risques liés à l’utilisation de produits à base
de testostérone qui ne sont pas correctement réglementés.
Cependant, étant donné que la testostérone n’est pas de longue
durée et qu’elle est métabolisée rapidement par l’organisme, il s’agit généralement d’un traitement
qui dure longtemps, et souvent à vie. Le gel de testostérone est absorbé par la peau comme
une lotion, et une fois qu’il pénètre dans la circulation sanguine, il
aide à augmenter votre taux de testostérone.
Mais comment expliquer que la biologie ait mis un temps fou à concevoir
comme normale l’existence d’une pluralité de types sexués ?
C’est que l’étude des mécanismes de détermination du sexe a longtemps été influencée par « l’idéologie patriarcale qui imprègne la plupart
des sociétés, répond Joëlle Wiels, biologiste, directrice de
recherche au CNRS4. L’idée a prévalu, jusque récemment,
que l’on naît fille à défaut de posséder certains gènes de masculinité,
et que le chromosome Y joue un rôle dominant dans la sexuation ».
En 1992, le joueur de football américain Lyle Alzado est décédé des
suites d’un cancer du cerveau attribué à l’utilisation de
stéroïdes anabolisants[84]. Cependant, si les stéroïdes sont connus pour causer
des cancers du foie[85], il n’existe pas de preuve publiée que les stéroïdes anabolisants soient la cause de most
cancers du cerveau ou du type de lymphome T qui a causé sa mort[86],[84].
Ils agissent bien au contraire sur les différents processus métaboliques qui conduisent à la synthèse
de cette substance. Ce sont des cocktails qui allient minéraux,
complexes vitaminiques et extraits végétaux.
Enfin, les graisses mono-insaturées peuvent être des amplificateurs naturels de cette hormone.
Consommer un avocat par jour, de l’huile d’olive ou des amandes peut vous
aider vraiment à obtenir ces saines graisses
qui peuvent vous aider à stimuler naturellement vos niveaux de
testostérone. Pendant la périménopause – la période précédant la ménopause – la manufacturing d’hormones dans vos
ovaires ralentit. Les niveaux d’œstrogènes commencent à fluctuer tandis que les niveaux de progestérone commencent à diminuer régulièrement.
70918248
References:
zu viel testosteron mann spermien
Trenbolone will give you far more muscle-gaining potential than Masteron, which is more of a pure-cutting AAS.
Typically stacked for an ultimate slicing cycle, they are
usually additionally run as standalone compounds (with Testosterone)
for slicing and contest prep. But not like Trenbolone, Dianabol comes with significant water retention. While the positive aspects might not be as huge, they will
be high-quality dry gains which would possibly be simpler
to maintain.
If you want excellent aesthetic results from Tren while minimizing the unwanted effects, you can’t go past a
low-dose Tren cycle. Think once more if you consider that’s too low – keep in mind that Tren Acetate is a number of
times more powerful than testosterone. At the higher finish of
the newbie dosage vary is 150mg per week, and this might very well be probably the most Trenbolone you’ll
need to take. Trenbolone won’t cause water retention however can also lower fluid retention, which another AAS may trigger when stacking it.
The result is incredible muscle hardness and a lean, vascular, shredded look
that makes Trenbolone so valued in recomp cycles and contest preparation. One of the numerous advantages that
has come out of Tren getting used to grow cattle is the way it promotes increased nutrient efficiency.
In most any nation, you’ll find a way to legally buy anabolic steroids so as lengthy as you accomplish
that from the pharmacy by way of a prescription given to you to
deal with a medical need. For example, in Canada
it is unlawful to sell anabolic steroids and it’s unlawful
to buy them, but in case you are caught in possession there isn’t any severe infraction at
hand. Conversely, in the us mere possession is a direct violation of the Steroid Management Acts.
In this part, we offer invaluable ideas for discerning dependable suppliers in a market
flooded with counterfeits and dubious products.
From reputable online vendors to native sources, we’ll
equip you with the knowledge to navigate the procurement process with confidence.
If you still don’t belief us, feel free to make a
take a look at order – our delivery worth is ready low so everybody can place a small trial order and verify our service, merchandise.
By following the following pointers, you probably can improve your chances of shopping for Anavar safely
and acquiring a genuine, high-quality product. Responsible purchasing practices
and thorough analysis are key to safeguarding your well being and maximizing the benefits
of Anavar usage. It is essential to note that individual responses
to Anavar may vary, and outcomes depend upon various components corresponding
to dosage, food plan, train routine, and total way of life.
Endogenous testosterone is answerable for sexual maturation in any respect levels of development throughout life.
The function of androgens in male development begins within the fetus,
is crucial throughout puberty, and continues to play an necessary position in the grownup male.
The secretion of androgens from the adrenal cortex is inadequate to hold
up male sexuality. Testosterone cypionate first appeared on the united states prescription drug market in the course of the early 1950’s, as Depo-Testosterone by Upjohn, now Pharmacia & Upjohn. You also can Signal up,
login and personal an account like most online stores, all
impending purchases are sent to the cart where you presumably can pay for the
items utilizing numerous fee strategies. We sincerely hope to offer you a smoother expertise in your next
orders.
You can uncover if the providers are respectable and provide high-quality steroids by studying by studying online reviews.
In an era dominated by online commerce, purchasing Dianabol on-line is a popular choice for many.
Nevertheless, it’s crucial to exercise caution and diligence
when browsing for anabolic steroids on the internet.
We highlight key issues, from legality and status to product quality
and buyer reviews. By prioritizing these factors, you’ll
have the ability to safeguard yourself in opposition to scams and subpar
merchandise, guaranteeing a seamless on-line purchasing experience.
While shopping for steroids online provides comfort, it’s essential to concentrate to the chance
of counterfeit merchandise.
Whatever you select to stack Trenbolone with,
including Testosterone as a base, is obligatory to keep away from full sexual dysfunction. Bulking, recomp, cutting, strength –
Trenbolone is so versatile that you will use it in almost any stack.
Masteron will all the time be a milder and easier steroid to
make use of than Trenbolone. Both will maintain strength ranges, but Trenbolone will do this
more powerfully than Masteron. You can expect fairly extreme side effects at doses greater than 400mg weekly,
and this cycle should only ever be considered if you have tolerated intermediate-level
doses.
But as with every androgenic side Effects Of Steroids On Athletes,
each particular person has their very own experience. You could presumably be
one of the lucky ones who isn’t genetically predisposed and
get away with minimal androgenic effects.
For these not conversant in the internal workings of Trenbolone earlier than utilizing it, this can be quite a shock.
When you aren’t ready for gyno to develop, you run the risk of it getting uncontrolled, and
it can be extreme with Trenbolone. Having
an anti-estrogen and aromatase inhibitor readily available is, subsequently, very important for a Trenbolone cycle, simply as you’ll with most different steroids.
So, with this cycle, you’ll find a way to see a fast transformation in your physique.
Also, when you notice the start of gyno, you possibly can instantly start working Letrozole.
Hair loss, thinning of hair, or balding is a side impact that
most individuals are scared of. Oily pores and skin is not a really massive concern, however, zits could be a matter
of concern. Some individuals may get an excessive amount of pimples throughout their physique while some might get very
little zits. It does not put any additional pressure
on your liver because the Testosterone steroid is injected.
A 2-week cycle will usually begin in the 20–40 mcg vary, with the dose rising every 1
or 2 days till a most dose is achieved (usually 100 mcg–140 mcg).
Clenbuterol has a stimulating impact on beta-2 adrenergic
receptors, which may have an effect on satiety ranges in people.
Consequently, our sufferers have reported decreased hunger throughout
the day, despite burning more energy. This impact can indirectly help with further fat loss due to customers being more likely to eat in a calorie deficit.
All anabolic steroids cause unwanted effects, some cause more
and some less.
You must let your physician know as quickly as the side-effects seem because of the possibility that they might be an allergic response or an intolerance
to the treatment. You might must cease taking the medicine or have your dosage adjusted.
It’s necessary to note that this is simply one instance of a
Clen and Anavar cycle and that dosages and cycle lengths
can differ depending on particular person factors.
Gynecomastia is seldom a difficulty, as none of those steroids aromatize.
Nevertheless, Anavar can counteract this momentary shrinkage because it increases cellular quantity, creating a full and pumped
look to the muscle tissue. Winstrol is a lot more inexpensive in comparability with Anavar, with
the latter typically costing tons of of dollars to run a cycle.
The anabolic and androgenic ratings of all steroids
are in contrast towards the usual ranking of testosterone, which has an even one hundred for each.
In comparability, Anavar comes with a far higher anabolic ranking however a a lot lower androgenic score of simply 24 – which suggests its androgenic activity is significantly milder than testosterone.
A standard PCT cycle will typically not restore testosterone ranges following Trenbolone use, and longer-term
TRT can be required. I suggest testosterone cruising for
four months following this cycle, keeping in mind there’s no assure of T levels returning completely back to regular after
utilizing Tren. Masteron is good for working for a
whole cycle, while Anavar is best used as a ending steroid
in the last weeks. Just as with Winstrol, Masteron usually leads to a
higher stage of vascularity and a grainer look than Anavar does.
If you’re taking T3 to deal with hypothyroidism, it’d harm your thyroid and make you reliant on exogenous T3 chemicals.
By the tip of my cut (5-7% physique fat usually) my dosage sometimes
ends up being mcg. Via this mechanism of action, Clenbuterol is
a fairly efficient thermogenic compound that enables the
physique to burn fats at a greater price.
Anavar-only cycles are usually beneficial for women, as stacking
can increase the danger of masculinization. If you assume this isn’t an infinite figure – you’re completely proper.
If you were to say eat in accordance with your maintenance calorie intake every day while utilizing clenbuterol, then you’d doubtless end up dropping this 2 – 4 lb value
over the course of your use. If however you structured your routine correctly and ensured that
you just ate in accordance with a 500 calorie per day deficit; you would undoubtedly lose nearly double
this figure throughout your clen cycle.
T3 (or Triiodothyronine) is the active thyroid hormone that has been transformed from T4 (Thyroxine).
Anavar is one other popular slicing drug used at the facet
of Clenbuterol. The distinction between Clen to Anavar is that Anavar
is an precise Anabolic Steroid.
Many factors might affect these outcomes, together
with the dose of T3 itself. Whether Or Not new to Cytomel or not,
25mcg is the sweet spot for a lot of customers. A good Clenbuterol and Anavar cycle for a man can vary relying on your objectives and expertise stage.
A typical cycle plan for Clen and Anavar can final anywhere from 6 to 8 weeks.
Despite this basic-looking cycle, glorious fats loss and enhancing muscular definition outcomes can still be achieved.
Clenbuterol is a extremely potent drug, so starting your dosage low
and scaling it up slowly all through the cycle is important.
Therapeutic and medical research doses are usually 20mcg to 40mcg per day.
Clenbuterol must be used in a method that maintains its
maximum effects for the full size of your cycle.
References:
Short Do
Our online store offers detailed product information, really helpful
dosages, and security recommendation, helping you make knowledgeable decisions about your well
being and health journey. There are several sorts of cycles, including bulking cycles
for constructing mass, slicing cycles for fats loss and muscle definition,
and lean mass cycles for clear, sustainable features. Anavar, additionally identified by its generic name
Oxandrolone, is a well-liked anabolic steroid renowned for its performance-enhancing properties.
However, its ability to promote lean muscle mass development, improve energy,
and help in fats loss rapidly caught the attention of the health and bodybuilding
group. The fitness and bodybuilding business has witnessed a major enhance in demand for protected and
efficient performance-enhancing supplements. Many lovers
have turned away from the infamous anabolic steroids due to their adverse well being results.
From the ratio of “price-performance” they are considerably inferior to the amino acids.
If you’re able to take your coaching to the next level, order your steroids from us at present.
Uncover why we are the #1 choice for ordering steroids in Canada.
Purchase Trenbolone acetate OnlineThis is a stronger anabolic steroid in Sports steroid that permits opponents
to get the ’dry’ type of muscle they search
for their aggressive lifestyle. This isn’t a compound designed for model new or intermediate customers as the concentrations and efficiency could
have very unfavorable consequences if used incorrectly.
Buy Anadrol in CanadaOne of the top sellers and most widely used
steroids out there. It is primarily used
to increase muscle volume and for strength will increase.
Earlier Than planning a steroid cycle, it is suggested to
get your bloodwork checked, this will permit you to plan the
cycle correctly and avoid any compounds that will enhance undesirable well being risks.
PCT protocols sometimes final between 4 to 6 weeks and
will start shortly after the steroid cycle ends, relying on the compounds used.
For shorter-acting steroids, PCT could begin within a few
days, while longer-acting ones may require a delay of as much as
two weeks. The mostly used PCT dietary supplements are Clomid
, Nolvadex , and HCG .
With constant use, Prime Male helps men unlock their full potential and attain their health goals successfully and naturally.
Easy to include into any health regimen, D-Bal presents a handy and affordable method to achieve the
specified physique without risking one’s health. It’s finest to concentrate on sustainable, wholesome ways to build muscle and stay fit.
We offer fast, safe, and easy credit card payments, debit and pre-paid debit
playing cards, in addition to bank transfers,
cash transfers, and cryptocurrency as forms of fee. Just
choose the drug, the strategy of cost and fill in the information for supply.
Be sure you will get the very best quality with discrete supply and 100% satisfaction guarantee.
The ACMD can also be recommending an increase within the help obtainable for users trying to stop using the drug.
Never neglect that every different compound you
place in your physique may have a different mechanism it uses to provide the outcomes you need.
Topical antifungals is in all probability not a difficulty, but all
the time let your doctor know what medicines you’re taking
before starting this medication. It’s most well-liked as a result of its bulking and also toughness increasing capabilities.
The major aim of this steroid is to keep your physique maintained.
It lessens the chance of androgenic unwanted effects such as acne as well as baldness.
First, it permits for a synergistic effect, where the combined compounds
work collectively to provide more pronounced outcomes compared to utilizing Anavar alone.
Stacking can even help people tailor their cycles to their particular goals, whether or not it’s gaining muscle mass, cutting fat, or improving athletic efficiency.
Additionally, by strategically combining compounds, customers could possibly achieve their desired results more effectively and
successfully, making the most out of their Anavar cycle.
Our website operates 24 hours a day, seven days every week,
so you could buy steroids within the US whenever you like.
Simply go to our web site and choose from our large selection of oral and injectable
steroids for sale in the USA. While shopping for steroids online presents convenience,
it’s essential to pay attention to the risk of counterfeit merchandise.
Purchasing with Domestic Provide minimizes these risks, as we are committed to
providing solely genuine, high-quality steroids to our clients.
If you’re contemplating steroids for bodybuilding or efficiency enhancement, consult with healthcare professionals
to grasp the authorized alternate options and
minimize risks to your well being. Muscle development accelerates significantly
with using testosterone and dihydrotestosterone, which improve protein synthesis in the body.
Brief ester injectable steroids will normally require injections 3 instances per week
to take care of stable hormone levels. Keep In Mind that each steroid has its own dosages, so it’s as much
as you the way safe and efficient your chopping cycles shall be.
However, it is important that each one the positive effects of getting rid of fat aren’t overlapped
by fluid retention. Therefore, for chopping cycles, select
steroids which most actively affect the breakdown of adipose tissue and have no aromatization.
Three to four weeks best beginner steroids are
beneficial corresponding to oxandrolone, peptides, or stanozolol.
Changes to the dosage could be made primarily based on reaching the
most effective anabolic effect, but your physician ought
to guide you thru these changes. Vitamin additionally performs
a significant role in the cycle; you should devour up to three and a half grams of protein and forty kcal per kg of
physique weight daily. It can be important to develop a personalised coaching
plan in accordance along with your cycling goals.
The medical effects of steroids are generally utilized by bodybuilders, professional athletes, influencers,
models, and even movie star actors looking to enhance their performance and physique.
Hypogonadism sufferers reap the benefits of testosterone for better health,
whereas others reap the same benefit for higher fitness.
The case is similar with most steroids, their benefits in medical remedies normally offer you an thought about
their benefits for efficiency enhancement.
70918248
References:
best place To buy steroids On the Internet (https://Malermeisterschmitz.de/component/k2/item/5-quisquam-maiores-sed-diam-nonummy-nibh-euismod)
70918248
References:
Injectable Vs Oral Steroids; http://www.evahoudova.com/index.php?article27%2F,
70918248
References:
steroid com legit – artigofeed.com,
70918248
References:
illegal steroids for sale (healthonlineidea.Co.uk)
70918248
References:
cheapest Steroid cycle
70918248
References:
steroids for sale online in usa (Aleida)
70918248
References:
what are steroids made out of (vedikabookstores.com)
70918248
References:
legit online casinos (https://www.pizzeria40.com/portfolio/enhancing-your-feelings/)
70918248
References:
none (https://tl-studio.jp/Tls/log/eid118.html)
70918248
References:
was arnold on steroids (https://talesofafrica.org/vincent-okezie-from-4x-guinness-world-record-holder-to-road-side-mechanic)
70918248
References:
cheap steroids for sale (Chad)
quinault casino
References:
https://joyeriasvanessa.com/product/pulsera-de-identificacion-de-chevron
jamul casino
References:
mysys.Pt
caesars palace las vegas nv
References:
englishmoral.com
caesars casino windsor
References:
https://Paramedical.Sureshinternationalcollege.In/Certification-In-Acupuncture/
illegal steroids for sale
References:
community.theclearwaytoconceive.com
steroids for endurance athletes
References:
jobcopeu.com
Um die Sicherheit Ihrer Daten zu gewährleisten, speichern wir personenbezogene Daten ausschließlich auf
deutschen Servern, nutzen neueste technische Methoden zur Verschlüsselung der Daten und haben organisatorische
Maßnahmen getroffen um sicherzustellen, dass
die gesetzlichen Datenschutzvorschriften eingehalten werden. Der Sinn und Zweck der Web Site
Klinikradar ist es, Ihnen fachlich fundierte Informationen, Hilfestellungen und konkrete
Ratschläge zu Ihren spezifischen gesundheitlichen Herausforderungen automatisiert
auszuspielen, mit dem Ziel Ihnen zu einer besseren medizinischen Behandlungen zu verhelfen. Die Erbringung dieses
Mehrwerts für Sie wäre ohne die Erhebung und Verarbeitung personalisierter Daten nur sehr eingeschränkt möglich.
Daher verarbeitet der Websitebetreiber personenbezogene
Daten, um den genannten Zweck optimal zu erfüllen, ein ansprechendes Nutzererlebnis bieten zu können und um eine fehlerfreie
Bereitstellung der Website zu gewährleisten.
Daten können hierzu zur Analyse Ihres Nutzerverhaltens verwendet werden, wie im Folgenden noch
detailliert wird.
Unsere Radiologie steht ausschließlich unseren stationären Patienten zur Verügung.
Die korrekte Darstellung der Webseite ist nicht
garantiert und die Bedienung ist eingeschränkt bis hin zu nicht bedienbar.
Damit Frau Verheyen sich auf Ihre persönlichen Wünsche einstellen kann,
melden Sie sich vorab bitte per E-mail an ohrenklinik-
für den jeweiligen Vortrag an. Mit der
Anmeldebestätigung erhalten Sie im Anschluss auch den Zoom-Link zur
Teilnahme. Das Berufsbild Beruflich Pflegende – Pflegefachfrauen und Pflegefachfmänner – betreuen und versorgen nach aktuellen pflegewissenschaftlichen Erkenntnissen selbstständig und umfassend kranke und pflegebedürftige Menschen aller Altersstufen in akut und dauerhaft stationären sowie ambulanten Pflegesituationen.
Durch geeignete Maßnahmen tragen beruflich Pflegende zur Erhaltung, Förderung, Wiedererlangung oder Verbesserung der physischen und psychischen State Of Affairs der zu pflegenden Menschen bei, beraten sie und begleiten sie in allen Lebensphasen. Der Nutzung von im Rahmen der Impressumspflicht veröffentlichten Kontaktdaten zur Übersendung von nicht ausdrücklich angeforderter Werbung und Informationsmaterialien wird hiermit widersprochen. Die Betreiber der Seiten behalten sich ausdrücklich rechtliche Schritte
im Falle der unverlangten Zusendung von Werbeinformationen, etwa
durch Spam-E-Mails, vor.
References:
infolokerbali.com
References:
steroids and kidney pain
why are anabolic steroids dangerous
References:
negative side effects of anabolic steroids, https://intensedebate.com/people/zooskin26,
Does your website have a contact page? I’m having a tough time locating it
but, I’d like to shoot you an e-mail. I’ve got some creative ideas for your blog you
might be interested in hearing. Either way, great blog and I look
forward to seeing it expand over time.
References:
medical uses Of anabolic steroids, independent.Academia.edu,
high roller online casinos
References:
Blackcoin.Co
beginner dianabol cycle
References:
dianabol only cycle results (https://hikvisiondb.webcam/)
dianabol deca cycle
References:
dianabol cycle before and after (https://codimd.fiksel.info)
testosterone cypionate and dianabol cycle
References:
best dianabol cycle – noticias-sociales.site,
hgh dosierung iu
References:
4Iu Hgh Reddit – http://Www.Youtube.Com –
testosterone vs hgh
References:
how many hgh injections should i take (https://Jobsirish.Ie/employer/protein-kapseln-die-15-besten-produkte-im-vergleich)
what steroids do to your body
References:
valley.md
fragment 176-191 & cjc-1295 & ipamorelin blend for sale
References:
tesamorelin or ipamorelin
ipamorelin oral form
References:
https://writeablog.net/perucafe36/tesamorelin-dosage-calculator-and-chart-a-z-guide
how to mix cjc 1295 and ipamorelin
References:
Dosage Cjc 1295 Ipamorelin Before And After – App.Tagii.Io,
cjc 1295 + ipamorelin
References:
defy medical reddit Ipamorelin
taking ipamorelin
References:
where to buy cjc-1295 ipamorelin peptides (dermandar.com)
before and after cjc 1295 ipamorelin
References:
Ipamorelin cjc 1295 no Dac
cjc 1295 + ipamorelin bodybuilding dosage reddit
References:
cjc 1295/Ipamorelin dosage (http://www.Atmasangeet.Com)
sermorelin vs ipamorelin for weight loss
References:
cjc 1295 / ipamorelin vs hgh (https://noticiasenvivo.top/item/461984)
ipamorelin wo kann ich kaufen
References:
cjc 1295 ipamorelin increase testosterone (Benedict)
ipamorelin tesamorelin dosage
References:
cjc1295 ipamorelin benefits (https://unired.zz.com.ve)
weed in prague prague drugs
pure cocaine in prague coke in prague
coke in prague buy weed prague
cocaine prague telegram buy cocaine prague
healthy alternative to steroids
References:
why is steroid use among athletes dangerous – https://www.nenboy.com:29283/francine329134,
did arnold schwarzenegger use steroids?
References:
valley.md
Нужна презентация? генератор презентаций Создавайте убедительные презентации за минуты. Умный генератор формирует структуру, дизайн и иллюстрации из вашего текста. Библиотека шаблонов, фирстиль, графики, экспорт PPTX/PDF, совместная работа и комментарии — всё в одном сервисе.
adverse effects of anabolic steroids
References:
non androgenic steroids (git.nuansa.co.id)
gh steroid
References:
valley.md
изготовление значков на заказ москва заказать значки с логотипом недорого
значок заказать москва изготовление значков на заказ москва
заказ на изготовление значков заказ значков с логотипом
joszaki regisztracio joszaki
pros and cons of testosterone pills
References:
md.chaosdorf.de
plant based steroids
References:
steroids Pill, git.youkehulian.cn,
effects of long term steroid use
References:
celebratebro.in
female bodybuilding steroids
References:
everest.ooo
pro bodybuilder steroid cycle
References:
http://www.udrpsearch.com
pro steroid cycle
References:
telegra.ph
winstrol steroids before and after
References:
google.co.vi
what is a common characteristic of male sex workers?
References:
maps.google.com.br
testosterone steroids for sale
References:
everest.ooo
melbet – paris sportif 1xbet africain
football africain 1xbet africain
telecharger 1xbet https://pari-foot2.com
фитнес клуб с бассейном абонемент в фитнес клуб
Самое интересное клик: https://pensioner54.ru/mozaika-zhizni/kluby-obshcheniya-pozhilykh/primenenie-cifrovoy-tipografii-vizitki-buklety-bannery-i-fotoprodukciya
chery tiggo max chery tiggo 7
Useful information in one click: https://srrennaprovincia.trasparenzarifiuti.it/buy-agency-ad-accounts-no-top-up-fees-12/
It is just legal to use anabolic steroids in Australia if they have been prescribed by a doctor for a medical objective.
It is towards the legislation to maintain, make, use, promote or give away or inject someone else with anabolic steroids.
I should also probably notice that authorized steroids
are not magic pills that can grow you muscles when you sleep.
Properly, it technically can, however you have to put in the effort and time to do so!
Steroids are simply there to assist pace up the process
but it’s YOU that does the heavy lifting, as they are saying.
Side effects might embrace bigger and stronger muscle tissue, a substantial drop in physique fats, above common power and energy,
longer endurance in the health club, and a chiseled, ripped look.
Even if taken on the same time, since they’re created from all pure ingredients, you won’t feel any antagonistic results.
These laws are in place to protect the well being and security of the general public and to maintain the integrity of skilled sports.
In South Australia, anabolic steroids are categorised as a controlled substance beneath the Managed Substances Act
1984. The possession, use, and supply of anabolic steroids and not utilizing a prescription are illegal.
Orders are packaged in a method that doesn’t draw attention, protecting your privacy each step of the method in which.
Tougher penalties also can distract from key harm-minimisation measures, such as secure injecting practices.
We make certain that all of our products are each presence and purity examined for each
batch earlier than they hit our shelves.
Authorized Steroids Australia are utilized by athletes, it’s
the primary androgenic steroids performing in the same way
as the testosterone, the pure male hormone. The steroids used to treat various irritation (eg.
prednisolone, cortisone, beclomethasone, budesonide, dexamethasone, and heaps of others) are referred
to as corticosteroids, wouldn’t have anabolic results.
In conclusion, understanding the fee, legalities, and risks
of steroids in Australia is essential for anybody contemplating their use.
There was no affiliation between the period of the AAS
cycle and the diploma of suppression of spermatogenesis.
There is not any good-quality proof indicating that AAS use is damaging to the kidneys.
However, some findings in the literature level to a potential detrimental
effect.
That is why authorized steroids are getting
popular amongst many people all all over the world. CrazyBulk
authorized anabolic are formulated and manufactured within the Usa utilizing the very
best quality, pure, pharmaceutical grade components, which means you get quick features with
no unwanted effects, and no prescription is required.
There are many joyful and happy patrons and users in Australia and many other locations
in the world…
Testosterone, and a choose few different AAS such as nandrolone and oxandrolone, may additionally be prescribed for different medical conditions (e.g., osteoporosis or aplastic anemia).
Apart From this valid medical use, AAS are widely used – or somewhat, abused – for
his or her muscle-building and strength-increasing properties in dosages far exceeding those used therapeutically.
For brevity, in the remainder of this review we employ the term ‘AAS use’ to discuss with the
nonmedical high-dose abuse of AAS.
Behavioral well being professionals should turn into involved when psychological unwanted
aspect effects are noticed. Penalties for the illegal importation, manufacture,
supply, or sale of anabolic steroids, HGH, and
testosterone in Australia vary relying on the state or territory.
Some states even have particular legal guidelines targeting
steroid use in sports activities, with penalties for
athletes found to be using these substances to reinforce their performance.
In Australia, anabolic steroids are categorised as controlled substances beneath the Poisons Normal, meaning they’re subject to strict regulation. It is authorized to own steroids for personal use, however it is unlawful
to import, manufacture, supply, or promote them with no legitimate prescription from a healthcare professional.
Some drugmakers and workout magazines claim that andro products help athletes train more Suppléments pour la perte de poids durable
and recuperate quicker. Gentle hirsutism occurs in around 1 out of 5 women given one hundred fifty mg testosterone enanthate each 4
weeks and is reversible after cessation of use (223). Equally,
in postmenopausal women who beforehand underwent hysterectomy with or with out oophorectomy, 12.5
mg and 25 mg testosterone enanthate weekly for 24 weeks led to a small enhance in hirsutism (224).
Lower dosages up to 6.25 mg weekly didn’t, suggesting a threshold for developing hirsutism in response
to testosterone at a dosage somewhere between 6.25
and 12.5 mg weekly. With the exception of its impact on Lp(a), AAS use –
particularly use of 17α-alkylated AAS – results in a extra atherogenic
lipid profile (see Table 1). This would possibly
help explain the outcomes of a population-based
cohort examine by which males that examined positive
for AAS had twice the cardiovascular morbidity and mortality fee as those who
examined unfavorable (149).
This success led to elevated steroid use among athletes in different international locations, including the
us and Japan (Franke and Berendonk, 1997). The Worldwide Olympic Committee (IOC) banned
AAS in 1975 (Hartgens and Kuipers, 2004).
The use of anabolic steroids has gained popularity since the 1980 s,
pushed by the will to reinforce muscle mass and bodily appearance (Pope
et al., 2014). In response, the World Anti-Doping Agency
(WADA) has yearly up to date its record of prohibited substances and methods
since 2004, tailoring restrictions to the requirements of each sport and
competitors (Collomp et al., 2022, Albano et al., 2021).
Even although these medicine have been banned from sporting competitions, doping
with AAS by female athletes continues regardless of the potential of great antagonistic effects.
These points underscore the need for increased surveillance; and training
and awareness among the medical group, sports group and lay public.
The systematic doping program of the former German Democratic Republic (GDR) offered evidence of anabolic steroid and amphetamine
use in feminine athletes (Karila, Kerlan, Christin-Maitre, 2024).
In the 1970 s, GDR athletes were given anabolic steroids to reinforce efficiency.
Their dominance at the 1976 Montreal Olympics, successful eleven of thirteen swimming
occasions, raised suspicions because of atypical bodily traits like deep voices and broad shoulders,
typical signs of steroid-induced masculinization.
The remaining seven sufferers both stabilized or confirmed a lower in serum
creatinine ranges and proteinuria after beginning medical remedy
(in the form of ACE inhibitors, ARBs, and/or renin inhibitors) and stopping AAS use.
One of the patients resumed AAS use and subsequently developed
progressive renal insufficiency and a rise in proteinuria.
It is appealing to invest that a very excessive (lean) body mass, maybe
together with very high dietary protein intake (as is common in this population), shapes a permissive surroundings for
the development of FSGS by continual AAS use. Serum creatinine ranges are commonly used to estimate the glomerular filtration fee (eGFR) utilizing formulas such because the Continual Kidney
Disease Epidemiology Collaboration (CKD-EPI)
equation (157). The eGFR is an effective and independent predictor of all-cause and cardiovascular mortality and
kidney failure in a variety of populations (158). However, it
ought to be appreciated that the accuracy of the equation is based on the belief that serum creatinine levels precisely replicate the GFR
– which is doubtful on this explicit inhabitants.
The negative effects linked to anabolic steroid
misuse can vary from these which are mildly annoying to those
that can be life-threatening. People who misuse steroids report experiencing well being effects that vary from
creating zits problems to having coronary heart attacks and liver cancer.
Anabolic steroids suppress testosterone in males, leading to much less sperm and problems with
testicle operate. This may cause hypogonadism AAS, seen as shrinking testicles and low
testosterone.
Considering such roles of testosterone in male human growth and well being, anabolic steroids may
be important instruments to help handle certain circumstances of
hormone deficiencies. These embrace bone marrow stimulation in leukemia, aplastic
anemia, kidney disease, progress failure, loss of appetite, and lack of
muscle mass in malignancy and purchased immunodeficiency syndrome.
Anabolic steroids are illegally used by athletes in any respect levels
in sports, such as bodybuilding, weightlifting, baseball, football, cycling, wrestling, and a lot of others, to improve their efficiency.
Practically one-third of people who misuse anabolic steroids turn into
depending on them.
Three months after ceasing AAS use and 1 year after the start of the AAS cycle it was
reported by 14% and 1% of users, respectively. None of those
adjustments had been significantly different from baseline, which might be a
sort II error. The relatively high percentage of customers reporting erectile dysfunction at baseline
compared with the last follow-up measurement suggests this side impact might have
nonetheless been present from relatively recent AAS use at baseline in some.
Nevertheless, since not all AAS users accomplished follow up, attrition bias may also (partly)
explain the distinction. Regardless, erectile dysfunction may develop after
an AAS cycle because of the transient hypogonadal state.
In this case a loss of libido because of testosterone deficiency usually
underlies the erectile dysfunction.
These genes make the cells produce extra proteins than they normally would.
Muscle dysmorphia, characterized by an extreme
and pathological preoccupation with muscularity, is prevalent among AAS customers.
It has been reported that muscle dysmorphia impacts
approximately 1.5% to 6% of Swedish fitness center visitors,
as indicated by a pupil thesis [35]. AAS customers might develop this situation because
of an obsession with the belief that their muscularity just isn’t
enough. Pope et al. [36] suggested that the significant gap between men’s precise muscularity
and their physique beliefs may contribute to the rise in disorders like
muscle dysmorphia and anabolic steroid abuse. This suggests that societal pressures and unrealistic physique requirements
might play a role within the growth of such conditions.
That means over time it starts to take larger and extra frequent doses to get the
same results. The major purpose individuals misuse anabolic steroids is to extend lean muscle mass when using
them along side weight coaching. Anabolic steroids are drugs that are
manufactured types of testosterone. The technical time period for these compounds is “anabolic-androgenic steroids”
(AAS).
References:
PedsElite
As you can see, though, nearly all anabolic
steroid users will persist with injecting their gear via
the muscle whereas leaving subcutaneous injections for these further compounds that are generally used.
The lack of PCT requirement for females is one advantage women have over men in phrases of steroid use.
Each cycle is proscribed to 4-6 weeks and consists of only one steroid compound per cycle.
Female steroid users will principally be restricted to only
sure steroid compounds, will use them at much lower doses, and can restrict
the length of cycles to minimize the event of virilizing effects.
Don’t fear – the Feminine Bulking Stack won’t have you turning into a person.
So, getting your check again on observe is
a crucial cause for endeavor PCT5. When utilizing the calculator, you should enter some personal
information. This includes your weight, age,
and experience degree with anabolic steroids.
As Quickly As the goal wholesome range is confirmed together with your medical specialist, a
dosage plan might be arranged. Sometimes, men will begin very low – below
100mg for several months, after which bloodwork is done
to substantiate progress and whether or not the TRT dose ought to increase.
If you’re looking to take such excessive doses of testosterone, you’ll most probably be at the point the place it’s going to make sense to stack different AAS to deliver in more powerful anabolic effects.
Tren is a very suppressive compound, and you’ll want to run an HCG and Nolvadex to
stop crashing your testosterone levels and maintain your positive aspects.
Dianabol may cause vital stress to the liver, so it’s only used for a few weeks.
On the other hand, you should use Testosterone Cypionate for
months safely.
Are you female and have NEVER used a single anabolic steroid in your life?
And when you won’t “turn into a person,” 99.9% of females
WILL wish to keep away from any masculinity… and especially irreversible results.
The Feminine Bulking Stack is designed to imitate the effects of three steroids that females would undergo important unwanted aspect effects taking collectively – Dianabol, Deca-Durabolin, and Trenbolone.
The Crazy Bulk options present related constructive effects but
remove all the tough sides (no virilization, no liver toxicity or ldl cholesterol
improve, and no acne). As I’ve already detailed, blasting for size and energy is almost
similar to utilizing Anadrol or Dianabol as a kickstart in longer cycles.
You can stack it with bulking steroids, slicing
steroids, or another combination. A frequent technique
is to stack Testosterone Cypionate with a fast-acting oral steroid
so you can start seeing effects early on in your cycle whereas waiting for Testosterone Cypionate to kick in. Stacking Testosterone
Cypionate and Trenbolone is another highly effective bulking stack
with large positive aspects possible, and you won’t
get the sort of water retention that might be a drawback when using Dianabol.
Trenbolone will also assist you to obtain a very
ripped and dry look, as it can help take away water.
A 12-week cycle of 150mg of Trenbolone and 600mg of Testosterone Cypionate will present a few of the
finest energy and muscle features potential.
Anabolic steroids are synthetic derivatives of testosterone that have both medical applications and
a excessive potential for misuse. Regardless Of
their therapeutic benefits, anabolic steroids are incessantly misused as a result of their ability to reinforce muscle measurement and
energy, which may result in significant antagonistic effects and long-term health dangers.
Excessive doses of Testosterone Cypionate will provide you with impressive energy positive aspects that will
become prominent after three or 4 weeks.
Anabolic steroids also upregulate and enhance the variety of
androgen receptors, thus enabling elevated coaching depth
and indirectly contributing to elevated muscle dimension and strength.
Use our steroid plotter to plan and plot your cycle or protocol and share it with friends.
You can begin from scratch or get began by using certainly one of our
preset examples within the list beneath. It does away with all that
and instead lets me focus purely on my goals and
outcomes, saving me money. Testosterone Cypionate will suppress your normal production of testosterone.
This occurs as a result of your body is fed a steady provide
of exogenous testosterone, signaling it has sufficient of
the hormone, so no extra must be produced. When you stop using Testosterone
Cypionate, and as soon as it clears your system, your testosterone ranges
will drop, typically considerably so.
If you’re excited about operating a post-cycle therapy (PCT) cycle utilizing Clomid, look at my in-depth Clomid PCT information. There’s nothing wrong with
enthusiasm, however diving in with zero knowledge or thought of what could go
mistaken, let alone HOW you need to be using steroids,
is going to turn your steroid expertise right into a dwelling nightmare.
Some steroids shall be extra fat-soluble than others and
so detectable for longer periods due to them remaining within the fat tissue.
Anabolic compounds are very fat-soluble compounds, meaning these are substances which would possibly be absorbed with fat and then saved in fatty tissue.
Injectable steroids have an attached ester that controls how quickly the hormone
is launched, and these steroids (and their metabolites)
will always stay detectable for for much longer. The kind of steroid is going to be the principle issue regarding its detection time because the steroid kind will determine
all the other factors I’ve outlined below. The metabolites of a steroid shall
be detected in urine testing (urinalysis), probably the
most widely used type of drug testing.
References:
PedsElite
Each 10 mmHg discount in systolic blood stress reduces the danger of main cardiovascular events, coronary heart
illness, stroke, coronary heart failure, and all-cause mortality by 20%, 17%, 27%, 28%, and 13%, respectively (95).
A persistent pharmacological enhance in blood stress – similar to caused by AAS use – can be speculated
to have the inverse impact. The stimulatory effect
on erythropoiesis is dose-dependent – a minimum of beyond 300 mg testosterone enanthate weekly – and is extra pronounced in older men (42).
It takes a number of months of testosterone treatment before hematocrit stabilizes,
with one (uncontrolled) trial reporting a steady enhance in hematocrit as much as 12 months in older
men receiving testosterone (43).
Bodybuilders typically take HGH in exogenous form to extend HGH manufacturing, rising
muscle mass and fat loss. Although not essentially
the most highly effective of steroids, Deca is often utilized by bodybuilders to reinforce the positive aspects from different bulking steroids.
These compounds work by rising nitrogen retention and protein synthesis within the muscle, resulting in faster restore and progress after coaching.
That’s why they’re so in style in power sports, physique contests,
and even among recreational lifters chasing the following level of increased muscle mass.
Subsequently, ideally, measurement ought to be carried out after a minimal of 1 week of abstinence of train. GGT and bilirubin levels in serum don’t appear to extend in response to train (111).
The membrane-bound enzyme GGT is expressed within the kidneys, pancreas, spleen, lungs,
brain, intestines, coronary heart, prostate and liver – the place it’s primarily expressed in areas
which would possibly be wealthy in biliary epithelial cells (112).
An increase in GGT is a sensitive measure of cholestatic liver disease
(113). The collective improve in these serum markers should thus
be interpreted as a sign of liver damage, even in the presence
of concomitant muscular exercise. Supraphysiological dosages
of testosterone, at least as a lot as 600 mg testosterone
enanthate, didn’t affect serum prostate-specific antigen (PSA)
ranges in both healthy young (15, 22) and older males (37).
Prostate volume, as assessed by magnetic resonance imaging (MRI), remained unchanged in response
to graded dosages up to 600 mg testosterone
enanthate weekly for 20 weeks in healthy males (22).
Even individuals wary of steroid dependency are curious about the most effective decisions, aiming to restrict their choice to solely the most respected choices.
The liquid steroids for sale in our catalog can be found in the type of
both disposable ampoules or reusable vials all containing high-quality ingredients.
Dopingteam.com provides the possibility to get steroids
on-line of productivity that may be very excessive.
Whether or not you’re possibly a bodybuilder
that is qualified or a beginner, with this web-store you will find a wide-range of authorized steroids, mailed instantly from
producers which are leading which may be globally.
We may handle to sell steroids legally at low cost competing majority costs, because, as stated above we are not an advanced and an authorized anabolic steroid dealer or on-line website or worse
fraudsters.
Some steroids are stronger on this effect than others, however all males
might want to cope with this facet effect regardless of which compound is getting used.
Excessive risks and possible dying are the potential penalties of injecting steroids with the IV method.
One study confirmed a bodybuilder who injected oil-based steroids intravenously suffered from acute respiratory distress36.
This scenario was not an intended IV injection; as a substitute, it mistakenly hit a
vein when injecting it into the buttock muscle.
We will also dive into the most effective practices for sourcing and shopping for authorized steroids
online. Legal steroids haven’t brought on any
virilization-related unwanted facet effects in our female sufferers.
However, we suggest shopping for from a trustworthy brand to make
sure you are getting real legal steroid alternatives
(instead of a spiked product).
The most significant issue with oral steroids is their hepatotoxicity because
they should be metabolized by the liver.
This can end result in heartburn, notably in common or
habitual use. It is important to watch out and
acquainted whenever you buy steroids in bulk. First of all, age is necessary; steroids are only utilized
by people over the age of 21 to avoid inhibiting pure progress.
It is the time in your physique to generate its structure, and hormones – in summary,
it’s your potential for the longer term.
As Soon As the steroids are stopped, the body is no longer receiving the synthetic hormones, and the consumer is left in a state of very low or even no
testosterone. When you’re using steroid compounds which
are fast-acting, they require more frequent injections than those compounds that have slower-release esters.
Some compounds that need to be incessantly injected include Winstrol
and Testosterone Suspension.
When Im not within the fitness center or spending time away from my family i typically take
into consideration what advice would help others obtain theirs
targets just like these impressed mine. For those serious about muscle growth and athletic efficiency, legal steroid alternate options
and proper training can provide glorious outcomes
with out pointless dangers. Uncover how semaglutide supports fats loss during slicing cycles by managing appetite, selling weight reduction, and preserving muscle mass.
Canada’s Trusted On-line Steroid Store High-quality anabolic steroids, SARMs,
PCT, and dietary supplements. Push past your limits with PG Anabolics, your premier source for SYN Pharma products
in Canada. Our rigorously selected vary of SYN Pharma’s premium steroids is designed for athletes and health lovers who are committed to excellence.
No matter which path you select, prioritize your long-term health above short-term features.
The HGH from Nova Pharma Labs helped me with joint restoration and deep sleep — and the fat just began melting off.
From testosterone to PCT, our merchandise are manufactured with
clinical-grade precision and backed by actual performance outcomes.
PGAnabolics carries products from the best quality and
reputable labs in Canada, similar to SYN Pharma,
World Pharma, Ultra Analysis & Development, & Pharma Tech labs.
We additionally carry merchandise from many Canadian & Worldwide Pharmaceutical
grade manufacturers. PGAnabolics will not settle for any subpar producers and only stocks products from the most
effective. Each athlete knows that progress is driven by ardour, and with the
proper instruments, that passion can transform
into tangible results.
References:
PedsElite
hgh wirkungseintritt
References:
4 einheiten hgh – Socialbookmark.stream,
how much hgh should a woman take
References:
how many iu are in 1 mg of hgh, http://www.folkd.com,
Đến với J88, bạn sẽ được trải nghiệm dịch vụ cá cược chuyên nghiệp cùng hàng ngàn sự kiện khuyến mãi độc quyền.
Оформите займ https://zaimy-82.ru онлайн без визита в офис — быстро, безопасно и официально. Деньги на карту за несколько минут, круглосуточная обработка заявок, честные условия и поддержка клиентов 24/7.
hgh results after 1 month
References:
difference between Hgh and testosterone – https://bestbizportal.Com/read-blog/178533,
how to take hgh for bodybuilding
References:
hgh and testosterone cycle results [telegra.ph]
Đến với J88, bạn sẽ được trải nghiệm dịch vụ cá cược chuyên nghiệp cùng hàng ngàn sự kiện khuyến mãi độc quyền.
anabolic steroids brands
References:
topbookmarks.site
signs of steroid use in females
References:
torrentmiz.ru
negatives of hgh
References:
Hgh & Testosterone (https://Stackoverflow.Qastan.Be)
1 iu hgh per day results
References:
how many iu are in 1 mg of Hgh (hedgedoc.info.uqam.ca)
hgh results after 1 month bodybuilding
References:
Hgh factor reviews – http://www.ecccnet.com/forums/users/jawseed83/ –
hgh cycle for beginners
References:
hgh dose for muscle growth (https://output.jsbin.com)
how much hgh do bodybuilders take
References:
test hgh cycle (hangoutshelp.net)
hgh bivirkninger
References:
hgh dosierung fettverbrennung (skitterphoto.com)
hgh dosage for men
References:
how much hgh should i take a day (https://iskustva.net)
best time of day to take hgh
References:
hgh wirkung bodybuilding (https://Googlino.com/members/templered5/activity/322734/)
hgh cycles for beginners
References:
how much hgh per day (https://firsturl.de/)
does testosterone increase hgh
References:
How long Does it take to see results From hgh (mozillabd.science)
苹果签名,苹果超级签平台,ios超级签平台ios超级签苹果企业签,苹果超级签,稳定超级签名
Розгорнути подробиці: https://massmedia.one/rozvahy.html
Khám phá thế giới giải trí trực tuyến đỉnh cao tại MM88, nơi mang đến những trải nghiệm cá cược thể thao và casino sống động.
hgh dose for men
References:
hgh vor oder nach dem training (https://hackmd.okfn.De)
hgh 4 einheiten am tag
References:
hgh cycle For beginners (https://empirekino.ru)
专业构建与管理谷歌站群网络,助力品牌实现全域流量的强势增长。谷歌站群
Благодаря сопровождению ВЭД мы уверены, что всё оформлено правильно и соответствует требованиям https://vsoprovozhdenie1.ru/
Компетентные специалисты, которые знают, как работать с таможней и документами https://vedsoprovozhdenie1.ru/
hgh dosage for anti aging
References:
play.ntop.tv
how many iu hgh for bodybuilding
References:
clashofcryptos.trade
hgh and testosterone
References:
pads.jeito.nl
Официальный сайт Kraken kra44 cc безопасная платформа для анонимных операций в darknet. Полный доступ к рынку через актуальные зеркала и onion ссылки.
Khám phá thế giới giải trí trực tuyến đỉnh cao tại MM88, nơi mang đến những trải nghiệm cá cược thể thao và casino sống động.
Với giao diện mượt mà và ưu đãi hấp dẫn, MM88 là lựa chọn lý tưởng cho các tín đồ giải trí trực tuyến.
Đến với J88, bạn sẽ được trải nghiệm dịch vụ cá cược chuyên nghiệp cùng hàng ngàn sự kiện khuyến mãi độc quyền.
Финансовые отчёты точно – нотариальный перевод документов рядом со самара. Срочный перевод документов? Самара поможет качественно! Нотариальное заверение. Конфиденциально. Гарантия качества.
студия дизайна интерьер проект современный дизайн интерьера
kuwin sở hữu kho game đa dạng từ slot đến trò chơi bài đổi thưởng, mang đến cho bạn những giây phút giải trí tuyệt vời.
Tham gia cộng đồng game thủ tại Go88 để trải nghiệm các trò chơi bài, poker phổ biến nhất hiện nay.
kuwin sở hữu kho game đa dạng từ slot đến trò chơi bài đổi thưởng, mang đến cho bạn những giây phút giải trí tuyệt vời.
Tham gia cộng đồng game thủ tại Go88 để trải nghiệm các trò chơi bài, poker phổ biến nhất hiện nay.
Only top materials: https://cardinalparkmld.listbb.ru/viewtopic.php?f=3&t=2974
kuwin sở hữu kho game đa dạng từ slot đến trò chơi bài đổi thưởng, mang đến cho bạn những giây phút giải trí tuyệt vời.
kuwin sở hữu kho game đa dạng từ slot đến trò chơi bài đổi thưởng, mang đến cho bạn những giây phút giải trí tuyệt vời.
kuwin sở hữu kho game đa dạng từ slot đến trò chơi bài đổi thưởng, mang đến cho bạn những giây phút giải trí tuyệt vời.
Khám phá thế giới giải trí trực tuyến đỉnh cao tại MM88, nơi mang đến những trải nghiệm cá cược thể thao và casino sống động.
AAABET77, not gonna lie, it’s pretty slick. The interface is clean and they’ve got a good range of games. Had a few wins here so I’m happy! aaabet77
casino slots https://elonbet-casino-game.com
дизайн проект квартиры стоимость услуги дизайна интерьера
Нужен трафик и лиды? сайт студии avigroup SEO-оптимизация, продвижение сайтов и реклама в Яндекс Директ: приводим целевой трафик и заявки. Аудит, семантика, контент, техническое SEO, настройка и ведение рекламы. Работаем на результат — рост лидов, продаж и позиций.
b8clubcasino is where the big boys play! Feels like Vegas from my couch, yo! Big wins and big thrill. Head over right here: b8clubcasino
need a video? video equipment rental in italy offering full-cycle services: concept, scripting, filming, editing and post-production. Commercials, corporate videos, social media content and branded storytelling. Professional crew, modern equipment and a creative approach tailored to your goals.
Продажа тяговых https://faamru.com аккумуляторных батарей для вилочных погрузчиков, ричтраков, электротележек и штабелеров. Решения для интенсивной складской работы: стабильная мощность, долгий ресурс, надёжная работа в сменном режиме, помощь с подбором АКБ по параметрам техники и оперативная поставка под задачу
Продажа тяговых https://ab-resurs.ru аккумуляторных батарей для вилочных погрузчиков и штабелеров. Надёжные решения для стабильной работы складской техники: большой выбор АКБ, профессиональный подбор по параметрам, консультации специалистов, гарантия и оперативная поставка для складов и производств по всей России
Быстрый вход на площадку через сегодня вход кракен через актуальные onion ссылки и клир зеркала
Продажа тяговых ab-resurs.ru аккумуляторных батарей для вилочных погрузчиков и штабелеров. Надёжные решения для стабильной работы складской техники: большой выбор АКБ, профессиональный подбор по параметрам, консультации специалистов, гарантия и оперативная поставка для складов и производств по всей России
Продажа тяговых faamru.com аккумуляторных батарей для вилочных погрузчиков, ричтраков, электротележек и штабелеров. Решения для интенсивной складской работы: стабильная мощность, долгий ресурс, надёжная работа в сменном режиме, помощь с подбором АКБ по параметрам техники и оперативная поставка под задачу
Just stumbled on m666. Not bad! Seems like a solid resource. Will definitely be back to see what else they’ve got. Explore at m666!
the rock steroids use
References:
saveyoursite.date
References:
Anavar before and after reddit
References:
https://travelersqa.com/
References:
Winstrol and anavar cycle before and after
References:
–7sbarohhk4a0dxb3c.рф
%random_anchor_text%
References:
https://bookmarkstore.download/story.php?title=androgel-50-mg-gel
References:
Leelanau sands casino
References:
doodleordie.com
References:
Grand eagle casino
References:
https://doodleordie.com/
References:
Sugarhouse casino
References:
https://pediascape.science/wiki/La_nueva_bonificacin_por_congelar_el_alquiler_choca_con_las_rebajas_fiscales_de_la_ley_de_vivienda_Vivienda_Economa
References:
Casino games download
References:
https://forum.dsapinstitute.org/forums/users/barbermirror1/
References:
Casino grand cercle
References:
ondashboard.win
References:
L’auberge casino
References:
gpsites.win
References:
Casino grand bay
References:
https://bookmarking.stream/story.php?title=candy96-casino-australia-800-welcome-bonus-160-free-spins-bundle
References:
888 casino login
References:
brewer-wang.federatedjournals.com
References:
Prime casino
References:
https://notes.io/eidqr
References:
Wild rose casino clinton iowa
References:
http://ezproxy.cityu.edu.hk/
legal steroids for losing weight
References:
wifidb.science
%random_anchor_text%
References:
pediascape.science
anavar anabolic steroid
References:
https://hack.allmende.io/
steroid protein powder
References:
yogaasanas.science
нужна люстра купить деревянную люстру
магазин мужских костюмов костюм мужской классический купить в спб
References:
Texas casinos
References:
gratisafhalen.be
References:
Blackjack pershing
References:
diego-maradona.com.az
References:
The sands casino
References:
https://funsilo.date/wiki/Best_Live_Dealer_Casinos_Online_Play_Real_Money_Games_Live
References:
Casper games
References:
marvelvsdc.faith
References:
Longhorn casino
References:
https://notes.io/
References:
Fort sill apache casino
References:
morphomics.science
pills for building muscle fast
References:
https://googlino.com/members/emeryleek0/activity/538372
buying steroids in canada
References:
mozillabd.science
strongest steroid on the market
References:
https://apunto.it/user/profile/577344
winstrol pills results
References:
opensourcebridge.science
Играешь в казино? апх Слоты, рулетка, покер и live-дилеры, простой интерфейс, стабильная работа сайта и возможность играть онлайн без сложных настроек.
Hey there, You’ve done an incredible job. I will definitely
digg it and personally recommend to my friends.
I’m sure they’ll be benefited from this website.
References:
The orleans casino
References:
https://mapleprimes.com/users/peonyopen3
References:
Casino club chicago
References:
dokuwiki.stream
References:
Pokie magic
References:
https://algowiki.win/
References:
North dakota casinos
References:
ozodagon.com
References:
Blackjack knives
References:
jobboard.piasd.org
Hi there, I log on to your new stuff like every week. Your writing style is awesome, keep up the good work!
References:
Closest casino to atlanta
References:
empirekino.ru
цена заклепки вытяжной заклепка вытяжная комбинированная
References:
Quick hit slot machine
References:
ai-db.science
References:
Hard rock casino miami
References:
downarchive.org
References:
Tulsa casinos
References:
http://ezproxy.cityu.edu.hk/login?url=https://s3.amazonaws.com/new-casino/best-online-casinos-australia.html
References:
Best online casino
References:
https://italyrate38.werite.net/australian-payid-casinos-with-aud
дизайн частного дома дизайн проекты коттеджей
дизайн 3 квартиры дизайн двухкомнатной квартиры 54 кв
pre workout steroids
References:
dubizzle.ca
anabolic diabolic
References:
hedgedoc.info.uqam.ca
полотенцесушители сайт купить полотенцесушитель
anabolic source
References:
xypid.win
are anabolic steroids illegal
References:
sonnik.nalench.com
References:
Casino cherokee nc
References:
prpack.ru
Do you love gambling? https://cryptodepositcasinos.com allow you to play online using Bitcoin and altcoins. Enjoy fast deposits, instant payouts, privacy, slots, and live dealer games on reliable, crypto-friendly platforms.
батарея на вилочный погрузчик купить Батарея тяговая для Komatsu: 48V, емкость 620 Ач. Полная совместимость.
Трещина на плитке Ремонт паркета
what does anabolic steroids do
References:
firsturl.de
cual es el codigo promocional de 1xbet
I was more than happy to uncover this site. I need to to thank you for your time for this wonderful read!! I definitely savored every bit of it and I have you book marked to look at new things in your blog.
buy legit testosterone cypionate
References:
wikimapia.org
best steroid on the market
References:
http://jobs.emiogp.com/author/linensteven8
Авторский блог https://blogger-tolstoy.ru о продвижении в Телеграм. Свежие гайды, проверенные стратегии и полезные советы по раскрутке каналов, чатов и ботов. Подробно о том, как увеличить аудиторию, повысить вовлеченность и эффективно монетизировать проекты в мессенджере Telegram.
полимолочная косметология клиника аппаратной косметологии
Keep on working, great job!
Приветствую форумчан.
Увидел интересную инфу.
Решил поделиться.
Линк:
Вроде норм.
Погрузитесь в мир кино https://zonefilm.media с нашим онлайн-кинотеатром! Здесь каждый найдет фильмы для себя: от захватывающих блокбастеров и трогательных драм до мультфильмов для всей семьи. Удобный интерфейс, возможность смотреть онлайн на любом устройстве и постоянно обновляемая библиотека! Присоединяйтесь и наслаждайтесь!
Нужен сувенир или подарок? https://gifts-kazan.online для компаний и мероприятий. Бизнес-сувениры, подарочные наборы и рекламная продукция с персонализацией и доставкой.
Лучшие подарки и сувениры https://perm-suveniry.ru нанесение логотипа, подарочные наборы, промо-продукция и деловые аксессуары для мероприятий и компаний.
cns depressant that was used in body building before it was banned.
References:
timeoftheworld.date
Нужна бытовая химия? купить бытовую химию моющие и чистящие средства, порошки и гели. Удобный заказ онлайн, акции и доставка по городу и регионам.
Бытовая химия с доставкой интернет магазин бытовой химии средства для уборки, стирки и ухода за домом. Широкий ассортимент, доступные цены и удобная оплата.
Hi there, after reading this amazing article i am also delighted to share
my knowledge here with mates.
UEFA Champions League http://sampiyonlar-ligi.com.az/ matches, results, and live scores. See the schedule, standings, and draw for Europe’s premier club competition.
Football online soccerstand com az live match results and accurate online scores. Tournaments, schedules, and up-to-date team statistics.
steroids for athletes
References:
https://socialisted.org/
Free online games http://1001.com.az/ for your phone and computer. Easy navigation, quick start, and a variety of genres with no downloads required.
Turkish Super League super lig standings, match results, and live online scores. Game schedule and up-to-date team statistics.
body building with steroids
References:
humanlove.stream
sideaffects of steriods
References:
https://bookmarkspot.win/story.php?title=hgh-hormone-de-croissance-effet-cure-et-dangers
Всем привет!
Наткнулся на полезную статью.
Советую глянуть.
Подробности здесь:
kraken онион тор
Всем удачи!
Доброго времени суток.
Наткнулся на годную инфу.
Решил поделиться.
Подробности здесь:
Mega сайт
Всем удачи!
спот Зайтун Хургада Кайт кайтинг кайтсёрфинг школа обучение сафари Дети ветра DETIVETRA
Медицинский сайт https://nogostop.ru об анатомии, патологиях и способах лечения. Симптомы, профилактика, современные препараты и рекомендации врачей в доступной форме.
Свежие новости https://plometei.ru России и мира — оперативные публикации, экспертные обзоры и важные события. Будьте в курсе главных изменений в стране и за рубежом.
Информационный портал https://diok.ru о событиях в мире, экономике, науке, автомобильной индустрии и обществе. Аналитика, обзоры и ключевые тенденции.
bodybuilders on steroids before and after
References:
https://securityholes.science/wiki/Buy_Contrave_Online_Weight_Loss_24h_Delivery
anavar stack
References:
http://www.youtube.com
обучение кайтсерфингу Кайт кайтинг кайтсёрфинг школа обучение сафари Дети ветра DETIVETRA
треугольная пицца рязань “Пицца куб” – новое измерение вкуса.
Сайт о фермерстве https://webferma.com и садоводстве: посадка, удобрения, защита растений, теплицы и разведение животных. Полезные инструкции и современные агротехнологии.
Справочный IT-портал https://help-wifi.ru программирование, администрирование, кибербезопасность, сети и облачные технологии. Инструкции, гайды, решения типовых ошибок и ответы на вопросы специалистов.
Новости и обзоры https://mechfac.ru о мире технологий, экономики, крипторынка, культуры и шоу-бизнеса. Всё, что важно знать о современном обществе.
Все об автозаконах https://autotonkosti.ru и штрафах — правила дорожного движения, работа ГИБДД, страхование ОСАГО, постановка на учет и оформление сделки купли-продажи авто.
Новостной портал https://webof-sar.ru свежие события России и мира, политика, экономика, общество, технологии и культура. Оперативные публикации и аналитика каждый день.
Онлайн новостной портал https://parnas42.ru с актуальными новостями, экспертными комментариями и главными событиями дня. Быстро, объективно и по существу.
дизайн интерьера 2026 ремонт дизайн интерьера
Hello! Would you mind if I share your blog with my twitter group? There’s a lot of people that I think would really enjoy your content. Please let me know. Many thanks
Мировые новости https://m-stroganov.ru о технологиях и криптовалютах, здоровье и происшествиях, путешествиях и туризме. Свежие публикации и экспертные обзоры каждый день.
Лучшее прямо здесь: https://linkparfum.ru/index.php
how much is anavar
References:
fields-moesgaard-3.federatedjournals.com
mass building steroids
References:
prpack.ru
Хочешь продать недвижимость? квартиры у метро в Москве экспертная оценка, подготовка к продаже, юридическая проверка и сопровождение на всех этапах сделки.
Все самое интересное сайт сми с лентой последних событий, аналитикой и комментариями экспертов. Оперативные публикации и аналитика каждый день.
Нужен новый телефон? apple iphone по выгодной цене. Интернет?магазин i4you предлагает оригинальные устройства Apple с официальной гарантией производителя — от года и более. Интернет?магазин i4you: оригинальные устройства Apple с гарантией от года. Выбирайте лучшее!
Новый Apple iPhone 17 купить уже в продаже в Санкт?Петербурге! В интернет?магазине i4you вас ждёт широкий выбор оригинальных устройств Apple по выгодным ценам. На каждый смартфон действует официальная гарантия от производителя сроком от года — вы можете быть уверены в качестве и долговечности покупки.
gnc alpha muscle stack
References:
briggs-yu.mdwrite.net
tren steroid before after
References:
humanlove.stream
Интересует бьюти индустрия? вакансии бровист вакансии косметолога, массажиста, мастера маникюра, шугаринга, ресниц, бровиста, колориста и администратора салона красоты. Курсы для бьюти мастеров, онлайн обучение и сертификаты.
Планируешь ремонт? ремонт квартир в новостройке от косметического обновления до капитальной перепланировки. Индивидуальный подход, современные технологии и официальное оформление договора.
Реклама на фургонах https://oklejka-transporta.ru
buy anabolic steroids with credit card
References:
https://henderson-morgan.mdwrite.net/nahrungserganzungsmittel-zur-appetitkontrolle-online-kaufen
top steroid labs
References:
https://skitterphoto.com/photographers/2224907/buchanan-bowden
концерт на теплоходе москва 2026 Теплоход с диджеем и танцами: зажигательная ночь гарантирована.
Охраны труда для бизнеса обучение по охране труда аудит системы безопасности, обучение персонала, разработка локальных актов и внедрение стандартов. Помогаем минимизировать риски и избежать штрафов.
Проблемы с зубами? альбадент профилактика, лечение, протезирование и эстетическая стоматология. Забота о здоровье зубов с применением передовых методик.
Professional сonstruction Moraira: architecture, engineering systems, and finishing. We work with local regulations and regional specifics in mind. We handle permitting and material procurement so you can enjoy the creative process without the stress of management.
A reliable construction company Costa Blanca — from site selection to delivery of the finished home. Experience, modern materials, and quality control. We manage every detail of turnkey construction, from initial architectural drawings to final interior finishes.
Охраны труда для бизнеса центр охраны труда аудит системы безопасности, обучение персонала, разработка локальных актов и внедрение стандартов. Помогаем минимизировать риски и избежать штрафов.
Нужен фулфилмент? фулфилмент для маркетплейсов — хранение, сборка заказов, возвраты и учет остатков. Работаем по стандартам площадок и соблюдаем сроки поставок.
Запчасти для сельхозтехники https://selkhozdom.ru и спецтехники МТЗ, МАЗ, Амкодор — оригинальные и аналоговые детали в наличии. Двигатели, трансмиссия, гидравлика, ходовая часть с быстрой доставкой и гарантией качества.
Оформления медицинских справок https://med-official2.info справки для трудоустройства, водительские, в бассейн и учебные заведения. Купить справку онлайн быстро
Медицинская справка https://086y-spr.info 086у в Москве по доступной цене — официальное оформление для поступления в вуз или колледж.
Медицинские справки https://norma-spravok2.info по доступной цене — официальное оформление. Быстрая запись, прозрачная стоимость и выдача документа установленного образца.
Оформление медицинских https://spr-goroda2.info справок в Москве недорого консультации специалистов и выдача официальных документов. Соблюдение стандартов и минимальные сроки получения.
Медицинская справка https://sp-dom1.ru с доставкой — официальное оформление. Удобная запись, прозрачные цены и получение документа курьером.
Медицинские справки https://medit-norma1.info в Москве с прозрачной ценой — анализы и выдача официального документа без лишних ожиданий. Удобная запись, прозрачные цены и быстрое получение документа установленного образца.
Получение медицинской https://gira-spravki2.ru справки с доставкой после официального оформления. Комфортная запись, минимальные сроки и законная выдача документа.
Справка 29н https://forma-029.ru в Москве с доставкой — без прохождение обязательного медосмотра в клинике. Отправка готового документа по указанному адресу.
Медицинские справки https://meduno.info и анализы в Москве — официально и удобно. Сеть из 10 клиник, оперативный прием специалистов и оформление документов по действующим стандартам.
Орби казино orby casino com онлайн-платформа с широким выбором слотов, настольных игр и бонусных предложений. Узнайте об акциях, турнирах и возможностях для комфортного игрового досуга.
Купить квартиру недорого https://spb-novostroyki-gid.ru актуальные предложения на первичном и вторичном рынке. Подбор вариантов по бюджету, помощь в ипотеке и полное юридическое сопровождение сделки.
Онлайн казино Орби https://orby-casino.net большой выбор слотов, бонусы для новых и постоянных игроков, регулярные турниры с призами.
Thank you for every other wonderful post. Where else may just anybody get that type of information in such an ideal manner of writing? I have a presentation next week, and I’m on the search for such information.
byueuropaviagraonline
sparkdex ai SparkDex is redefining decentralized trading with speed, security, and real earning potential. On spark dex, you keep full control of your assets while enjoying fast swaps and low fees. Powered by sparkdex ai, the platform delivers smarter insights and optimized performance for confident decision-making. Trade, earn from liquidity, and grow your crypto portfolio with sparkdex — the future of DeFi starts here.
Чудові бонуси казино — депозитні бонуси, бездепозитні бонуси та Турнір з призами. Обзори пропозицій і правила участі.
Найпопулярніша платформа кращі онлайн казино – популярні слоти, бонуси та турніри з призами. Огляди гри та правила участі в акціях.
Грайте в онлайн слоти — популярні ігрові автомати, джекпоти та спеціальні пропозиції. Огляди гри та можливості для комфортного харчування.
https://auto.ae/catalog/
Квартиры в новостройках https://domik-vspb.ru от застройщика — студии, однокомнатные и семейные варианты. Сопровождение сделки и прозрачные условия покупки.
Найкращі ігри онлайн казино – безліч ігрових автоматів, правил, бонусів покерів і. Огляди, новинки спеціальні
Un’accogliente pasticceria https://www.pasticceriabonati.it con fragranti prodotti da forno, classici dolci italiani e torte natalizie personalizzate. Ingredienti naturali e attenzione a ogni dettaglio.
https://auto.ae/showrooms/all/
Металлический кованый факел купить с доставкой — прочная конструкция, эстетичный внешний вид и устойчивость к погодным условиям.
sparkdex ai SparkDex is redefining decentralized trading with speed, security, and real earning potential. On spark dex, you keep full control of your assets while enjoying fast swaps and low fees. Powered by sparkdex ai, the platform delivers smarter insights and optimized performance for confident decision-making. Trade, earn from liquidity, and grow your crypto portfolio with sparkdex — the future of DeFi starts here.
Хочешь восстановить мрамор? реставрация мрамора устранение трещин, пятен и потертостей. Современные технологии шлифовки и кристаллизации для идеального результата.
Carbon credits https://offset8capital.com and natural capital – climate projects, ESG analytics and transparent emission compensation mechanisms with long-term impact.
Свежие новости SEO https://seovestnik.ru и IT-индустрии — алгоритмы, ранжирование, веб-разработка, кибербезопасность и цифровые инструменты для бизнеса.
фриспины без депозита Не упусти шанс получить бесплатные вращения – они могут стать твоим первым билетом к настоящим джекпотам.
Установка бассейна на даче под ключ цена https://atlapool.ru
Хочешь помочь своей стране? служба в сво требования, документы, порядок заключения контракта и меры поддержки. Условия выплат и социальных гарантий.
Майнинг Исследуйте мир криптовалют с помощью этих инструментов и находите наиболее подходящие для вас способы заработка.
Самое полезное для вас: https://my-mizon.ru/best-sales/
https://emiratesambassadeurs.com/vip-concierge/ Emirates Ambassadeurs Geneva supports Patek Philippe requests for Manama: Nautilus 5990/1A, authentic only, no replicas, with full set confirmed.
sparkdex SparkDex is redefining decentralized trading with speed, security, and real earning potential. On spark dex, you keep full control of your assets while enjoying fast swaps and low fees. Powered by sparkdex ai, the platform delivers smarter insights and optimized performance for confident decision-making. Trade, earn from liquidity, and grow your crypto portfolio with sparkdex — the future of DeFi starts here.
Rowy, Poddabie, Debina https://turystycznybaltyk.pl noclegi, pensjonaty i domki blisko plazy. Najnowsze aktualnosci, imprezy i wydarzenia z regionu oraz porady dla turystow odwiedzajacych wybrzeze.
Лучшие фриспины без депозита — бесплатные бонусы для старта, подробные обзоры и сравнение условий различных платформ.
Нужны казино бонусы? https://kazinopromokod.ru — бонусы за регистрацию и пополнение счета. Обзоры предложений и подробные правила использования кодов.
Онлайн покер покерок — турниры с крупными гарантиями, кеш-игры и специальные предложения для игроков. Обзоры форматов и условий участия.
anabolic steroids withdrawal symptoms
References:
forums.cgb.designknights.com
phone casino
References:
http://www.fcla.de
hollywood casino baton rouge
References:
http://www.sommer-architekt-warstein.de
Все о фундаменте https://rus-fundament.ru виды оснований, расчет нагрузки, выбор материалов и этапы строительства. Практичные советы по заливке ленточного, плитного и свайного фундамента.
Портал о жизни в ЖК https://pioneer-volgograd.ru инфраструктура, паркинг, детские площадки, охрана и сервисы. Информация для будущих и действующих жителей.
online casino biz
References:
http://www.fcla.de
Зарубежная недвижимость https://realtyz.ru актуальные предложения в Европе, Азии и на побережье. Информация о ценах, налогах, ВНЖ и инвестиционных возможностях.
Все о ремонте квартир https://belstroyteh.ru и отделке помещений — практические инструкции, обзоры материалов и современные решения для интерьера.
Свежие мировые новости https://m-stroganov.ru оперативные публикации, международные события и экспертные комментарии. Будьте в курсе глобальных изменений.
Всё про строительство https://hotimsvoydom.ru и ремонт — проекты домов, фундаменты, кровля, инженерные системы и отделка. Практичные советы, инструкции и современные технологии.
Найкращі бонуси в казино — депозитні акції, бездепозитні пропозиції та турніри із призами. Огляди та порівняння умов участі.
Грати в найкраще ігри онлайн казино — широкий вибір автоматів та настільних ігор, вітальні бонуси та спеціальні пропозиції. Дізнайтеся про умови участі та актуальні акції.
Руны Ритуал на изобилие на успех – это действенный инструмент, позволяющий активировать потоки процветания и достичь желаемых результатов в любой сфере.
schecter blackjack atx solo 6
References:
https://www.instapaper.com/p/17488559
Грати в онлайн слоти – великий каталог автоматів, бонуси за реєстрацію та регулярні турніри. Інформація про умови та можливості для гравців.
Онлайн ігри казино онлайн – великий вибір автоматів, рулетки та покеру з бонусами та акціями. Огляди, новинки та спеціальні пропозиції.
hard rock casino tulsa ok
References:
http://kriminal-ohlyad.com.ua/
northern quest casino spokane
References:
coolpot.stream
william hill mobile app
References:
https://u.to
blackjacks elgin
References:
http://www.bandsworksconcerts.info
Онлайн покер Покер онлайн pokerok — регулярные турниры, кеш-игры и специальные предложения для игроков. Обзоры возможностей платформы и условий участия.
Slotini uning https://chickenroadgames.top/uz/ jonli dizayni, qiziqarli mexanikasi va qoshimcha oyin xususiyatlari bilan sinab koring. Qoidalar va format haqida hamma narsani bilib oling.
http://npar.ru/wp-content/pgs/1hbet_promokod_pri_registracii__bonus_do_32500_rub_.html
online betting sites
References:
uchkombinat.com.ua
https://fsris.org.rs/news/4rabet_promo_code_india.html
slot oyunu https://mineslot.club/tr/ piksel grafikler, bonus ogeler ve ilgi cekici mekanikler. Oyunun kurallar? ve ozellikleri hakk?nda bilgi edinin.
Discover a mine slot with an original theme and bonus features. Learn about the mechanics and gameplay features.
santa ana star casino
References:
fachrihelmanto.com
Discover the minedrop stake—an online slot with engaging mechanics and interesting gameplay features. Learn more about the rules and format.
fort mcdowell casino
References:
http://madk-auto.ru/user/pointcarrot7
leadmark site – Mobile version looks perfect; no glitches, fast scrolling, crisp text.
Want to try https://zeusvshades250.com a slot machine about the clash of gods with bonus rounds and spectacular animation? Learn more about the format and features.
boostster site – Found practical insights today; sharing this article with colleagues later.
blue rodeo in our nature
References:
https://bookmark4you.win
A catalog of cars https://www.auto.ae/catalog/ across all brands and generations—specs, engines, trim levels, and real market prices. Compare models and choose the best option.
БПЛА Волгоград сегодня Смертельное ДТП Волгоград: хроника трагических происшествий на дорогах, информация о погибших и расследованиях.
https://zambiadispatch.com/news/1xbet-promo-code-%e2%8b%99-bonus1x200-%e2%8b%98-vip-bonus-130/
blsp at
Un sito web https://www.sopicks.it per trovare abbigliamento, accessori e prodotti alla moda con un motore di ricerca intelligente. Trova articoli per foto, marca, stile o tendenza, confronta le offerte dei negozi e crea look personalizzati in modo rapido e semplice.
Нужно быстрое и недорогое такси https://taxi-aeroport.su в Москве? Делюсь находкой — сервис Taxi-Aeroport. Удобный онлайн-заказ за пару кликов, фиксированная цена без сюрпризов, чистые машины и вежливые водители. Проверил сам: в аэропорт подали вовремя, довезли спокойно, без переплат и лишней суеты. Отличный вариант для поездок по городу и комфортных трансферов.
Dzisiejsze mecze https://mecze-dzis.pl/ aktualny harmonogram z dokladnymi godzinami rozpoczecia. Dowiedz sie, jakie mecze pilki noznej, hokeja i koszykowki odbeda sie dzisiaj, i sledz turnieje, ligi i druzyny w jednym wygodnym kalendarzu.
A convenient car catalog https://auto.ae/catalog/ brands, models, specifications, and current prices. Compare engines, fuel consumption, trim levels, and equipment to find the car that meets your needs.
Wiadomosci tenisowe http://www.teniswiadomosci.pl/ z Polski i ze swiata: najnowsze wyniki meczow, rankingi zawodniczek, analizy turniejow i wywiady z zawodniczkami. Sledz wydarzenia ATP i WTA, dowiedz sie o zwyciestwach, niespodziankach i najwazniejszych meczach sezonu.
https://ecoinn74.ru/images/pgs/1xbet_promokod_pri_registracii_bonus.html
schecter blackjack atx
References:
notes.io
Siatkowka w Polsce http://www.siatkowkanews.pl/ najnowsze wiadomosci, wyniki meczow, terminarze i transfery druzyn. Sledz PlusLige, wystepy reprezentacji narodowych i najwazniejsze wydarzenia sezonu w jednej wygodnej sekcji sportowej.
Koszykowka koszykowkanews pl najnowsze wiadomosci, PLK, transfery i wyniki meczow. Sledz polska lige, turnieje miedzynarodowe i postepy zawodnikow, dowiedz sie o transferach, statystykach i najwazniejszych wydarzeniach sezonu.
Jan Blachowicz janblachowicz to polski zawodnik MMA i byly mistrz UFC w wadze polciezkiej. Pelna biografia, historia kariery, statystyki zwyciestw i porazek, najlepsze walki i aktualne wyniki.
kahneeta casino
References:
day-astrup-5.technetbloggers.de
mahjong 3d more time
References:
bookmark4you.win
A convenient car catalog http://www.auto.ae/catalog/ brands, models, specifications, and current prices. Compare engines, fuel consumption, trim levels, and equipment to find the car that meets your needs.
Amazing blog! Is your theme custom made or did you download it from somewhere? A theme like yours with a few simple tweeks would really make my blog shine. Please let me know where you got your theme. Kudos
4 winds casino
References:
bookmarkingworld.review
gowild casino
References:
myenglishguide.com
A convenient car catalog https://auto.ae/catalog/ brands, models, specifications, and current prices. Compare engines, fuel consumption, trim levels, and equipment to find the car that meets your needs.
bs2we at
Everything about FC Qarabag http://www.qarabag.com.az/ in one place: match results and schedule, Premier League standings, squads and player stats, transfers, live streams, and home ticket sales.
IDMAN TV http://www.idman-tv.com.az/ live stream online: watch the channel in high quality, check today’s program guide, and find the latest TV schedule. Conveniently watch sporting events and your favorite shows live.
Free online games oyun-oyna with no installation required—play instantly in your browser. A wide selection of genres: arcade, racing, strategy, puzzle, and multiplayer games are available in one click.
Julie Cash juliecash.online on OnlyFans features exclusive content, private posts, and regular updates for subscribers. Subscribe to gain access to original content and special offers.
Watch Selcuksport TV selcuksports com az live online in high quality. Check the broadcast schedule, follow sporting events, and watch matches live on a convenient platform.
Julie Cash http://www.juliecash.online on OnlyFans features exclusive content, private posts, and regular updates for subscribers. Subscribe to gain access to original content and special offers.
Crystal Lust https://crystal-lust.online/ is the official website, featuring original publications, premium content, and special updates for subscribers. Stay up-to-date with new posts and gain access to exclusive content.
Exclusivo de Candy Love https://candylove.es contenido original, publicaciones vibrantes. Suscribete para ser el primero en enterarte de las nuevas publicaciones y acceder a actualizaciones privadas.
Shilpa Sethi https://shilpasethi.in/ exclusive content, breaking news, and regular updates. Get access to new publications and stay up-to-date on the most interesting events.
Brooke Tilli brooketilli official website features unique, intimate content, exclusive publications, and revealing updates. Access original content and the latest news on the official platform.
MiniTinah http://www.minitinah.es comparte contenido exclusivo y las ultimas noticias. Siguenos en Instagram y Twitter para enterarte antes que nadie de nuestras nuevas publicaciones y recibir actualizaciones emocionantes a diario.
upmark site – Content reads clearly, helpful examples made concepts easy to grasp.
Lily Phillips lily-phillips.com offers unique intimate content, exclusive publications, and revealing updates for subscribers. Stay up-to-date with new content, access to original photos, and special announcements on her official page.
Eva Elfie evaelfie shares unique intimate content and new publications. Her official page features original materials, updates, and exclusive offers for subscribers.
Sweetie Fox sweetiefox.ing offers exclusive content, original publications, and regular updates. Get access to new materials, private photos, and special announcements on the official page.
Unique content from Angela White http://www.angelawhite.ing/ new publications, exclusive materials, and personalized updates. Stay up-to-date with new posts and access exclusive content.
Souzan Halabi souzanhalabi.online shares exclusive content and new publications. Get access to private updates and original materials on the official platform.
заказать лазерный принтер (Лазерный принтер – идеальное решение для быстрой и четкой печати документов. | Лазерные принтеры превосходят струйные по скорости и экономии тонера. | Хотите лазерный принтер купить? Широкий выбор моделей по доступным ценам! | Лазерные принтеры купить легко в нашем магазине с гарантией качества. | Купить лазерный принтер – значит инвестировать в надежность и производительность. | Заказать лазерный принтер онлайн – быстро и без лишних хлопот. | Лазерный принтер цена радует: от 5000 руб. за базовые модели. | Узнайте лазерный принтер стоимость – выгодные акции для всех покупателей. | Ищете лазерный принтер недорого? У нас лучшие предложения! | Лазерный принтер купить недорого – реальность с нашими скидками до 30%. | Дешевый лазерный принтер не уступает по качеству печати. | Бюджетный лазерный принтер для дома и офиса – оптимальный выбор. | Лазерный принтер купить онлайн в 2 клика с доставкой. | Заказать лазерный принтер онлайн – удобный сервис 24/7. | Лазерный принтер интернет магазин с тысячами отзывов. | Интернет магазин лазерных принтеров – ваш надежный партнер. | Лазерный принтер каталог: фото, характеристики, отзывы. | Лазерный принтер в наличии – забирайте сегодня! | Лазерный принтер с доставкой по России бесплатно от 5000 руб.)
seogrowth site – Navigation felt smooth, found everything quickly without any confusing steps.
чат твич опыт путешествий
Shilpa Sethi shilpasethi in official page features unique, intimate content and premium publications. Private updates, fresh photos, and personal announcements are available to subscribers.
Riley Reid https://rileyreid.ing is a space for exclusive content, featuring candid original material and regular updates. Get access to new publications and stay up-to-date on the hottest announcements.
Luiza Marcato Official https://luizamarcato.online/ exclusive updates, personal publications, and the opportunity to connect. Get access to unique content and official announcements.
Brianna Beach’s exclusive briannabeach online page features personal content, fresh posts, and the chance to stay up-to-date on new photos and videos.
Exclusive Aeries Steele aeries steele intimate content, and original publications all in one place. New materials, special announcements, and regular updates for those who appreciate a premium format.
заказать аудиорекламу Заказать аудиорекламу онлайн: экономьте время и бюджет на студийной записи.
Google salaries by position https://salarydatahub.uk comparison of income, base salary, and benefits. Analysis of compensation packages and career paths at the tech company.
Sabrina Cortez sabrinacortez.online offers unique content and fresh publications. Join us on social media to receive exclusive updates and participate in exciting activities.
Exclusive content Alexis Fawx alexisfawx original publications and special updates. Follow us on social media to stay up-to-date on new releases and participate in exciting events.
Любишь азарт? https://eva-vlg.ru онлайн-платформа с широким выбором слотов, настольных игр и живого казино. Бонусы для новых игроков, акции, турниры и удобные способы пополнения счета доступны круглосуточно.
Bunny Madison bunnymadison online features exclusive, intimate content, and special announcements. Join us on social media to receive unique content and participate in exciting events.
hollywood casino ms
References:
https://onlinevetjobs.com/author/squidshare87
rankrise site – Bookmarked this immediately, planning to revisit for updates and inspiration.
leadnex site – Found practical insights today; sharing this article with colleagues later.
ranklio site – Mobile version looks perfect; no glitches, fast scrolling, crisp text.
This text is worth everyone’s attention. Where can I find out more?
clickrank site – Mobile version looks perfect; no glitches, fast scrolling, crisp text.
Jill Kassidy Exclusives http://www.jillkassidy-official.online featuring original content, media updates, and special announcements.
Scarlett Jones http://www.scarlettjones.in/ shares exclusive content and the latest updates. Follow her on Twitter to stay up-to-date with new publications and participate in exciting media events.
Discover Avi Love’s avilove world: exclusive videos, photos, and premium content on OnlyFans and other platforms.
Die Welt von Monalita https://monalita.de/ bietet exklusive Videos, ausdrucksstarke Fotos und Premium-Inhalte auf OnlyFans und anderen beliebten Plattformen. Abonniere den Kanal, um als Erster neue Inhalte und besondere Updates zu erhalten.
Johnny Sins johnnysins is the official channel for news, media updates, and exclusive content. Be the first to know about new releases and stay up-to-date on current events.
Читать расширенную версию: оборудование конференц залов
Discover the world of LexiLore https://lexilore.ing exclusive videos, original photos, and vibrant content. Regular updates, new publications, and special content for subscribers.
Dive into the world of Dolly Little https://dollylittle-official.online original videos, exclusive photos, and unique content available on OnlyFans and other services. Regular updates and fresh publications for subscribers.
Serenity Cox https://serenitycox.ing shares exclusive content and regular updates. Follow her on Instagram, Twitter, and Telegram to stay up-to-date on creative projects and inspiring events.
Купить квартиру https://sbpdomik.ru актуальные предложения на рынке недвижимости. Новостройки и вторичное жильё, удобный поиск по цене, району и площади. Подберите идеальную квартиру для жизни или инвестиций.
clicktraffic site – Loved the layout today; clean, simple, and genuinely user-friendly overall.
Karely Ruiz karely ruiz comparte contenido exclusivo y actualizaciones periodicas. Siguela en Instagram, Twitter y Telegram para estar al tanto de sus proyectos creativos y eventos inspiradores.
Get to know JakKnife jakknife and discover unique content. Regular updates, special publications, and timely announcements are available to subscribers.
Discover the world of Comatozze https://comatozze.in exclusive content on OnlyFans and active updates on social media. Subscribe to stay up-to-date on new publications and exciting projects.
The official website of MiniTina https://minitinah.com/ your virtual friend with exclusive publications, personal updates, and exciting content. Follow the news and stay connected in a cozy online space.
Нужна плитка? тротуарная плитка город большой ассортимент, современные формы и долговечные материалы. Подходит для мощения тротуаров, площадок и придомовых территорий.
slot game
References:
https://rushbrainhomes.com/article-15-prohibition-of-discrimination-india/
william hill uk login
References:
https://innovativeforge.com/navigating-the-unknown-a-journey-discovery/
At online casino spain you can enjoy a very immersive atmosphere with localized themes that resonate well with the Spanish audience. The bonuses are transparent and easy to track within your personal account.
Строишь дом или забор? https://gazobeton-krasnodar.ru продажа газобетона и газоблоков в Краснодаре с доставкой по Краснодарскому краю и СКФО. В наличии автоклавные газобетонные блоки D400, D500, D600, опт и розница, расчет объема, цены от производителя, доставка на объект манипулятором
Нужен газоблок? газобетон краснодар каталог газоблоков и газобетона в Краснодаре: размеры, характеристики и цены на газобетонные блоки КСМК. Можно купить газоблоки с доставкой по Краснодару, краю и СКФО. Актуальная цена газоблоков, помощь в подборе, расчет объема и заказ с завода
Visiting pin-up official site chile gives you access to a legitimate gaming platform with clear terms and conditions regarding bonuses. The registration is fast, and the verification process didn’t take more than a few hours in my case.
Нужны ЖБИ? завод жби минск широкий ассортимент ЖБИ, прочные конструкции и оперативная доставка на объект. Консультации специалистов и индивидуальные условия сотрудничества.
best place to order steroids online
References:
https://g.clicgo.ru
Unique content from Gattouz0 – daily reviews, new materials, and the opportunity for personal interaction. Stay connected and get access to the latest publications.
Contenido exclusivo de Karely Ruiz: resenas diarias, nuevos materiales y la oportunidad de interactuar personalmente. Mantengase conectado y acceda a las ultimas publicaciones.
Discover the world of CandyLove Officiall: exclusive content, daily reviews, and direct communication. Subscribe to receive the latest updates and stay up-to-date with new publications.
Immerse yourself in the world of CrystalLust Officiall: unique content, daily reviews, and direct interaction. Here you’ll find not only content but also live, informal communication.
Exclusive from SkyBri – daily reviews, new publications, and direct communication. Subscribe to stay up-to-date and in the know.
how to get prescribed steroids legally by a doctor
References:
dokuwiki.stream
The official delux_girl channel features daily hot content, private selfies, and exclusive videos. Intriguing real-life moments and regular updates for those who want to get closer.
official page ElleLee Officiall features hot posts, private selfies, and real-life videos. Subscribe to receive daily updates and exclusive content.
The official LexisStar page features daily breaking news, personal selfies, and intriguing content. Subscribe to stay up-to-date with new updates.
Discover the world of NaomiHughes Official: daily vibrant content, candid selfies, and dynamic videos. Real life moments and regular updates for those who appreciate a lively format.
Discover the world of MickLiter: behind-the-scenes stories, bold provocations, and personal footage. All the most interesting content gathered in one place with regular updates.
bs2we at
The best of MilaSolana – sharing all the most interesting content in one channel. Behind-the-scenes atmosphere, provocative mood, and personal snippets. Stay tuned and don’t miss any new releases.
Descubre el mundo de LiaLin Oficial: historias tras bambalinas, provocaciones audaces y videos personales. Todo el contenido mas interesante reunido en un solo lugar con actualizaciones periodicas.
Immerse yourself in the MewSlutOfficial experience: candid behind-the-scenes moments, provocative vibes, and intriguing updates all in one place.
intriguing publications Reislin and new materials appear regularly, creating a truly immersive experience. Personal moments, striking provocations, and unexpected materials are featured. Stay tuned for new publications.
anabolic steroids biz
References:
http://l1ae1d.творение.москва/user/nepalfear4
телевизор +с интернетом Выбор подходящего тарифа интернета от Мегафон или другого провайдера важен для комфортного пользования услугами, будь то для работы, развлечений или телевидения.
nicheninja site – Appreciate the typography choices; comfortable spacing improved my reading experience.
leadzo site – Loved the layout today; clean, simple, and genuinely user-friendly overall.
reachly site – Loved the layout today; clean, simple, and genuinely user-friendly overall.
leadora site – Pages loaded fast, images appeared sharp, and formatting stayed consistent.
roulette wheel selection
References:
officeretail.mpi-bidakara.com
%random_anchor_text%
References:
https://algowiki.win/
I was suggested this web site by my cousin. I’m not sure whether this post is written by him as nobody else know such detailed about my trouble. You are amazing! Thanks!
https://www.maanation.com/CodigoVip1
exclusive revelations Monalita genuine passion and bold aesthetics. Private content you’ll find only here—directly from the author, without filters or unnecessary boundaries.
honest revelations AlinaRai vivid emotions and a sensual atmosphere. Unique private content, available only on this page—directly from me.
passionate atmosphere Amadani Officiall openness and a personal format of communication. Exclusive content, created without intermediaries—only for those who want more.
bold format Big Titty Goth Egg sincere emotions and expressive images. Private materials and special publications that you’ll only see here.
personal revelations EvaElfie Officially powerful energy and private publications. Unique content, available exclusively here—directly from me.
Pure emotion ReislinOfficiall bold presentation, and a private format without boundaries. Exclusive content, personally created and available only here—for those who appreciate true energy.
Candid style Diana Rider vibrant passion, and a unique atmosphere. Private publications and unique materials that you’ll find exclusively in this space.
Genuine emotions Girthmasterr Officiall bold visual presentation, and personal communication. Exclusive content revealed only to its audience.
%random_anchor_text%
References:
cqr3d.ru
los angeles casinos
References:
http://www.eventistrybyalecia.com
Pure emotion Reislin Officiall bold presentation, and a private format without boundaries. Exclusive content, personally created and available only here—for those who appreciate true energy.
Candid style DianaRider vibrant passion, and a unique atmosphere. Private publications and unique materials that you’ll find exclusively in this space.
Vivid revelations Sweetie fox sensual aesthetics, and a signature format. Private materials created without boundaries or templates—available only in one place.
Boldness and sincerity LunaOkko maximum intimacy. Personal content without intermediaries—only here and only directly from me.
casino classic
References:
cpdbouvxc3m7.blog.fc2.com
Maximum candor PrincesslsiOfficiall vibrant energy, and a private atmosphere. Exclusive content is personally created and available only here—for those ready for a truly unique experience.
An intimate atmosphere Mia Marin sensual presentation, and signature style. Exclusive materials available exclusively in this space.
A bold image LunaOkko Officiall strong charisma, and a personal communication format. Private publications and special materials revealed only to our audience.
Frank emotions RaeLilBlac captivating aesthetics, and a personalized format. Content without unnecessary filters—directly from the author.
The energy of passion RomiRain Officiall sincerity, and private access. Unique publications created for those who appreciate a personalized and bold format.
blackjack practice
References:
vietlinklogistics.com
baton rouge casino
References:
http://www.bonbini-na-curacao.nl
new mobile casino
References:
http://www.realitateavalceana.ro
Играешь в казино? https://eva-vlg.ru популярная онлайн-платформа с большим выбором слотов, настольных игр и лайв-казино. Бонусы для новых игроков, регулярные акции и удобные способы пополнения доступны круглосуточно.
Bold aesthetics Siri Dahl personal revelations, and an intimate atmosphere. Exclusive content is created without compromise—only for our audience, and only here.
Sensual style Coco Lovelock vibrant energy, and an unfiltered format. Unique materials available exclusively in this space.
Лучшее казино онлайн pin up casino online слоты, джекпоты, карточные игры и лайв-трансляции. Специальные предложения для новых и постоянных пользователей, акции и турниры каждый день.
Нужен промокод казино? https://promocodenastavki.ru получите бесплатные вращения в популярных слотах. Актуальные бонус-коды, условия активации и пошаговая инструкция по использованию для новых и действующих игроков.
Нужен компрессор? https://macunak.by для производства и мастерских. Надёжные системы сжатого воздуха, гарантия, монтаж и техническая поддержка на всех этапах эксплуатации.
Play unblocked games online without registration or downloading. A large catalog of games across various genres is available right in your browser at any time.
Работаешь с авито? авито магазин профессиональное создание и оформление Авито-магазина, настройка бизнес-аккаунта и комплексное ведение. Поможем увеличить охват, повысить конверсию и масштабировать продажи.
Подробности по ссылке: Обследование в поведенческой психотерапии: ключевые аспекты и методики
цены на квартиры в сарове Продажа квартир в Сарове: ваш ключ к комфортной жизни
new brunswick postal code
References:
https://www.elsieisy.com/raped
thc chocolate delivery in prague cali weed in prague
hemp for sale in prague thc joint for sale in prague
marina bay casino
References:
https://fashionandtravelreporter.com/buzios-os-principais-pontos-turisticos-da-cidade
cali weed shop in prague weed store in prague
thc vape shop in prague marijuana shop in prague
kush for sale in prague weed store in prague
ruby fortune casino
References:
https://www.elsieisy.com/
http://www.studenternas.nu
aria casino las vegas
References:
https://vivek-desai.com
paradise casino
References:
watbosa.ac.th
online roulette play roulette and receive $1500
References:
http://www.elsieisy.com
casino m8trix
References:
http://www.elsieisy.com
hialeah park casino
References:
https://vivek-desai.com/pages/page-left-sidebar
citikliniken.com
blsp at bs2web at
thc gummies for sale in prague thc gummies for sale in prague
cannafood shop in prague thc gummies for sale in prague
thc joint for sale in prague thc joint shop in prague
hash in prague thc vape delivery in prague
cannabis in prague buy cannabis in prague
https://www.gelbilibili.com/Tavuk%20Yemi%20Nas%C4%B1l%20Yap%C4%B1l%C4%B1r/traveling/greece-travel
thc chocolate for sale in prague cali weed for sale in prague
buy weed in prague marijuana
hemp delivery in prague marijuana shop in prague
buy cannabis in prague marijuana
buy hash in prague buy thc vape in prague
Sensory branding Strategy, scent technologies and successful implementation across all product stages by Aromamedia
uk casino club
References:
http://schlatthof.net/togo-reise-maerz-2020/palmoel-und-seife/
best casinos for online slot machines
References:
tarbiyah.alqolam.ac.id
thc joint in prague hashish shop in prague
cbd weed in prague buy thc gummies in prague
hashish shop in prague marijuana in prague
hashish in prague buy thc gummies in prague
Jouez-vous au casino? https://sultan-willd-fr.eu.com une plateforme de jeux moderne proposant une variete de machines a sous, de jackpots et de jeux de table. Inscription et acces faciles depuis n’importe quel appareil.
Check https://votemikedugan.com/ for essential information regarding local community initiatives and the strategic goals set by leadership. The layout is very clear, which makes it easy to find specific data about upcoming public events and policy updates without much effort. It really helps bridge the gap by providing transparent and timely information that matters to every active citizen in the region.
Visit online source to find unique entertainment tips and detailed guides about the latest lifestyle trends. This platform is well-researched and provides a fresh perspective for anyone interested in high-quality content that isn’t covered by mainstream blogs. I especially like how they categorize their posts, making it easy to navigate through different themes without feeling overwhelmed.
At fafabet-casino.com you will find an extensive library of licensed slots and live dealer tables that definitely cater to all types of players. The site has a reputation for offering very competitive bonuses with fair wagering requirements, making it a solid choice for both beginners and pros. I’ve personally found their withdrawal process to be quite efficient, which is always a top priority when choosing a new platform.
Try Mr.Jackbet slots if you are looking for the official Mr.Jackbet platform with the most reliable slots and betting options. This destination is very professional and provides all the necessary details and service descriptions you might need before you start playing for real. It’s a great example of a secure environment that values transparency and makes it easy for users to find exactly what they need.
mardi gras casino florida
References:
schlatthof.net
Inside official India link you will find a massive selection of games specifically tailored for the Indian market, including hits like Teen Patti and Andar Bahar. The platform utilizes high-level encryption to ensure all transactions and personal data remain secure at all times. I also found that they offer excellent local deposit options, which makes the whole experience much more convenient for users in the region.
At Amunra mobile players in the Czech region can experience high-quality slots and live dealer games in a completely secure and localized environment. The site supports popular local payment methods and offers 24/7 customer support to resolve any technical or account issues as quickly as possible. It’s a very reliable destination for those looking for a smooth registration process and a diverse library of certified casino games.
Playing top Plinko portal is a fantastic way to experience this classic arcade-style game with modern graphics and certified fair mechanics. The interface is very straightforward, allowing you to jump straight into the action without dealing with overly complicated settings or menus. It’s perfect for those who enjoy quick gaming sessions where the outcome is clear and the gameplay remains consistently engaging.
On Greek gaming site you can enjoy a very engaging loyalty program that rewards active players with frequent cashback and exclusive tournament invitations. The platform is highly stable and performs well on both desktop and mobile browsers, ensuring you never miss a beat. It’s a great choice for those who value long-term rewards and a consistent gaming environment with plenty of variety.
Visit official Sportuna link if you are looking for a premium gaming experience in Greece with a heavy focus on sports-themed slots and live betting. The site is fully localized, making navigation easy for Greek speakers, and the bonus offers are quite generous for new registrations. They have a great mix of classic casino games and modern sportsbook features that keep the overall experience very diverse.
evansville casino
References:
raskrussia.ru
Visiting Spain digital portal is essential for those tracking the latest digital trends and platform launches in Spain for the upcoming year. The site provides technical details and roadmap updates that are quite valuable for anyone involved in the local tech or gaming sectors. It serves as an official hub for news and announcements regarding several key digital initiatives starting in early 2024.
Check verified Gomblingo site for an expert analysis of the site’s payout speeds and the overall quality of their customer support team. This comprehensive guide covers everything from the registration process to the specific terms of their latest promotional offers. It’s an essential read for players who want to ensure they are joining a reliable platform with a strong track record.
Visiting official Herrera link gives you a detailed look into the career and professional achievements of one of Mexico’s top football stars. The site includes exclusive content, career milestones, and regular updates that are perfect for dedicated fans of the midfielder. It’s a well-organized tribute to his journey from local clubs to the international stage and his ongoing impact on the sport.
On official sports site you will find a wide range of articles covering everything from local football to international sports tournaments. It’s a comprehensive portal for anyone who wants to stay updated on Mexican sports without having to visit multiple different news sites. The quality of the reporting is very high, and they cover a diverse range of athletic disciplines beyond just soccer.
Explore pronosticos-deportivos.com.mx to find professional analysis and data-driven predictions for all major sporting events in the region. The site uses advanced statistical models to help users make more informed decisions when placing their bets on football, baseball, or other popular sports. It’s a great starting point for anyone looking to add a layer of expert insight to their wagering strategy.
jackpotjoy slot machines
References:
yashichi.com
apache gold casino
References:
schlatthof.net
slot machine jammer
References:
raskrussia.ru
This https://rayados-de-monterrey.com.mx/ portal provides comprehensive coverage of the club’s history, current roster, and community initiatives in the Monterrey region. I check it regularly for official injury reports and transfer news to stay updated on the team’s latest developments. It’s a great resource for dedicated supporters who want to follow every aspect of the club’s journey in the league.
The 365bet Mexico app is the recommended tool for Mexican players who want instant access to their betting accounts from any location. It’s fast, secure, and includes all the features found on the main website, such as live streaming and instant cash-outs. Downloading the official app ensures you have the most stable connection possible, even when you’re away from your desktop.
Checking Chivas Mexico link is a must for any fan looking for the latest news, match schedules, and official team updates. The portal provides in-depth coverage of the club’s performance and includes exclusive interviews with players and coaching staff throughout the season. It’s the most reliable source for verified information regarding upcoming fixtures and official club announcements.
See Toluca portal link for the most accurate statistics and official statements directly from the club’s management this season. The site offers a detailed look at the team’s performance metrics and upcoming match analysis, which is perfect for fans who like to dive deep into the numbers. It’s a professional and well-maintained site that serves as the official voice of the team for its loyal fanbase.
Using legal betting Mexico ensures that you are only accessing verified and licensed operators that fully comply with local Mexican laws. This guide is essential for players who prioritize financial security and want to avoid offshore sites with questionable reputations. It provides a clear list of legal platforms and explains the current regulations in a way that is very easy to understand.
шлюха область бывшая шлюха
данные порно красивое порно
грузоперевозки с грузчиками стоимость услуг грузчиков
грузчиков области грузчики москва цена
Медицинская мебель https://tenchat.ru/0614265/ это основа оснащения клиник, лабораторий и частных кабинетов. Мы предлагаем мебель медицинская для любых задач: шкафы, столы, тумбы, стеллажи и специализированные решения. В ассортименте можно купить медецинскую мебель, соответствующая санитарным требованиям и стандартам безопасности.
grand villa casino
References:
http://www.elsieisy.com
simslots com
References:
http://www.elsieisy.com
Play online https://bloxd-io.com.az/ for free right in your browser. Build, compete, and explore the world in dynamic multiplayer mode with no downloads or installations required.
pin up онлайн-казино https://games-pinup.ru
Football online http://www.qol.com.az goals, live match results, top scorers table, and detailed statistics. Follow the news and never miss the action.
El sitio web oficial de Kareli Ruiz https://karelyruiz.es ofrece contenido exclusivo, noticias de ultima hora y actualizaciones periodicas. Mantengase al dia con las nuevas publicaciones y anuncios.
Lily Phillips http://www.lilyphillips.es te invita a un mundo de creatividad, conexion y emocionantes descubrimientos. Siguela en Instagram y Twitter para estar al tanto de nuevas publicaciones y proyectos inspiradores.
трансы омск Этот стиль, зародившийся в начале 90-х, продолжает волновать сердца клабберов по всему миру своей энергичностью и способностью создавать на танцполе атмосферу единения.
new buffalo casino
References:
wspomozycielka-lodz.pl
https://iob.uog.edu.et/events/elegant-light-box-paper-cut-dioramas-1/#comment-1848
заказать кухню в Пскове Обращаясь к нам, вы получаете не просто кухню, а эксклюзивное решение, созданное специально для вас. Мы понимаем, насколько важен правильный выбор, поэтому предлагаем консультации с опытными дизайнерами, которые помогут вам определиться с материалами, цветом и конфигурацией, чтобы ваша будущая кухня стала идеальным отражением вашего стиля.
Hi there Dear, are you genuinely visiting this website on a regular basis, if so afterward you will absolutely get good know-how.
кухни из мдф заказать Присоединяйтесь к нам, чтобы «готовить алгоритмы пошагово» и превращать теорию в практику с удовольствием. Добро пожаловать на наш кулинарный блог, посвященный не еде, а «алгоритмам» — «Кухня алгоритмов»!
сервіс електросамокатів з заміною акумулятора
свирыч Секрет его успеха кроется не только в харизме, но и в искренней отдаче своему делу, что делает каждый такой стрим по-настоящему ценным для его поклонников.
adster – Overall, professional vibe here; trustworthy, polished, and pleasantly minimal throughout.
offerorbit – Found practical insights today; sharing this article with colleagues later.
reacho – Overall, professional vibe here; trustworthy, polished, and pleasantly minimal throughout.
promova – Pages loaded fast, images appeared sharp, and formatting stayed consistent.
rankora – Color palette felt calming, nothing distracting, just focused, thoughtful design.
trendfunnel – Mobile version looks perfect; no glitches, fast scrolling, crisp text.
scaleify – Loved the layout today; clean, simple, and genuinely user-friendly overall.
купить провода силовые купить кабель минск
кайтинг кайт школа
Dlaczego warto wybrać Slottica? Nasza oferta regularnie się powiększa dzięki współpracy z najlepszymi dostawcami, takimi jak Novomatic, BGaming, Play’n Go, Gamzix, NetEnt czy Playson. Dzięki temu każdy znajdzie coś odpowiedniego dla siebie – od klasyki po nowoczesne gry z zaawansowaną grafiką. Kasyno obsługuje wygodne metody płatności, w tym Blik (zgodny z bankami, takimi jak mBank, ING, PKO BP, Pekao czy Millennium), a także karty Visa i Mastercard. Liczne pozytywne opinie na platformach takich jak Trustpilot czy Opinie pokazują, że Slottica to miejsce godne zaufania. Dla fanów mobilnej rozrywki przygotowaliśmy aplikację na systemy iOS oraz Android, zapewniającą płynną rozgrywkę na nowoczesnych urządzeniach.
https://artist.link/mpdrhsbrjq9jh
Hi there, You have done a fantastic job. I’ll definitely digg it and personally recommend to my friends. I am sure they’ll be benefited from this web site.
3д забор орехово зуево
Slotica to dynamiczne kasyno w internecie, które zdobyło uznanie graczy w Polsce oraz poza jej granicami. Dzięki swoim unikalnym zaletom jest doskonałym wyborem zarówno dla początkujących, jak i doświadczonych entuzjastów gier hazardowych. Jednym z największych atutów platformy jest pełna obsługa w języku polskim, co ułatwia grę zarówno osobom z Polski, jak i Polakom mieszkającym w Niemczech czy Holandii.Jednym z wyróżników kasyna jest brak konieczności weryfikacji konta, co umożliwia natychmiastowe rozpoczęcie gry. Ekspresowe wypłaty wygranych oraz obsługa popularnych metod płatności, takich jak Revolut, czynią korzystanie z platformy wyjątkowo wygodnym. Co więcej, kasyno akceptuje płatności w polskiej walucie, oferując stawki zaczynające się już od 1 grosza – dzięki temu każdy gracz znajdzie tu coś dla siebie, niezależnie od budżetu.
https://spread-the-light.com/code-promo-1xbet-2026-bonus-1950-e-150-tours-gratuits/
https://pad.nixnet.services/s/K8fJRTRwL
автобусы расписание москва луганск
bytehq – Loved the layout today; clean, simple, and genuinely user-friendly overall.
stackhq – Navigation felt smooth, found everything quickly without any confusing steps.
cloudhq – Content reads clearly, helpful examples made concepts easy to grasp.
cloudopsly – Content reads clearly, helpful examples made concepts easy to grasp.
devopsly – Overall, professional vibe here; trustworthy, polished, and pleasantly minimal throughout.
stackops – Navigation felt smooth, found everything quickly without any confusing steps.
kubeops – Pages loaded fast, images appeared sharp, and formatting stayed consistent.
how to get big without supplements
References:
firsturl.de
For those seeking an exceptional online gaming experience, us.com](https://maxispin.us.com/) stands out as a premier destination. At Maxispin Casino, players can enjoy a vast array of pokies, table games, and other thrilling options, all accessible in both demo and real-money modes. The casino offers attractive bonuses, including free spins and a generous welcome offer, along with cashback promotions and engaging tournaments. To ensure a seamless experience, Maxispin provides various payment methods, efficient withdrawal processes, and reliable customer support through live chat. Security is a top priority, with robust safety measures and a strong focus on responsible gambling tools. Players can easily navigate the site, with detailed guides on account creation, verification, and payment methods. Whether you’re interested in high RTP slots, hold and win pokies, or the latest slot releases, Maxispin Casino delivers a user-friendly and secure platform. Explore their terms and conditions, read reviews, and discover why many consider Maxispin a legitimate and trustworthy choice in Australia.
The platform is user-friendly, making it accessible to everyone.
**Features of MaxiSpin.us.com**
By inputting their requirements, users can receive personalized content in just a few minutes.
**Benefits of Using MaxiSpin.us.com**
The platform’s scalability ensures that it meets the needs of users regardless of their size or industry.
Нужны столбики? переносные ограждения столбика столбики для складов, парковок и общественных пространств. Прочные материалы, устойчивое основание и удобство перемещения обеспечивают безопасность и порядок.
купить кабель 6 купить кабель минск
people on steroids before and after
References:
https://theflatearth.win
https://studyinassam.com/code-promo-1xbet-pour-inscription-bonus-130-e/
define steroids
References:
https://school-of-safety-russia.ru/
promoseeder – Navigation felt smooth, found everything quickly without any confusing steps.
adscatalyst – Found practical insights today; sharing this article with colleagues later.
clickrevamp – Found practical insights today; sharing this article with colleagues later.
serpstudio – Content reads clearly, helpful examples made concepts easy to grasp.
leadspike – Mobile version looks perfect; no glitches, fast scrolling, crisp text.
trafficcrafter – Found practical insights today; sharing this article with colleagues later.
anabolicsteroid
References:
https://cameradb.review
система электронной очереди
auditpilot – Found practical insights today; sharing this article with colleagues later.
leadvero – Pages loaded fast, images appeared sharp, and formatting stayed consistent.
authoritylab – Content reads clearly, helpful examples made concepts easy to grasp.
шаровый кран приварной кран шаровый под приварку
datadev – Found practical insights today; sharing this article with colleagues later.
applabs – Navigation felt smooth, found everything quickly without any confusing steps.
dataops – Color palette felt calming, nothing distracting, just focused, thoughtful design.
trycloudy – Mobile version looks perfect; no glitches, fast scrolling, crisp text.
gobyte – Loved the layout today; clean, simple, and genuinely user-friendly overall.
getbyte – Color palette felt calming, nothing distracting, just focused, thoughtful design.
usebyte – Appreciate the typography choices; comfortable spacing improved my reading experience.
стойка мобильного ограждения с лентой мобильная стойка
магазин кабель каталог купить кабель минск
где свадебное платье свадебные платья магазины каталог
getkube – Appreciate the typography choices; comfortable spacing improved my reading experience.
trystack – Content reads clearly, helpful examples made concepts easy to grasp.
usekube – Appreciate the typography choices; comfortable spacing improved my reading experience.
getstackr – Mobile version looks perfect; no glitches, fast scrolling, crisp text.
usestackr – Mobile version looks perfect; no glitches, fast scrolling, crisp text.
cloudster – Appreciate the typography choices; comfortable spacing improved my reading experience.
deployly – Bookmarked this immediately, planning to revisit for updates and inspiration.
byteworks – Bookmarked this immediately, planning to revisit for updates and inspiration.
stackable – Mobile version looks perfect; no glitches, fast scrolling, crisp text.
datavio – Found practical insights today; sharing this article with colleagues later.
devnex – Mobile version looks perfect; no glitches, fast scrolling, crisp text.
bytevia – Loved the layout today; clean, simple, and genuinely user-friendly overall.
ремонт 3 квартир капітальний ремонт квартири
dataworks – Overall, professional vibe here; trustworthy, polished, and pleasantly minimal throughout.
Vivo caiu Vivo caiu .
cryptora – Overall, professional vibe here; trustworthy, polished, and pleasantly minimal throughout.
kubexa – Appreciate the typography choices; comfortable spacing improved my reading experience.
stackora – Mobile version looks perfect; no glitches, fast scrolling, crisp text.
cloudiva – Overall, professional vibe here; trustworthy, polished, and pleasantly minimal throughout.
netlance – Content reads clearly, helpful examples made concepts easy to grasp.
devonic – Found practical insights today; sharing this article with colleagues later.
apponic – Overall, professional vibe here; trustworthy, polished, and pleasantly minimal throughout.
codefuse – Pages loaded fast, images appeared sharp, and formatting stayed consistent.
securia – Overall, professional vibe here; trustworthy, polished, and pleasantly minimal throughout.
99 down caiu.site .
Wow, amazing blog layout! How long have you been blogging for? you made blogging look easy. The overall look of your web site is great, as well as the content!
codestackr – Navigation felt smooth, found everything quickly without any confusing steps.
Found a bride? planning a proposal in Barcelona romantic scenarios, beautiful locations, photo shoots, decor, and surprises for the perfect declaration of love. Make your engagement in Barcelona an unforgettable moment in your story.
Проблемы с застройщиком? неустойка по договору дду помощь юриста по долевому строительству, расчет неустойки, подготовка претензии и подача иска в суд. Защитим права дольщиков и поможем получить компенсацию.
Ищешь кран? кран шаровый под сварку для трубопроводов различного назначения. Надежная запорная арматура для систем водоснабжения, отопления, газа и промышленных магистралей. Высокая герметичность, долговечность и устойчивость к нагрузкам.
Нужен юрист? арбитражный юрист стоимость услуг представительство в арбитражном суде, защита интересов бизнеса, взыскание задолженности, споры по договорам и сопровождение судебных процессов для компаний и предпринимателей.
какие женские духи https://elicebeauty.com/parfyumeriya/filter/_m194_m238/
codepushr – Color palette felt calming, nothing distracting, just focused, thoughtful design.
devpush – Loved the layout today; clean, simple, and genuinely user-friendly overall.
gitpushr – Overall, professional vibe here; trustworthy, polished, and pleasantly minimal throughout.
mergekit – Pages loaded fast, images appeared sharp, and formatting stayed consistent.
встраиваемые сейфы купить
заказать кухню рассчитать стоимость zakazat-kuhnyu-4.ru .
купить сейф для офиса
shipkit – Loved the layout today; clean, simple, and genuinely user-friendly overall.
Если вы планируете купить недвижимость в Москве, важно учитывать расположение, транспортную доступность и инфраструктуру района. Риелторы помогают подобрать оптимальные варианты и сопровождают процесс сделки: ситизен
testkit – Loved the layout today; clean, simple, and genuinely user-friendly overall.
купить сейф интернете
заказать кухню через интернет заказать кухню через интернет .
взломостойкие сейфы
logkit – Found practical insights today; sharing this article with colleagues later.
сейф металлический офисный
встраиваемые сейфы в стену
promptkit – Mobile version looks perfect; no glitches, fast scrolling, crisp text.
flowbot – Bookmarked this immediately, planning to revisit for updates and inspiration.
modelops – Pages loaded fast, images appeared sharp, and formatting stayed consistent.
databrain – Navigation felt smooth, found everything quickly without any confusing steps.
заказать кухню с замером zakazat-kuhnyu-4.ru .
сейфы для отелей
ломоносовская школа онлайн ломоносовская школа онлайн .
варикоцеле лапароскопическая операция
сейф для оружия цена
несгораемый сейф купить
онлайн школа для детей онлайн школа для детей .
тонзиллэктомия показания
сейфы для оружия
mlforge – Color palette felt calming, nothing distracting, just focused, thoughtful design.
септопластика цена в москве
атерома иссечение
септопластика носа в москве
сейф москва
жировик удаление
taskpipe – Loved the layout today; clean, simple, and genuinely user-friendly overall.
smartpipe – Color palette felt calming, nothing distracting, just focused, thoughtful design.
opsbrain – Content reads clearly, helpful examples made concepts easy to grasp.
patchkit – Found practical insights today; sharing this article with colleagues later.
guardstack – Found practical insights today; sharing this article with colleagues later.
ломоносов скул ломоносов скул .
securekit – Bookmarked this immediately, planning to revisit for updates and inspiration.
pipelinesy – Appreciate the typography choices; comfortable spacing improved my reading experience.
authkit – Loved the layout today; clean, simple, and genuinely user-friendly overall.
удаление полипа шейки матки
фимоз у мужчин лечение
варикоцеле левого яичка
школа онлайн школа онлайн .
где можно навесы заказать где можно навесы заказать
Marriage proposal options proposal packages in Barcelona
где можно навесы заказать устанавливаем навесы
увеличение длины полового члена
lbs lbs .
zerotrusty – Pages loaded fast, images appeared sharp, and formatting stayed consistent.
threatlens – Loved the layout today; clean, simple, and genuinely user-friendly overall.
операция по удлинению члена
auditkit – Overall, professional vibe here; trustworthy, polished, and pleasantly minimal throughout.
keyvaulty – Mobile version looks perfect; no glitches, fast scrolling, crisp text.
secstackr – Appreciate the typography choices; comfortable spacing improved my reading experience.
shieldops – Navigation felt smooth, found everything quickly without any confusing steps.
операция удаление полипа на шейке
99 caiu caiu.site .
Hey I am so delighted I found your site, I really found you by error, while I was browsing on Askjeeve for something else, Nonetheless I am here now and would just like to say cheers for a incredible post and a all round enjoyable blog (I also love the theme/design), I don’t have time to read through it all at the moment but I have bookmarked it and also added your RSS feeds, so when I have time I will be back to read much more, Please do keep up the awesome jo.
https://tm-marmelad.com.ua/yak-pravylno-pidhotuvaty-shov-pid.html
AWS caiu caiu.site .
smartbyte – Mobile version looks perfect; no glitches, fast scrolling, crisp text.
Hi there to all, because I am genuinely keen of reading this web site’s post to be updated daily. It carries good data.
https://ostercenter.com.ua/maibutnie-avtoremontu-chy-zaminyat-roboty-z.html
Ita? caiu caiu.site .
techsphere – Overall, professional vibe here; trustworthy, polished, and pleasantly minimal throughout.
cyberstack – Loved the layout today; clean, simple, and genuinely user-friendly overall.
nanotechhub – Found practical insights today; sharing this article with colleagues later.
keyvaulty – Color palette felt calming, nothing distracting, just focused, thoughtful design.
clicktechy – Color palette felt calming, nothing distracting, just focused, thoughtful design.
bytetap – Bookmarked this immediately, planning to revisit for updates and inspiration.
quickbyte – Found practical insights today; sharing this article with colleagues later.
techvertex – Content reads clearly, helpful examples made concepts easy to grasp.
pixelengine – Content reads clearly, helpful examples made concepts easy to grasp.
Księga Ra to jeden z najbardziej rozpoznawalnych automatów Novomatic w Casino Slotica, osadzony w klimacie starożytnego Egiptu. Gra posiada 5 bębnów i 9 linii wypłat. Symbol Book of Ra pełni rolę Wild i Scatter, uruchamiając 10 darmowych spinów z losowo wybranym symbolem rozszerzającym, co zwiększa szanse na duże wygrane.
logicforge – Color palette felt calming, nothing distracting, just focused, thoughtful design.
futurestack – Overall, professional vibe here; trustworthy, polished, and pleasantly minimal throughout.
bytelab – Overall, professional vibe here; trustworthy, polished, and pleasantly minimal throughout.
zyrotech – Loved the layout today; clean, simple, and genuinely user-friendly overall.
omegabyte – Overall, professional vibe here; trustworthy, polished, and pleasantly minimal throughout.
techdock – Overall, professional vibe here; trustworthy, polished, and pleasantly minimal throughout.
bitzone – Mobile version looks perfect; no glitches, fast scrolling, crisp text.
codehive – Overall, professional vibe here; trustworthy, polished, and pleasantly minimal throughout.
анонимный вывод из запоя в ростове vyvod-iz-zapoya-v-rostove-3.ru .
tronbyte – Appreciate the typography choices; comfortable spacing improved my reading experience.
professional mold removal Santa Rosa CA
Żaden bonus niczego nie warty bez gry hazardowej, ponieważ tylko tam możemy je wykorzystywać. Kasyno Spinamba oferuje szeroki wybór gier hazardowych w tym gry na żywo, zakłady sportowe, najlepsze automaty, cybersport, wirtualny sport oraz gry karciane i stołowe. Wszystkie kategorie można sortować według filtrów, które pomagają łatwiej znaleźć to, czego potrzebujemy. Jest również opcja gry za darmo lub na prawdziwe pieniądze, co ważne jest dla tych, którzy po prostu chcą poćwiczyć. Patrząc na opinie graczy, możemy śmiało powiedzieć, że omawiane przez nas casino online daje możliwości graczom z PL zagrać właśnie w te gry, które oni często szukają w Internecie.
futurebyte – Mobile version looks perfect; no glitches, fast scrolling, crisp text.
вывод из запоя в ростове цена vyvod-iz-zapoya-v-rostove-3.ru .
цена золотого кольца 585 https://kolca-pomolvka-msk.ru
Find out the exact https://www.the-weather-in-budva.com today. Detailed 7- and 10-day forecasts, including temperature, wind, precipitation, humidity, and pressure. Up-to-date weather information for Budva on the Adriatic coast for tourists and residents.
Если вам интересен провайдер провайдер PG Soft и вы хотите разбираться в его играх не “вслепую”, а с пониманием механик – загляните в наш Telegram. Мы регулярно выкладываем подборки слотов PG Soft, рассказываем, чем отличаются популярные тайтлы, на что смотреть по волатильности/бонускам, какие фичи встречаются чаще всего и где реально можно поймать самые сочные раунды. Формат простой: короткие обзоры, заметки по обновлениям и идеи, что стоит попробовать в первую очередь.
Топ лучших онлайн казино России – это не только “где больше бонус”, а где в целом комфортнее: понятные правила, стабильные выплаты, адекватные лимиты и нормальная обратная связь от поддержки. Чтобы не тратить время на десятки сайтов и противоречивые рейтинги, мы ведём Telegram-канал с актуальными подборками и обновлениями по площадкам. Ссылка: https://t.me/s/rating_casino_russia/27
This post provides clear idea designed for the new visitors of blogging, that genuinely how to do blogging and site-building.
References:
Casino dice games
References:
http://epecs.hanyang.ac.kr/30/?bmode=view&idx=2277252
לבוא אלי, לשים עליך צווארון, לחגור אותך במסדרון, לקשור את הידיים מאחורי הגב כדי שלא תוכל לאונן בהיעדרותי ולהניח לפניך קערת אוכל לכלבים, ובכן, אתה הכלבה הנאמנה שלי, אז תאכל אוכל תצעק בהנאה!!! ואני מזהיר אותך על זה!!!”אמר רודיון בביטחון עצמי. לאה נרגעה: “ובכן, אם כן, בוא נלך אליך! אבל אני צריך לקנות את הספר הזה!”. “לאה הראתה על דמעה שחוקה על הדף. “שום דבר!”. https://vipgirls.co.il/
cyberpulse – Found practical insights today; sharing this article with colleagues later.
bytenova – Loved the layout today; clean, simple, and genuinely user-friendly overall.
codenova – Overall, professional vibe here; trustworthy, polished, and pleasantly minimal throughout.
zybertech – Appreciate the typography choices; comfortable spacing improved my reading experience.
cybernexus – Found practical insights today; sharing this article with colleagues later.
vortexbyte – Found practical insights today; sharing this article with colleagues later.
zenixtech – Overall, professional vibe here; trustworthy, polished, and pleasantly minimal throughout.
technexus – Found practical insights today; sharing this article with colleagues later.
veloxtech – Overall, professional vibe here; trustworthy, polished, and pleasantly minimal throughout.
byterise – Mobile version looks perfect; no glitches, fast scrolling, crisp text.
заказать курсовую заказать курсовую .
Качественное SEO https://outreachseo.ru продвижение сайта для бизнеса. Наши специалисты предлагают эффективные решения для роста позиций в поисковых системах. Подробнее об услугах и стратегиях можно узнать на сайте
Ремонт компьютеров выполняется после полной диагностики оборудования, https://forum.vipcs.pp.ua/gallery/image/746-%D1%87%D0%B0%D1%81%D1%82%D0%BE%D1%82%D0%B0-%D0%BE%D0%B1%D0%BD%D0%BE%D0%B2%D0%BB%D0%B5%D0%BD%D0%B8%D1%8F-%D1%8D%D0%BA%D1%80%D0%B0%D0%BD%D0%B0-%D0%B8-%D0%B0%D0%BF%D0%BF%D0%B0%D1%80%D0%B0%D1%82%D0%BD%D0%BE%D0%B5-%D1%83%D1%81%D0%BA%D0%BE%D1%80%D0%B5%D0%BD%D0%B8%D0%B5-chrome-%D0%B4%D1%80%D0%B0%D0%B9%D0%B2%D0%B5%D1%80-%D0%BC%D0%BE%D0%BD%D0%B8%D1%82%D0%BE%D1%80%D0%B0-%D0%B8-%D0%BC%D0%B5%D1%80%D1%86%D0%B0%D0%BD%D0%B8%D0%B5/
заказать студенческую работу заказать студенческую работу .
quantumforge – Overall, professional vibe here; trustworthy, polished, and pleasantly minimal throughout.
techcatalyst – Mobile version looks perfect; no glitches, fast scrolling, crisp text.
devbyte – Mobile version looks perfect; no glitches, fast scrolling, crisp text.
dataforge – Appreciate the typography choices; comfortable spacing improved my reading experience.
bytecore – Color palette felt calming, nothing distracting, just focused, thoughtful design.
logicbyte – Loved the layout today; clean, simple, and genuinely user-friendly overall.
binaryforge – Found practical insights today; sharing this article with colleagues later.
bitcore – Navigation felt smooth, found everything quickly without any confusing steps.
курсовая заказать недорого kupit-kursovuyu-84.ru .
seovault – Loved the layout today; clean, simple, and genuinely user-friendly overall.
seoshift – Appreciate the typography choices; comfortable spacing improved my reading experience.
seonexus – Loved the layout today; clean, simple, and genuinely user-friendly overall.
продвинуть сайт в москве продвинуть сайт в москве .
Профессиональная приемка квартиры помогает обнаружить недочеты, которые сложно заметить без опыта. Специалист проверяет качество отделочных работ и соответствие строительным нормам. Проводится осмотр стен, потолков и полов с использованием измерительных приборов. Особое внимание уделяется окнам, дверям и герметичности примыканий. Итоги проверки оформляются в виде официального акта. Такой подход позволяет отстоять свои права перед застройщиком – http://fabnews.ru/forum/member.php?u=12552
Whoa! This blog looks exactly like my old one! It’s on a completely different topic but it has pretty much the same layout and design. Outstanding choice of colors!
Накрутка поведенческих факторов рассматривается как один из методов усиления сигналов для поисковых систем. Это может помочь сайту быстрее набирать позиции: сервис накрутки сайтов
Если вы планируете купить памятник в Могилеве, обратите внимание на изделия из натурального гранита. Этот материал отличается долговечностью, стойкостью к погодным условиям и благородным внешним видом. В каталоге представлены как классические вертикальные стелы, так и эксклюзивные мемориальные комплексы. Профессиональное изготовление памятников в Могилеве включает разработку индивидуального эскиза, качественную гравировку и установку на кладбище: https://pamyatniki.top/
clickrly – Pages loaded fast, images appeared sharp, and formatting stayed consistent.
seoradar – Navigation felt smooth, found everything quickly without any confusing steps.
reachrocket – Found practical insights today; sharing this article with colleagues later.
scalewave – Appreciate the typography choices; comfortable spacing improved my reading experience.
leadmatrix – Navigation felt smooth, found everything quickly without any confusing steps.
продвижение сайтов в москве продвижение сайтов в москве .
Любишь азарт? казино онлайн пин ап предлагает разнообразные игровые автоматы, настольные игры и интересные бонусные программы. Платформа создана для комфортной игры и предлагает широкий выбор развлечений.
интернет продвижение москва интернет продвижение москва .
convertcraft – Loved the layout today; clean, simple, and genuinely user-friendly overall.
усиление ссылок переходами prodvizhenie-sajtov-v-moskve16.ru .
boostsignals – Navigation felt smooth, found everything quickly without any confusing steps.
раскрутка и продвижение сайта prodvizhenie-sajtov-v-moskve16.ru .
We’re a group of volunteers and starting a new scheme in our community. Your site provided us with valuable information to work on. You have done an impressive job and our whole community will be thankful to you.
ranktarget – Bookmarked this immediately, planning to revisit for updates and inspiration.
leadpipeline – Navigation felt smooth, found everything quickly without any confusing steps.
searchmetrics – Overall, professional vibe here; trustworthy, polished, and pleasantly minimal throughout.
searchsignals – Appreciate the typography choices; comfortable spacing improved my reading experience.
rankstrategy – Color palette felt calming, nothing distracting, just focused, thoughtful design.
adzio – Bookmarked this immediately, planning to revisit for updates and inspiration.
как мастурбировать до оргазма
Профессиональная веб-студия разрабатывает сайты под ключ и занимается их эффективным SEO-продвижением. Помогает бизнесу заявлять о себе в сети и увеличивать продажи. Подробнее об услугах на сайте: сколько стоит поддержка сайта
Ароматные подарки ручной работы создаются с особым вниманием к деталям и эстетике. Они могут стать стильным украшением интерьера и приятным элементом домашней атмосферы. Посмотреть идеи подарков можно по ссылке: https://aroma-lavka.ru/
When someone writes an piece of writing he/she keeps the idea of a user in his/her mind that how a user can know it. So that’s why this paragraph is amazing. Thanks!
ремонт ванной комнаты плитка ремонт ванной и санузла
продвижение сайтов трафик на сайт продвижение сайтов трафик на сайт .
devwave – Found practical insights today; sharing this article with colleagues later.
xyrotech – Pages loaded fast, images appeared sharp, and formatting stayed consistent.
cybernexus – Color palette felt calming, nothing distracting, just focused, thoughtful design.
nexonbyte – Loved the layout today; clean, simple, and genuinely user-friendly overall.
zentrotech – Color palette felt calming, nothing distracting, just focused, thoughtful design.
топ digital компаний россии luchshie-digital-agencstva.ru .
продвижение трафика prodvizhenie-sajtov-po-trafiku10.ru .
диджитал агентства москвы диджитал агентства москвы .
which internet partner prodvizhenie-sajtov-po-trafiku10.ru .
Co wyróżnia Slottica na tle innych stron podobnych do Kasyno Total? Lobby gier stale rośnie dzięki współpracy z uznanymi studiami developerskimi, takimi jak Maskot Gaming, BGaming, Play’n Go, Gamzix, NetEnt oraz Playson. Dzięki temu gracze mają dostęp zarówno do klasycznych automatów, jak i nowoczesnych slotów z rozbudowaną grafiką i dodatkowymi funkcjami bonusowymi. Platforma obsługuje wygodne formy płatności, w tym BLIK kompatybilny z bankami mBank, ING, PKO BP, Pekao i Millennium, a także popularne karty Visa i Mastercard (Maestro). Pozytywne opinie użytkowników publikowane w serwisach Trustpilot oraz Opinie.com potwierdzają wysoki poziom zaufania do marki. Miłośnicy gry na smartfonach mogą korzystać z dedykowanej aplikacji dostępnej na urządzenia z systemem iOS oraz Android, która zapewnia płynną i stabilną rozgrywkę. Slottica to nie tylko polskie kasyno internetowe, lecz także przestrzeń, w której możesz cieszyć się grą i wygrywać na własnych zasadach.
нехуй пиздить чужой контент
заказать продающий сайт kak-prodat-sajt.ru .
рейтинг компаний по продвижению сайтов рейтинг компаний по продвижению сайтов .
продвижение трафика prodvizhenie-sajtov-po-trafiku11.ru .
google посещаемость сайта google посещаемость сайта .
рейтинг digital агентств москвы рейтинг digital агентств москвы .
статьи про digital маркетинг статьи про digital маркетинг .
techsnap – Content reads clearly, helpful examples made concepts easy to grasp.
bytecraft – Loved the layout today; clean, simple, and genuinely user-friendly overall.
интернет маркетинг агентство интернет маркетинг агентство .
seo продвижение по трафику seo продвижение по трафику .
оптимизация сайта блог оптимизация сайта блог .
сделать аудит сайта цена сделать аудит сайта цена .
заказать сео анализ сайта пушка заказать сео анализ сайта пушка .
google посещаемость сайта google посещаемость сайта .
seo рейтинг seo рейтинг .
рейтинг агентств digital маркетинга luchshie-digital-agencstva.ru .
раскрутка сайта по трафику prodvizhenie-sajtov-po-trafiku11.ru .
блог про продвижение сайтов блог про продвижение сайтов .
продвижение сайтов во франции продвижение сайтов во франции .
сео центр сео центр .
список seo агентств список seo агентств .
продвижение сайтов во франции продвижение сайтов во франции .
growthmarketing – Appreciate the typography choices; comfortable spacing improved my reading experience.
socialmarketing – Overall, professional vibe here; trustworthy, polished, and pleasantly minimal throughout.
seo аудит веб сайта seo аудит веб сайта .
продвижение сайтов во франции продвижение сайтов во франции .
каталог seo агентств каталог seo агентств .
оптимизация сайта франция оптимизация сайта франция .
internetagentur seo internetagentur seo .
технического аудита сайта технического аудита сайта .
топ 10 сео компаний топ 10 сео компаний .
продвижение сайтов в москве продвижение сайтов в москве .
успешные seo кейсы санкт петербург успешные seo кейсы санкт петербург .
успешные seo кейсы санкт петербург успешные seo кейсы санкт петербург .
продвижение сайтов продвижение сайтов .
продвижение сайта франция продвижение сайта франция .
seo агентство seo агентство .
לשבת ואז להישען לאחור. הבד הקריר כיסה את הסדינים והרגשתי את בליטות האווז מתרוצצות על העור. שכבתי והסתכלתי על התקרה והקשבתי לו נע בחדר. אפשר היה לשמוע אותו מוריד חולצת טריקורשרוש קל לעשות. לא התקשרנו לשוטריםפחדנו שוויטק יחזור. אבל ידעתי שהערב הזה שבר אותנו. אשתי, הבית שלי, החיים שליהכל הלך לעזאזל בגלל בדלן שיכור שזיין אותה בזמן שצפיתי בפראייר מוחלט. . נערות https://niigata-classicstreet.com/
seo продвижение рейтинг компаний seo продвижение рейтинг компаний .
продвижение сайтов интернет магазины в москве продвижение сайтов интернет магазины в москве .
internetagentur seo internetagentur seo .
оптимизация сайта франция оптимизация сайта франция .
закупка ссылок в гугл заказать услугу агентство закупка ссылок в гугл заказать услугу агентство .
комплексное продвижение сайтов москва комплексное продвижение сайтов москва .
seo network seo network .
ванны ключ ремонт ванной https://remont-vannoy-spb.ru
сео агентство сео агентство .
https://www.art-electro.com.ua/
раскрутка и продвижение сайта prodvizhenie-sajtov-v-moskve15.ru .
продвижение в google продвижение в google .
Go to our website now > http://madguy.ru/images/pgs/1xbet_promokod_pri_registracii_bonus_5.html
продвижение сайтов во франции prodvizhenie-sajtov-v-moskve15.ru .
заказать анализ сайта prodvizhenie-sajtov-v-moskve15.ru .
seo expert agency reiting-seo-kompaniy.ru .
продвижение сайта продвижение сайта .
Саморезы по металлу востребованы в проектах, где крепеж должен работать стабильно, а монтаж должен идти быстро и без лишних сложностей Это удобно для регулярных поставок и серийной сборки https://metizy-optom-moskva.ru/
продвижение корпоративного сайта омск продвижение корпоративного сайта омск .
продвижение сайта продвижение сайта .
При расчете стоит учитывать не только площадь, но и все нюансы помещения, влияющие на монтаж https://notebooklm.google.com/notebook/8313ee60-514a-4d5c-b2ec-4f8019a647d2
btcusa – Loved the layout today; clean, simple, and genuinely user-friendly overall.
продвижение сайтов в москве продвижение сайтов в москве .
продвижение корпоративного сайта омск продвижение корпоративного сайта омск .
лучшие seo агентства лучшие seo агентства .
References:
Rules of blackjack
References:
https://www.investagrams.com/Profile/poole3700850
Все самое свежее здесь: https://l-parfum.ru/catalog/Salvatore_Ferragamo/
порно на йоге в HD порно на йоге в HD .
инъекционное усиление грунта цена usilenie-gruntov-1.ru .
капитальный ремонт здания это капитальный ремонт здания это .
комплексное продвижение сайтов москва prodvizhenie-sajtov-v-moskve15.ru .
услуги продвижения сайтов омск услуги продвижения сайтов омск .
сео агентство сео агентство .
1xbet yeni adresi 1xbet-47.com .
Sufity napinane szybko odmieniają wygląd wnętrza. To rozwiązanie ukrywa nierówności stropu i poprawia estetykę. Popularne są też profile cieniowe i światło obwodowe, a pomieszczenie zyskuje świeży charakter: https://sufity-napinane-wroclaw.pl/
на йоге секс видео на йоге секс видео .
References:
High winds casino
References:
https://morphomics.science/wiki/Bitcoin_Casino_Multiaward_Winning_Crypto_Casino
1 xbet giri? 1 xbet giri? .
1x giri? 1xbet-49.com .
проект капитального ремонта здания remont-zdaniya-1.ru .
геополимерное усиление грунта usilenie-gruntov-1.ru .
marketingautomation – Content reads clearly, helpful examples made concepts easy to grasp.
birxbet giri? 1xbet-47.com .
analyticsreport – Appreciate the typography choices; comfortable spacing improved my reading experience.
секс на занятии йогой секс на занятии йогой .
reachriver – Found practical insights today; sharing this article with colleagues later.
1xbet giri? linki 1xbet-52.com .
References:
Craps system
References:
https://case.edu/cgi-bin/newsline.pl?URL=https://rojas-gottlieb-2.mdwrite.net/official-website-pokiesurf-casino-in-au-2026
Howdy! This post could not be written any better! Reading through this post reminds me of my good old room mate! He always kept talking about this. I will forward this article to him. Pretty sure he will have a good read. Many thanks for sharing!
1xbet ?yelik 1xbet ?yelik .
усиление грунта под дорожным полотном usilenie-gruntov-1.ru .
гидроизоляция подвала цена за м2 гидроизоляция подвала цена за м2 .
References:
Casinos en bogota
References:
https://bookmarks4.men/story.php?title=best-australian-online-casinos-for-real-money-in-2026
References:
Online slots usa
References:
https://test.najaed.com/user/bitefaucet4
1xbet g?ncel 1xbet g?ncel .
References:
Queens casino
References:
http://cqr3d.ru/user/mindfaucet4/
услуги гидроизоляции подвала gidroizolyacziya-podvalov.ru .
ремонт бетонных конструкций компания ремонт бетонных конструкций компания .
усиление грунта под монолитным фундаментом usilenie-gruntov-1.ru .
1xbet resmi 1xbet-53.com .
ремонт бетонных конструкций гидроизоляция remont-betona-1.ru .
1xbet g?ncel 1xbet g?ncel .
инъектирование грунта цена инъектирование грунта цена .
1xbet tr giri? 1xbet-48.com .
ремонт бетонных конструкций гарантия remont-betona-1.ru .
1xbet tr 1xbet tr .
йога порно онлайн йога порно онлайн .
ремонт в подвале ремонт в подвале .
1x giri? 1xbet-54.com .
порно на занятии йогой порно на занятии йогой .
ремонт подвального помещения gidroizolyacziya-podvalov.ru .
netamplify – Mobile version looks perfect; no glitches, fast scrolling, crisp text.
leadcircuit – Navigation felt smooth, found everything quickly without any confusing steps.
xbet xbet .
https://chipstarscasino.website/
https://tower-rush-gamess.com/
гидроизоляция подвала цена за м2 гидроизоляция подвала цена за м2 .
1x bet 1x bet .
ремонт бетонных конструкций трещины ремонт бетонных конструкций трещины .
цены на букеты цветов https://zakazat-cveti-moskva.ru .
bahis sitesi 1xbet bahis sitesi 1xbet .
Заказывали модульный дом для дачи и были приятно удивлены качеством исполнения. Все элементы изготовлены точно, без дефектов. Установка заняла всего несколько дней. Внутри дом выглядит современно и аккуратно. Отличное решение для отдыха за городом https://modul66.ru/
Заказывали сборку шкафа-купе и остались приятно удивлены скоростью и качеством. Мастер быстро разобрался с конструкцией и аккуратно всё собрал. Двери ходят плавно, ничего не скрипит. Все детали установлены точно и надежно. Отличный результат без лишних хлопот – Сборка мебели
1xbet giri? 1xbet giri? .
ремонт бетонных конструкций промышленный объект remont-betona-1.ru .
1xbet t?rkiye giri? 1xbet t?rkiye giri? .
1xbet giri? 1xbet giri? .
1xbet tr giri? 1xbet-giris-27.com .
доставка букет цветов москва заказать недорого https://zakazat-cveti-moskva.ru/ .
1xbet 1xbet .
1xbet resmi 1xbet-giris-30.com .
заказать дизайн проект загородного дома дизайн проект интерьера коттеджа
Последние обновления: https://bio.site/dezavtor1
one x bet 1xbet-giris-34.com .
букет цветов купить в москве с доставкой https://zakazat-cveti-moskva.ru/ .
1xbet turkey 1xbet turkey .
интернет магазин букет http://zakazat-cveti-moskva.ru .
1xbet yeni giri? adresi [url=https://1xbet-giris-30.com/]1xbet yeni giri? adresi[/url] .
джет тон промокоды
1x giri? 1x giri? .
ремонт и реконструкция зданий ремонт и реконструкция зданий .
1xbet yeni giri? 1xbet yeni giri? .
References:
Pills that make you gain muscle fast
References:
https://gitea.nongnghiepso.com/lashaybess8481/career.abuissa.com2012/wiki/Dianabol-Benefits%2C-Side-Effects%2C-and-DBOL-Steroid-Alternatives-That-Work
1xbet 1xbet .
реконструкция и ремонт зданий и сооружений реконструкция и ремонт зданий и сооружений .
birxbet giri? birxbet giri? .
References:
Why do anabolic steroids differ from other illegal drugs?
References:
https://social.midnightdreamsreborns.com/read-blog/241321_hi-tech-dianabol-tablets-90-each-delivery-or-pickup-near-me.html
1xbet tr giri? 1xbet tr giri? .
References:
How to get steroids from a doctor
References:
https://repositories.action2quare.com/melindaestrada
References:
Bodybuilding get cut
References:
http://124.223.89.168:8080/karrimault3812
References:
Best steroid websites
References:
http://www.shqkxh.org:3000/yvharlette1676/sigma-talenta.com1996/wiki/Dianabol-Prohormone-Hi-Tech-Pharmaceuticals
доставка цветов недорогие букеты https://zakazat-cveti-moskva.ru/ .
References:
What are anabolic steroids used for
References:
https://skillrizen.com/profile/lawannacunning
1xbet tr giri? 1xbet tr giri? .
капитальный ремонт помещений remont-zdaniya-1.ru .
1x bet giri? 1xbet-giris-37.com .
Hi everyone, it’s my first visit at this website, and post is in fact fruitful designed for me, keep up posting these types of content.
1 xbet 1xbet-giris-33.com .
казик jet ton
1xbet tr 1xbet tr .
leadmagnet – Overall, professional vibe here; trustworthy, polished, and pleasantly minimal throughout.
1xbet resmi 1xbet-giris-43.com .
clickedge – Pages loaded fast, images appeared sharp, and formatting stayed consistent.
1xbet com giri? 1xbet-giris-33.com .
реферат нейросеть реферат нейросеть .
нейросеть студент бот нейросеть студент бот .
нейросеть реферат онлайн нейросеть реферат онлайн .
References:
Steroid side effects long term
References:
https://git.jerl.dev/mickieswafford/mickie2007/wiki/CrazyBulk+D-Bal+Reviews%3A+Is+it+Worth+Your+Money+in+2026%3F.-
нейросеть для школьников и студентов nejroset-dlya-referatov.ru .
нейросеть для школьников и студентов nejroset-dlya-referatov-1.ru .
нейросеть студент бот нейросеть студент бот .
нейросети для студентов нейросети для студентов .
Новое в категории: https://domstav.ru
jetton промокод
нейросеть для школьников и студентов nejroset-dlya-referatov.ru .
заказать цветы москва с доставкой недорого https://www.dostavka-cvetov-moskva495.ru .
References:
Steroids prescription
References:
https://galleryauxburg.com/en/BLOG/index.php/;focus=STRATP_com_cm4all_wdn_Flatpress_51982244&path=?x=entry:entry240807-195448;comments:1
умная нейросеть для учебы nejroset-dlya-referatov-3.ru .
нейросеть реферат нейросеть реферат .
ии для учебы студентов nejroset-dlya-referatov-1.ru .
дизайн интерьера типовая квартиры дизайн проект квартиры
References:
Drug steroids
References:
http://www.szfzhemmingen.de/Startseite/index.php/;focus=STRATP_com_cm4all_wdn_Flatpress_9648037&path=?x=entry:entry190807-113342;comments:1
References:
Do steroids make you fat
References:
https://www.jaegerhof-bergneustadt.de/aktuelles/index.php/;focus=STRATP_com_cm4all_wdn_Flatpress_34914428&frame=STRATP_com_cm4all_wdn_Flatpress_34914428?x=entry:entry230424-162416;comments:1
resultsfirst – Overall, professional vibe here; trustworthy, polished, and pleasantly minimal throughout.
References:
Anabolic and hyperbolic are the two main types of steroids.
References:
http://scw1946.de/index.php/;focus=STRATP_com_cm4all_wdn_Flatpress_22342930&path=&frame=STRATP_com_cm4all_wdn_Flatpress_22342930?x=entry:entry230611-203503%3Bcomments:1
1xbet g?ncel 1xbet g?ncel .
дизайнеры спб квартир дизайнер интерьера заказать проект
References:
Tren fat burner
References:
https://www.lippoldshausen.org/index.php/;focus=STRATP_com_cm4all_wdn_Flatpress_48233805&frame=STRATP_com_cm4all_wdn_Flatpress_48233805?x=entry:entry240314-100929;comments:1
сайт для рефератов сайт для рефератов .
ии для учебы студентов ии для учебы студентов .
нейросеть студент бот нейросеть студент бот .
нейросеть для студентов онлайн nejroset-dlya-referatov-6.ru .
нейросеть для учебы нейросеть для учебы .
цветы с доставкой москва недорого https://dostavka-cvetov-moskva495.ru .
нейросеть генерации текстов для студентов нейросеть генерации текстов для студентов .
нейросеть онлайн для учебы nejroset-dlya-referatov.ru .
1xbet spor bahislerinin adresi 1xbet spor bahislerinin adresi .
ии для студентов ии для студентов .
нейросеть для учебы онлайн nejroset-dlya-referatov-5.ru .
нейросеть для студентов нейросеть для студентов .
нейросеть для студентов нейросеть для студентов .
ии для школьников и студентов nejroset-dlya-referatov.ru .
нейросети для студентов нейросети для студентов .
ии реферат ии реферат .
секс с женой друга секс с женой друга .
умная нейросеть для учебы умная нейросеть для учебы .
реферат нейросеть реферат нейросеть .
цветы заказать с доставкой москва недорого http://dostavka-cvetov-moskva495.ru/ .
ии для учебы студентов nejroset-dlya-referatov.ru .
hd ролики с женой друга hd ролики с женой друга .
сделать реферат сделать реферат .
нейросеть студент бот нейросеть студент бот .
ии для студентов nejroset-dlya-referatov-5.ru .
секс с женой друга секс с женой друга .
ии для студентов nejroset-dlya-referatov-6.ru .
нейросеть для учебы онлайн нейросеть для учебы онлайн .
ии для студентов nejroset-dlya-referatov-1.ru .
нейросеть для рефератов нейросеть для рефератов .
нейросеть для учебы nejroset-dlya-referatov-7.ru .
букет купить в москве недорого http://dostavka-cvetov-moskva495.ru/ .
ии для школьников и студентов ии для школьников и студентов .
нейросеть генерации текстов для студентов nejroset-dlya-referatov-5.ru .
нейросеть генерации текстов для студентов nejroset-dlya-referatov-6.ru .
нейросети для студентов нейросети для студентов .
пришел к жене друга пришел к жене друга .
нейросеть для учебы онлайн nejroset-dlya-referatov-7.ru .
clicksthatsell – Color palette felt calming, nothing distracting, just focused, thoughtful design.
нейросеть для школьников и студентов nejroset-dlya-referatov-6.ru .
clickorbit – Mobile version looks perfect; no glitches, fast scrolling, crisp text.
лучшая нейросеть для учебы лучшая нейросеть для учебы .
highroi – Content reads clearly, helpful examples made concepts easy to grasp.
порно с другом мужа порно с другом мужа .
металлический значок доты значки металл срочно москва
цветы доставка дешево москва http://www.dostavka-cvetov-moskva495.ru/ .
продвижение веб сайтов москва prodvizhenie-sajtov-v-moskve4.ru .
нейросеть студент бот нейросеть студент бот .
запоминаемость слогана реклама reklamnyj-kreativ14.ru .
продвижение сайтов продвижение сайтов .
ии анализ рекламы ии анализ рекламы .
анализ карточек маркетплейс [url=https://reklamnyj-kreativ12.ru/]reklamnyj-kreativ12.ru[/url] .
mostbet apk mostbet apk .
Поведенческие показатели помогают оценить качество контента и удобство сайта. Чем выше активность пользователей, тем лучше результат – накрутка яндекс
интернет продвижение москва [url=https://prodvizhenie-sajtov-v-moskve4.ru/]интернет продвижение москва[/url] .
продвинуть сайт в москве продвинуть сайт в москве .
реферат нейросеть реферат нейросеть .
точность прогноза креативов 95% reklamnyj-kreativ14.ru .
технический переводчик стоимость teh-perevod.ru .
продвижения сайта в google продвижения сайта в google .
ии для школьников и студентов ии для школьников и студентов .
интернет раскрутка internet-agentstvo-prodvizhenie-sajtov-seo.ru .
clickfusion – Navigation felt smooth, found everything quickly without any confusing steps.
прогноз доли выбора карточка прогноз доли выбора карточка .
hyperclick – Bookmarked this immediately, planning to revisit for updates and inspiration.
анализ наружной рекламы reklamnyj-kreativ12.ru .
mostbet app download mostbet app download .
продвижение сайта продвижение сайта .
villas for sale in phuket villas for sale in phuket .
luxury real estate phuket real-estate-for-sale-in-phuket.com .
phuket villas for sale thailand villas-for-sale-in-phuket-1.com .
condo for sale in phuket apartments-for-sale-in-phuket-1.com .
investment apartments for sale in phuket apartments-for-sale-in-phuket.com .
clickifypro – Found practical insights today; sharing this article with colleagues later.
I take pleasure in, cause I discovered exactly what I used to be taking a look for. You have ended my 4 day lengthy hunt! God Bless you man. Have a nice day. Bye
профессиональное продвижение сайтов internet-agentstvo-prodvizhenie-sajtov-seo.ru .
сервис анализа креативов сервис анализа креативов .
mostbet apk download mostbet apk download .
luxury real estate phuket real-estate-for-sale-in-phuket.com .
condos in phuket for sale condos in phuket for sale .
freehold apartments for sale in phuket apartments-for-sale-in-phuket.com .
luxury villas phuket for sale villas-for-sale-in-phuket-1.com .
ии анализ рекламы ии анализ рекламы .
технического аудита сайта технического аудита сайта .
согласование перепланировки в москве согласование перепланировки в москве .
luxury villas phuket for sale [url=https://villas-for-sale-in-phuket.com/]villas-for-sale-in-phuket.com[/url] .
phuket property for sale phuket property for sale .
freehold apartments for sale in phuket apartments-for-sale-in-phuket-1.com .
cheap phuket apartments for sale apartments-for-sale-in-phuket.com .
узаконивание перепланировки квартиры pereplanirovka-kvartir11.ru .
seo partner program internet-agentstvo-prodvizhenie-sajtov-seo.ru .
точность прогноза креативов 95% reklamnyj-kreativ12.ru .
перевод технического текста в москве teh-perevod.ru .
luxury villas in phuket for sale thailand villas-for-sale-in-phuket-1.com .
Старый паркет? шлифовка паркета в спб профессиональное восстановление деревянного пола без пыли и лишних затрат. Удаляем царапины, потемнения и старое покрытие, возвращаем гладкость и естественный цвет. Используем современное оборудование, выполняем циклевку, шлифовку и лакировку паркета под ключ с гарантией качества и точным соблюдением сроков.
apartments for sale in phuket thailand apartments for sale in phuket thailand .
phuket thailand real estate for sale real-estate-for-sale-in-phuket.com .
apartments for sale phuket apartments for sale phuket .
Hi my family member! I want to say that this post is awesome, great written and come with approximately all significant infos. I would like to see extra posts like this .
технический перевод стоимость teh-perevod.ru .
codespark – Appreciate the typography choices; comfortable spacing improved my reading experience.
condo for sale in phuket apartments-for-sale-in-phuket.com .
techify – Color palette felt calming, nothing distracting, just focused, thoughtful design.
villas for sale phuket thailand villas for sale phuket thailand .
property for sale phuket property for sale phuket .
ии анализ креативов 60 секунд reklamnyj-kreativ12.ru .
clickmetric – Navigation felt smooth, found everything quickly without any confusing steps.
apartments for sale phuket thailand apartments for sale phuket thailand .
технический переводчик услуги teh-perevod.ru .
перепланировка квартиры согласование pereplanirovka-kvartir11.ru .
seo с нуля seo с нуля .
где согласовать перепланировку pereplanirovka-kvartir12.ru .
сео продвижение по трафику clover prodvizhenie-sajta-po-trafiku2.ru .
проект перепланировки и переустройства квартиры проект перепланировки и переустройства квартиры .
Старый паркет? стоимость шлифовки паркета профессиональное восстановление деревянного пола без пыли и лишних затрат. Удаляем царапины, потемнения и старое покрытие, возвращаем гладкость и естественный цвет. Используем современное оборудование, выполняем циклевку, шлифовку и лакировку паркета под ключ с гарантией качества и точным соблюдением сроков.
villas for sale in phuket thailand villas for sale in phuket thailand .
ии реферат ии реферат .
You actually make it appear so easy together with your presentation however I to find this topic to be really something which I think I would never understand. It kind of feels too complex and extremely extensive for me. I am taking a look forward to your next put up, I’ll try to get the grasp of it!
живые цветы с доставкой по москве http://www.cvejie-cveti.ru .
технический переводчик в москве teh-perevod.ru .
узаконивание перепланировки pereplanirovka-kvartir11.ru .
согласование переоборудования квартиры pereplanirovka-kvartir12.ru .
The best is right here: https://blog.spacehey.com/entry?id=2126215
Expand details: https://leetcode.com/u/xxxbp/
Additional Information: https://aitechone.com/casinos-online-confiaveis-2025-gamblermaster-portugal/
нейросеть пишет реферат нейросеть пишет реферат .
перепланировка услуги перепланировка услуги .
seo продвижение сайта по трафику кловер prodvizhenie-sajtov-po-trafiku.ru .
цветы с доставкой подмосковье http://cvejie-cveti.ru/ .
The best is collected here: https://sintenpietrotterdam.nl/migliori-siti-scompiglio-online-per-arbitrio-aams-sopra-italia-2025-vertice-siti-casa-da-gioco-sicuri/
When someone writes an paragraph he/she keeps the thought of a user in his/her brain that how a user can be aware of it. Therefore that’s why this piece of writing is great. Thanks!
продвижение сайта по трафику продвижение сайта по трафику .
заказать проект перепланировки заказать проект перепланировки .
seo интенсив kursy-seo-12.ru .
нейросеть студент бот нейросеть студент бот .
интернет партнер интернет партнер .
Fresh news on Page: https://www.plastexpb.com.br/marriage-and-you-may-knowledge-planning-features/
New in the Category: https://floridaapostille.org/bangladesh-bangladesh-the-current-most-recent-out-of-al-jazeera/
Premium selection: https://ecallc.org/penn-staying-with-hollywood-gambling-establishment-just-after-end-espn-choice/
Top picks for you: https://charma.app/best-online-casinos-within-the-malaysia-2026-ranked-current-review/
интернет партнер интернет партнер .
цветы анонимно https://cvejie-cveti.ru .
заказать проект перепланировки квартиры в москве proekt-pereplanirovki-kvartiry24.ru .
курсы seo kursy-seo-12.ru .
поисковое продвижение инфо сайта увеличить трафик специалисты prodvizhenie-sajtov-po-trafiku.ru .
Right now it appears like BlogEngine is the preferred blogging platform available right now. (from what I’ve read) Is that what you’re using on your blog?
vavada войти vavada войти .
вавада играть вавада играть .
услуги по согласованию перепланировки услуги по согласованию перепланировки .
melbet melbet .
сео продвижение по трафику clover prodvizhenie-sajta-po-trafiku2.ru .
мелбет букмекерская контора официальный мелбет букмекерская контора официальный .
seo продвижение сайта по трафику seo продвижение сайта по трафику .
скачать букмекерскую контору мелбет скачать букмекерскую контору мелбет .
проект перепланировки квартиры в москве проект перепланировки квартиры в москве .
сайт мелбет сайт мелбет .
школа seo kursy-seo-12.ru .
vavada казино рабочее зеркало vavada казино рабочее зеркало .
вавада ставки на спорт вавада ставки на спорт .
мелбет полная версия сайта мелбет полная версия сайта .
согласование перепланировки москва согласование перепланировки москва .
сео продвижение сайта по трафику сео продвижение сайта по трафику .
цветы подарки рядом http://www.cvejie-cveti.ru/ .
скачать мелбет бесплатно скачать мелбет бесплатно .
продвижение сайта по трафику пример договора продвижение сайта по трафику пример договора .
продвижение по трафику без абонентской платы продвижение по трафику без абонентской платы .
мелбет букмекерская контора официальный мелбет букмекерская контора официальный .
скачать вавада на телефон скачать вавада на телефон .
курсы по seo курсы по seo .
мелбет регистрация мелбет регистрация .
vavada ставки vavada ставки .
which internet partner which internet partner .
продвижение сайтов по трафику продвижение сайтов по трафику .
букмекерская компания мелбет букмекерская компания мелбет .
бк vavada бк vavada .
цветы с доставкой московский http://www.cvejie-cveti.ru/ .
Санитарные системы https://bio-ecopro.ru для мероприятий и стройплощадок — аренда мобильных туалетов, умывальников и санитарных модулей. Доставка, обслуживание и вывоз. Надежные решения для фестивалей, концертов, стройки и массовых событий.
Проверенные адвокаты Москвы https://isk1.ru квалифицированная юридическая помощь и защита в суде. Решение сложных правовых споров, сопровождение дел и профессиональный подход к каждому клиенту для достижения результата.
Менопауза и перименопауза https://menopower.ru симптомы, приливы и гормональные изменения. Полезные советы для женщин 45+, рекомендации по здоровью, образу жизни и управлению финансами для комфортного прохождения этого периода.
Компания DARKLUM https://darklum.ru/catalogue предлагает широкий ассортимент светодиодных светильников различного назначения для коммерческих и жилых помещений как внутреннего, так и уличного освещения. В каталоге представлено более 5 000 моделей различных форм-факторов, среди которых Вы без труда сможете выбрать оптимальный вариант.
Промокод Пятёрочка доставка http://reporter63.ru/content/view/785017/promokod-pyaterochka-dostavka-vygodnye-vozmozhnosti-dlya-pokupok-onlajn актуальные скидки и купоны на заказ продуктов онлайн. Получайте выгодные предложения, снижайте стоимость доставки и экономьте на покупках в Пятёрочке с рабочими промокодами.
заказать проект перепланировки заказать проект перепланировки .
мел бет букмекерская контора официальный сайт мел бет букмекерская контора официальный сайт .
PUPIL OF FATE MOTORS https://auto.ae/pupiloffatemotors автосалон премиум авто в Дубае. Продажа роскошных автомобилей, эксклюзивные модели и индивидуальный подбор. Помогаем выбрать, оформить и доставить авто с гарантией качества и высоким уровнем сервиса.
Эко-бытовая химия http://reporter63.ru/content/view/784903/himiya-dlya-uborki-sekrety-effektivnosti-i-bezopasnosti в Санкт-Петербурге — средства для уборки без вредных компонентов. Эффективная очистка, безопасность для здоровья и окружающей среды. Широкий ассортимент и доставка по городу.
Читать далее: https://eleven7.ru/muzhskaja-parfjumerija/
согласование перепланировки в москве согласование перепланировки в москве .
вавада казино официальный сайт вход вавада казино официальный сайт вход .
Modern earth fault indicator monitor the condition of electrical networks and protect equipment. They offer rapid fault detection, high accuracy, and reliability for industrial applications.
букмекерская компания мелбет melbetregistratsiya.ru .
vavada зеркало vavada зеркало .
Купить стройматериалы https://stroyrostov161.ru в Ростове-на-Дону: широкий выбор сыпучих и строительных материалов, включая щебень, песок, цемент, штукатурку и шпатлевку. Быстрая доставка и доступные цены для вашего объекта.
Заборы под ключ https://dachnie-zabory.ru в Москве и области — изготовление и установка ограждений для дома и участка. Профнастил, штакетник, сетка рабица и 3D заборы. Замер, доставка и монтаж с гарантией качества и соблюдением сроков.
мелбет мобильный сайт мелбет мобильный сайт .
Читать расширенную версию: https://prodmagaz.ru
Самое важное сегодня: https://conservaroot.ru
Узнать больше здесь: https://istnews.ru
мелбет официальный сайт мелбет официальный сайт .
Читать расширенную версию: https://admkuzino.ru
Все подробности по ссылке: https://conservaroot.ru
вавада на русском вавада на русском .
вавада официальный вавада официальный .
Узнать больше здесь: https://svetilnik-svetodiodnyj-ulichnyj.ru
Все подробности по ссылке: https://hvd-store.com
Наша лучшая подборка: https://fmob.ru
Последние публикации: https://jeevikaa.com
Полная статья здесь: https://kra-32-at.ru
мелбет официальный мелбет официальный .
нарколог на дом круглосуточно нарколог на дом круглосуточно .
Последние обновления: https://languillc.com
Последние публикации: https://mt-nara.com
Читать расширенную версию: https://formuladomina.ru
Текущие рекомендации: https://miapharmer.com
Лучший выбор дня: https://vimall24.com
Накрутка поведенческих факторов позволяет увеличить вовлеченность пользователей и улучшить показатели сайта. Это может оказать влияние на ранжирование. Узнайте подробности по ссылке: накрутка пф цена
Больше на нашем сайте: https://wareefstore.com
Последние обновления: https://frentian.com
Последние изменения: https://sunrisedyecolor.com
Расширенный обзор: https://marketing99.ru
Подробности на странице: https://loglifeofaghost.com
Последние обновления: https://redevivacidade.com
Полная версия по ссылке: https://tdyasenevo.ru
Наша лучшая подборка: https://da-sever.ru
Самое важное сегодня: https://techtownweb.com
Полная версия по ссылке: https://greenhouse-kazan.ru
melbet зеркало скачать на айфон melbet зеркало скачать на айфон .
vavada online casino официальный сайт vavada online casino официальный сайт .
Расширенная статья здесь: https://richyess.com
Последние обновления: https://protechcz.com
Последние обновления: https://scuzice.org
Подробности внутри: https://radifeelcompany.com
Узнать больше здесь: https://redwayonline.com
Wonderful article! That is the kind of info that are supposed to be shared around the net. Disgrace on the seek engines for not positioning this post higher! Come on over and talk over with my site . Thanks =)
vavada официальный сайт личный кабинет vavada официальный сайт личный кабинет .
buy diazepam
Расширенная статья здесь: https://labotigadelapell.com
Самое интересное: https://olukeyindustry.com
Узнать больше здесь: https://jiuliwindpowerjs.com
Читать расширенную версию: https://kingsunnyct.com
Все подробности по ссылке: https://jiulienergy.com
Все самое свежее здесь: шлифовка старого паркета
Последние изменения: циклевка паркета цена
Самое интересное: стоимость шлифовки паркета
Главные новости: циклевка паркета в спб цены
мелбет бк мелбет бк .
Самое полезное для вас: https://jftairbags.com
a/b тест наружная реклама [url=https://reklamnyj-kreativ13.ru/]reklamnyj-kreativ13.ru[/url] .
генерация генерация .
ии анализ рекламы ии анализ рекламы .
технический перевод в москве teh-perevod.ru .
vavada вход vavada вход .
вавада казино сайт вавада казино сайт .
вызвать нарколога на дом вызвать нарколога на дом .
запоминаемость слогана реклама reklamnyj-kreativ13.ru .
перевод технического текста teh-perevod.ru .
точность прогноза креативов 95% reklamnyj-kreativ12.ru .
Earth fault indicators are compact and efficient devices used to enhance monitoring of electrical networks. Their reliability makes them essential in critical infrastructure. Explore details at the link: earth fault indicator
vavada казино официальный сайт vavada казино официальный сайт .
vavada рабочее зеркало vavada рабочее зеркало .
мелбет онлайн мелбет онлайн .
платный нарколог на дом narkolog-na-dom-v-krasnodare-1.ru .
наркологические клиники в москве частные narkologicheskaya-klinika-trezvyj-vybor.ru .
internet partner internet partner .
выезд нарколога на дом narkolog-na-dom-v-krasnodare.ru .
Лучшее прямо здесь: https://ileabonmachine.com
Текущие рекомендации: https://hhbsteel.com
Только лучшие материалы: https://yiy-elec.com
Новое в категории: https://donquixoteplay.com
Последние публикации: https://kvartirnyj-pereezd11.ru
Посмотреть на сайте: https://katiessweettreats.com
melbet register melbet register .
нарколог на дом круглосуточно нарколог на дом круглосуточно .
seo продвижение по трафику clover seo продвижение по трафику clover .
buy saxenda online
платная наркологическая клиника платная наркологическая клиника .
вызвать нарколога на дом вызвать нарколога на дом .
Все самое свежее здесь: https://gad-elhak.com
Читать далее: https://kazhongao.net
заказать кухню в интернете заказать кухню в интернете .
вызвать нарколога на дом вызвать нарколога на дом .
заказать кухню под размеры zakazat-kuhnyu-9.ru .
аудит продвижения сайта аудит продвижения сайта .
нарколог на дом нарколог на дом .
мелбет букмекерская контора официальный мелбет букмекерская контора официальный .
частного нарколога на дом narkolog-na-dom-v-krasnodare-1.ru .
нейросеть для учебы нейросеть для учебы .
Читать далее: https://hi-456.com
Все подробности по ссылке: https://hrustalnye-torshery.ru
Подробности на странице: https://greenplaza-perm.ru
наркология москва наркология москва .
вызов нарколога на дом вызов нарколога на дом .
заказать кухню с замером zakazat-kuhnyu-10.ru .
Обновления по теме: https://domicamkids.com
Обновления по теме: https://161dm.ru
Только лучшее здесь: https://2flab.com
интернет агентство продвижение сайтов сео интернет агентство продвижение сайтов сео .
вызвать нарколога на дом вызвать нарколога на дом .
vavada казино рабочее зеркало vavada казино рабочее зеркало .
заказать кухню через интернет zakazat-kuhnyu-9.ru .
Все лучшее здесь: https://drel-mikser.ru
Наша лучшая подборка: https://zaprosto-internet.ru
Только лучшие материалы: https://asd-liquid.ru
оптимизация наружки оптимизация наружки .
diva escort london
Читать расширенную версию: https://viborok.ru
Все подробности: https://gimpinfo.ru
Только лучшие материалы: https://rus-pipe.ru
Главные новости: https://nvidia-geforce-gtx-1060.ru
Подробности внутри: https://akkumulyatornyj-shurupovert.ru
вызов нарколога на дом круглосуточно narkolog-na-dom-v-krasnodare-3.ru .
Подробности на странице: https://amd-videokarty.ru
Читать расширенную версию: https://drel-dlya-almaznogo-bureniya.ru
заказать кухню заказать кухню .
нарколог на дом краснодар нарколог на дом краснодар .
врач нарколог на дом narkolog-na-dom-v-krasnodare.ru .
наркология наркология .
заказать кухню в рассрочку zakazat-kuhnyu-9.ru .
бесплатный период upster reklamnyj-kreativ14.ru .
заказать кухню по индивидуальному заказу заказать кухню по индивидуальному заказу .
нарколог на дом краснодар нарколог на дом краснодар .
заказать кухню заказать кухню .
выезд нарколога на дом выезд нарколога на дом .
психолог нарколог психолог нарколог .
улучшение hero карточки улучшение hero карточки .
кухни под заказ кухни под заказ .
заказать кухню по индивидуальным размерам в спб kuhni-spb-49.ru .
поисковое продвижение москва профессиональное продвижение сайтов internet-agentstvo-prodvizhenie-sajtov-seo.ru .
Узнать больше здесь: https://drel-shurupovert-akkumulyatornaya-v-moskve.ru
Все подробности по ссылке: https://drel-ehlektricheskaya-udarnaya.ru
Лучшее прямо здесь: https://drel-s-mikroudarom.ru
заказать кухню по размерам заказать кухню по размерам .
вызвать нарколога на дом вызвать нарколога на дом .
кухни на заказ в санкт-петербурге kuhni-spb-49.ru .
частный нарколог на дом частный нарколог на дом .
база бенчмарков рекламы reklamnyj-kreativ14.ru .
заказать кухню сайт заказать кухню сайт .
аудит продвижения сайта аудит продвижения сайта .
заказать кухню заказать кухню .
нарколог на дом срочно narkolog-na-dom-v-krasnodare-2.ru .
сервис анализа креативов сервис анализа креативов .
продвинуть сайт в москве продвинуть сайт в москве .
кухни на заказ от производителя в спб кухни на заказ от производителя в спб .
где заказать кухню в спб kuhni-spb-51.ru .
кухни на заказ питер kuhni-spb-49.ru .
кухни на заказ от производителя в спб кухни на заказ от производителя в спб .
заказать кухню с доставкой zakazat-kuhnyu-12.ru .
nanotech – Overall, professional vibe here; trustworthy, polished, and pleasantly minimal throughout.
codeshift – Overall, professional vibe here; trustworthy, polished, and pleasantly minimal throughout.
заказать кухню по индивидуальным размерам в спб заказать кухню по индивидуальным размерам в спб .
кухни на заказ спб недорого с ценами kuhni-spb-49.ru .
заказать кухню в спб по индивидуальному проекту kuhni-spb-50.ru .
купить кухню купить кухню .
купить кухню купить кухню .
Промокоды Пятёрочки https://www.time-samara.ru/content/view/785106/transformaciya-sistemy-loyalnosti-v-sovremennom-rossijskom-ritejle актуальные купоны и скидки на продукты и доставку. Получайте бонусы, снижайте стоимость заказов и экономьте на покупках. Только проверенные промокоды для выгодных покупок в Пятёрочке.
Самое интересное: https://geforce-gt-730.ru
Все подробности по ссылке: https://interskol-shurupovert.ru
кухни на заказ в спб цены kuhni-spb-51.ru .
изготовление кухонь на заказ в санкт петербурге kuhni-spb-52.ru .
ленинградские кухни kuhni-spb-50.ru .
частного нарколога на дом narkolog-na-dom-v-krasnodare-3.ru .
кухни на заказ от производителя кухни на заказ от производителя .
заказать кухню заказать кухню .
phuket villas for sale thailand villas-for-sale-in-phuket.com .
buy real estate in phuket real-estate-for-sale-in-phuket.com .
вызов нарколога на дом круглосуточно narkolog-na-dom-v-krasnodare-1.ru .
нарколог на дом недорого narkolog-na-dom-v-krasnodare.ru .
thailand phuket apartments for sale thailand phuket apartments for sale .
кухни под заказ [url=https://kuhni-spb-49.ru/]kuhni-spb-49.ru[/url] .
Проверка авто по VIN https://dtf.ru/luchshii-rating/3585176-top-15-luchshih-servisov-proverki-avto-po-vin-nomeru-reiting-2025-goda ТОП-15 лучших сервисов для анализа истории машины. ДТП, пробег, владельцы и ограничения. Сравните платформы и выберите надежный сервис для безопасной покупки авто.
Промокоды Пятёрочки https://www.time-samara.ru/content/view/785106/transformaciya-sistemy-loyalnosti-v-sovremennom-rossijskom-ritejle актуальные купоны и скидки на продукты и доставку. Получайте бонусы, снижайте стоимость заказов и экономьте на покупках. Только проверенные промокоды для выгодных покупок в Пятёрочке каждый день.
выезд нарколога на дом выезд нарколога на дом .
phuket villas for sale thailand villas-for-sale-in-phuket.com .
заказать кухню каталог заказать кухню каталог .
property for sale in phuket thailand property for sale in phuket thailand .
apartments in phuket thailand for sale apartments-for-sale-in-phuket-1.com .
нарколог на дом в краснодаре narkolog-na-dom-v-krasnodare-1.ru .
кухни на заказ в спб недорого kuhni-spb-49.ru .
кухни от производителя спб недорого и качественно kuhni-spb-51.ru .
вызов нарколога на дом круглосуточно narkolog-na-dom-v-krasnodare.ru .
net seo net seo .
I’m not sure where you are getting your info, but great topic. I needs to spend some time learning much more or understanding more. Thanks for fantastic info I was looking for this info for my mission.
поисковое продвижение портала увеличить трафик специалисты поисковое продвижение портала увеличить трафик специалисты .
luxury villas phuket for sale villas-for-sale-in-phuket-1.com .
References:
Best steroid for fat loss and muscle gain
References:
https://git.ewengadonnaud.xyz/chandraclowes9
homeinsurancemag – Appreciate the typography choices; comfortable spacing improved my reading experience.
References:
Natural steroids for sale
References:
https://gitea.hadi.es/martyh38988355
References:
Steroid for sale online
References:
http://13.230.31.145:8418/stephanyrowcro
References:
Steroid injections bodybuilding
References:
http://www.aionesight.com/rhondamott2146
References:
Deca durabolin pills for sale
References:
https://mycrewdate.com/@leonidaaubry72
вывод из запоя в краснодаре vyvod-iz-zapoya-v-krasnodare-1.ru .
капельница от похмелья vyvod-iz-zapoya-na-domu-samara-1.ru .
вывод из запоя краснодар наркология вывод из запоя краснодар наркология .
luxury apartments for sale phuket apartments-for-sale-in-phuket.com .
References:
Two examples of steroids
References:
https://code.wemediacn.com/gailkeener4152/3174camtalking.com/wiki/Arzneimitteln%2C-die-den-Wirkstoff-enthalten-CLENBUTEROL-HYDROCHLORID
вывод из запоя на дому краснодар вывод из запоя на дому краснодар .
лечение наркомании vyvod-iz-zapoya-na-domu-voronezh.ru .
реабилитация алкоголиков реабилитация алкоголиков .
наркологическая помощь наркологическая помощь .
вывод из запоя на дому краснодар круглосуточно вывод из запоя на дому краснодар круглосуточно .
капельница от запоя vyvod-iz-zapoya-na-domu-samara.ru .
References:
What works as good as steroids
References:
https://www.robots.rip/delilasena6843
References:
Best legal anabolic supplements
References:
https://yaseen.tv/@rogeliodowie21?page=about
References:
Anabolic steroi
References:
https://www.uria.dev/ioladegillern
реабилитация наркоманов vyvod-iz-zapoya-na-domu-voronezh-1.ru .
References:
Are steroids and testosterone the same thing
References:
http://46.202.189.66:3000/georgiaa145465
красивый недорогой букет цветов https://cveti-nederogo.ru .
References:
Steroid results
References:
https://www.italia24.tv/tube/@shannan9050335?page=about
References:
Prednisolone bodybuilding
References:
https://gitea.personalsoftware.space/lorettawickens
References:
How does the abuse of anabolic steroids affect teens
References:
http://gitea.jb1000.com:88/granttrouton67
References:
Difference between prohormones and steroids
References:
https://askmilton.tv/@estellamaclean?page=about
References:
Rx blend clinical strength hair vitamins
References:
https://git.dslak.it/dorie51m935209
вывод из запоя краснодар на дому vyvod-iz-zapoya-v-krasnodare-1.ru .
реабилитация наркоманов vyvod-iz-zapoya-na-domu-samara-1.ru .
вывод из запоя круглосуточно краснодар на дому вывод из запоя круглосуточно краснодар на дому .
реабилитация наркоманов vyvod-iz-zapoya-na-domu-voronezh-2.ru .
вывод из запоя дешево краснодар вывод из запоя дешево краснодар .
вывод из запоя в стационаре краснодара vyvod-iz-zapoya-v-krasnodare-3.ru .
phuket apartments for sale phuket apartments for sale .
нарколог на дом нарколог на дом .
капельница от похмелья vyvod-iz-zapoya-na-domu-voronezh-3.ru .
наркологический центр наркологический центр .
References:
Anabolic performance research
References:
https://gitea.hadi.es/wileyfas332442
References:
Most popular steroids for bodybuilding
References:
http://211.149.155.157:3000/williefuhrmann
References:
Ripped usa muscle
References:
https://git.hanumanit.co.th/rafaelglynn585/rafael2020/wiki/CLENBUTEROL-Uses%2C-Side-Effects%2C-Medicines-%26-FAQs
References:
Anabolic supplements review
References:
https://gitea.fefello.org/millapollack66
кодирование от алкоголизма кодирование от алкоголизма .
References:
Legal steroid injections
References:
http://47.100.212.83:3000/brettfinnegan
References:
Where can i get trenbolone
References:
https://gitea.hadi.es/wileyfas332442
References:
Steroid expert
References:
https://gitea.nkal.me/erin5561781634
быстрый анонимный вывод из запоя на дому vyvod-iz-zapoya-v-krasnodare-1.ru .
букет цветов дешево https://cveti-nederogo.ru/ .
References:
Best muscle building pills 2015
References:
http://43.139.2.237:3000/allanfuhrmann1
наркологический стационар vyvod-iz-zapoya-na-domu-voronezh-2.ru .
лечение наркомании vyvod-iz-zapoya-na-domu-samara-1.ru .
вывод из запоя дешево краснодар вывод из запоя дешево краснодар .
вывод из запоя цены на дому краснодар вывод из запоя цены на дому краснодар .
вывод из запоя круглосуточно краснодар на дому vyvod-iz-zapoya-v-krasnodare-2.ru .
реабилитационный центр от алкоголизма vyvod-iz-zapoya-na-domu-samara.ru .
реабилитационный центр для наркозависимых vyvod-iz-zapoya-na-domu-voronezh.ru .
наркологический стационар vyvod-iz-zapoya-na-domu-voronezh-3.ru .
I’m impressed, I must say. Seldom do I encounter a blog that’s both equally educative and entertaining, and let me tell you, you have hit the nail on the head. The issue is something too few men and women are speaking intelligently about. Now i’m very happy I came across this during my hunt for something regarding this.
реабилитация алкоголиков vyvod-iz-zapoya-na-domu-voronezh-1.ru .
villas for sale in thailand phuket villas for sale in thailand phuket .
наркологический центр наркологический центр .
вывод из запоя стационар краснодар vyvod-iz-zapoya-v-krasnodare-1.ru .
вывод из запоя на дому краснодар круглосуточно вывод из запоя на дому краснодар круглосуточно .
лечение наркомании vyvod-iz-zapoya-na-domu-samara-1.ru .
наркологическая клиника наркологическая клиника .
нарколог вывод из запоя краснодар vyvod-iz-zapoya-v-krasnodare-2.ru .
капельница от запоя vyvod-iz-zapoya-na-domu-samara.ru .
вывод из запоя краснодар на дому анонимно vyvod-iz-zapoya-v-krasnodare-3.ru .
реабилитационный центр от алкоголизма vyvod-iz-zapoya-na-domu-voronezh-3.ru .
наркологическая помощь наркологическая помощь .
дешевые цветы с доставкой https://cveti-nederogo.ru/ .
реабилитационный центр для наркозависимых vyvod-iz-zapoya-na-domu-voronezh-1.ru .
капельница от запоя капельница от запоя .
References:
Can taking steroids affect your period
References:
https://git.ultra.pub/belldennison28/bell2018/wiki/High-Quality+Anabolic+Steroids+for+Sale.-
References:
Closest super supplements
References:
https://gitea.scivigi.com/hymanfiorini22
References:
Natural steroids in food
References:
https://play.talkdrove.cc.nf/@lorenahaugen48?page=about
реабилитационный центр для наркозависимых vyvod-iz-zapoya-na-domu-samara-2.ru .
References:
Best muscle building supplement reviews
References:
https://git.scinalytics.com/alfredomakutz3
References:
Some studies have found a reduced risk for acne among people consuming
References:
http://183.236.243.71:3693/damianreber50/106.52.71.2042285/wiki/Buy-Dianabol-Methandienone-Online-Lab-Tested-%26-99%25-Purity
вывод из запоя цены на дому краснодар вывод из запоя цены на дому краснодар .
наркологическая помощь наркологическая помощь .
капельница от запоя vyvod-iz-zapoya-na-domu-samara.ru .
вывод из запоя краснодар на дому анонимно vyvod-iz-zapoya-v-krasnodare-3.ru .
срочная помощь вывод из запоя краснодар vyvod-iz-zapoya-v-krasnodare-2.ru .
алкоголизм вывод из запоя краснодар vyvod-iz-zapoya-v-krasnodare-1.ru .
реабилитационный центр от алкоголизма vyvod-iz-zapoya-na-domu-voronezh-3.ru .
капельница от запоя vyvod-iz-zapoya-na-domu-voronezh.ru .
References:
Anabolic steroid legal
References:
https://git.binarycat.org/erikax84248213
References:
Where can you buy legal steroids
References:
https://buzzafricanmusic.com/chasitydunaway
References:
Weight gain steroid
References:
https://www.shlakoblock.com/launadunbar831
References:
Reputable steroid sites
References:
https://code.ownwire.net/bufordarringto
References:
Free legal steroids
References:
http://187.216.152.151:9999/ouidalazar5399/7648git2.ne-it.net/wiki/Dianabol-vs-Anavar%3A-Which-is-Better%3F-5-DIFFERENCES%21
References:
Pro annabolic
References:
https://klimaexpress-tube.de/@sarat75105993?page=about
нарколог на дом нарколог на дом .
цветы недорогие и красивые cveti-nederogo.ru .
кодирование от алкоголизма кодирование от алкоголизма .
загрузчик видео с youtube skachat-video-s-youtube-3.ru .
References:
Buy legal anabolic steroids
References:
https://git.lifetop.net/lashawnwille22
реабилитационный центр от алкоголизма vyvod-iz-zapoya-na-domu-samara-2.ru .
References:
Are they on steroids
References:
https://www.krakhead.dev/maryloukline32
отправить букет цветов курьером по москве недорого https://cveti-nederogo.ru .
наркологическая помощь наркологическая помощь .
скачать ролик с ютьюб скачать ролик с ютьюб .
сервис скачивания с ютуба сервис скачивания с ютуба .
Very nice article, just what I wanted to find.
youtube downloader url youtube downloader url .
скачать пин ап казино https://drrebenka.ru
актуальные промокоды алиэкспресс бесплатный промокод алиэкспресс
скачать с ютюб скачать с ютюб .
Volvo спецтехніка https://novosti.stck.me/post/1800412/Kupit-spetstekhniku-SDLG-v-Ukraine/ екскаватори, фронтальні навантажувачі та дорожні машини. Надійність, ефективність і сучасні рішення для будівництва. Продаж, підбір і обслуговування техніки для бізнесу.
References:
Steroid ingredients
References:
https://ztube.com.br/@jacquesbarrien?page=about
смотреть фильмы 2025 фильмы топ
Volvo в Україні купити спецтехніку екскаватори, фронтальні навантажувачі та дорожні машини. Надійність, ефективність і сучасні рішення для будівництва. Продаж, підбір і обслуговування техніки для бізнесу.
References:
Steroid com reviews
References:
https://git.cloudsean.com/martinadon9896
References:
Test pills steroids
References:
https://62.234.182.183/frankiec25889/gitea.scivigi.com5310/wiki/Testosterone-Replacement-Therapy-for-Men-Everything-You%27ve-Ever-Wanted-to-Know-About-TRT-Testosterone-Centers-of-Texas
References:
Legal anabolic steroids in australia
References:
http://www.xngel.com/@bradkurtz71946?page=about
References:
Best supplements to get big and ripped
References:
http://www.jobteck.co.in/companies/do-testosterone-boosters-increase-size/
доставка цветов московский http://www.dostavka-cvetov777.ru/ .
References:
Bodybuilding steroids vs natural
References:
https://code.wemediacn.com/willardscerri4/4439101.37.69.204/wiki/Pygeum-Health-Information-Library
pin up games https://hr-kafedra.ru
References:
Fastest ways to build muscle
References:
http://61.178.84.89:8998/racheltaormina
References:
Npp dosage for cutting
References:
https://www.globaltubedaddy.com/@angelica74689?page=about
References:
What are legal steroids
References:
https://teanurture.online/your-trusted-supplier-for-australian-steroids/
References:
Anabolic steroids for sale
References:
https://www.abgodnessmoto.co.uk/index.php?page=user&action=pub_profile&id=64340&item_type=active&per_page=16
References:
Dianabol pills price
References:
http://code.sz-chaohui.cn/wwikattie17458
References:
Dianabol injection
References:
https://git.mis24.ru/sergiosimoi746
References:
Side effects of steroid use
References:
http://219.157.255.213:25311/adrianhenegar
References:
Pro lab steroids
References:
https://jomowa.com/@milan43x333666
References:
Which steroid is best for muscle gain
References:
https://www.loginscotia.com/veta0493942620
Volvo в Україні https://spectehnika-volvo.mystrikingly.com/ екскаватори, фронтальні навантажувачі та дорожні машини. Надійність, ефективність і сучасні рішення для будівництва. Продаж, підбір і обслуговування техніки для бізнесу.
References:
What are the risks of anabolic steroids
References:
https://git.dieselor.bg/nikinaquin8917
References:
Steroids without lifting
References:
https://rsh-recruitment.nl/employer/topical-corticosteroids-choice-and-application/
References:
Steroids over 40
References:
http://124.223.18.41:10082/vickyhoran9952
References:
Hormone classification chart
References:
http://106.52.165.114:15004/toneyemy324934
References:
Can prednisone help build muscle
References:
https://vyaparappsurat.store/testogreens-max-reviews-2026-legit-or-scam-hidden-truth/
References:
Steroid friendly doctors
References:
http://47.101.59.106:8181/lois43h8567151/8206353/wiki/Endocrine+Effects+of+Repeated+Hot+Thermal+Stress+and+Cold+Water+Immersion+in+Young+Adult+Men
References:
Steroids function
References:
http://8.131.93.145:54082/rosariophares5
References:
Dbol hair loss
References:
https://git.barneo-tech.com/daniloliddell
References:
What is the best steroid to use
References:
https://career.ltu.bg/employer/ostarine-mk-2866-results-before-and-after-pictures-dosages/
References:
Steroid side effects for women
References:
https://gitlab.iplusus.com/ginomacklin55
References:
Prednisone for muscle growth
References:
http://59.110.175.62:4322/tessawillson8
References:
How does the abuse of anabolic steroids affect teens
References:
https://jobstak.jp/companies/testosterone-and-hair-loss-is-there-a-connection/
доставка 24 часа цветы доставка 24 часа цветы .
References:
Testosterone pills steroids
References:
https://joblinksolution.org/employer/testosterone-and-insulin-resistance-in-men-evidence-for-a-complex-bi-directional-relationship/
срочная доставка цветов https://dostavka-cvetov777.ru/ .
доставка цветов в московском районе http://www.dostavka-cvetov777.ru .
Нужны заклепки? заклепки нержавеющие вытяжные 4.8 прочный крепеж для соединения деталей. Алюминиевые, стальные и нержавеющие варианты. Надежность, долговечность и удобство монтажа для различных задач и конструкций.
курьерская доставка цветов москва https://dostavka-cvetov777.ru .
References:
Instant Casino Slots
References:
https://pad.stuve.uni-ulm.de/s/B48apXr5X
References:
Instant Casino VIP Programm
References:
https://myplaceholders.com/News/das-instant-casino-mobile-app-sofort-spielen-ueberall-gewinnen/
Промпты для нейросетей — готовые шаблоны. Рекомендую воспользоваться: промты для ии мультяшные
References:
Instant Casino Slots
References:
http://madk-auto.ru/user/pointcarrot7/
References:
Roulette online echtgeld
References:
http://downarchive.org/user/hairchick05/
office space for lease in new york office rentals nyc
References:
Blackjack online echtgeld
References:
https://notes.io/evjfz
References:
Instant Casino Kontakt
References:
http://ezproxy.cityu.edu.hk/login?url=https://hanffidel.de/
References:
Instant Casino Live Casino
References:
https://urlscan.io/result/019c892c-2c09-71fc-a715-c4f0d1dda0a9/
References:
Pci expansion slot
References:
https://lindhardt-frazier-3.technetbloggers.de/beste-online-spielothek-75-freispiele-ab-1-einzahlung-100-legal-1774630518
Stackshine en.stackshine.io a SaaS cost management platform: subscription control, usage transparency, renewal tracking, and employee offboarding. Optimize your budget and reduce unnecessary software costs.
References:
Golden nugget las vegas nv
References:
https://notes.medien.rwth-aachen.de/k0hPiCrDSHek_4uZvR2iqg/
References:
Online casino echtgeld merkur
References:
https://isowindows.net/user/dryshow32/
Здесь можно узнать подробнее – dall e 2 генерация изображений
References:
Hollywood casino harrisburg
References:
https://noticias-sociales.site/item/599500
References:
Instant Casino Auszahlungsdauer
References:
https://rentry.co/g5t5wktb
Появились вредители? дезинфекция от тараканов в квартире обработка помещений от вирусов, бактерий и насекомых. Современные методы, безопасные средства и опытные специалисты для надежной защиты.
Уничтожение вредителей https://dezinfekciya-mcd.ru/tarakan/ уничтожение бактерий, вирусов и насекомых. Обработка квартир, домов и коммерческих помещений. Безопасные препараты, опытные специалисты и гарантия результата.
Сделать презентацию нейросетью — топ сервисов https://vc.ru/aihub/2842535-prezentatsiya-neurosyetei
Free online games poki com az play without downloading or registering. A large collection of games across various genres: action, puzzles, racing, and strategy. Easily access from any device.
Arizona sports news oxu-az com az football, transfers, and match results in real time. Breaking news, analysis, and reviews. Follow the teams and stay up-to-date with all the state’s sports news.
References:
What are the risks of using anabolic steroids
References:
https://academicbard.com/employer/clenbuterol-side-effects-risks-and-legal-status/
https://mine-drop1.com/
Arizona sports events https://oxu-az.com.az/ football, transfers, and live match results. Latest news, statistics, and reviews for fans and sports enthusiasts.
Free online games https://1001-oyun.com.az the best browser games with no installation required. Huge selection of genres, easy search, and quick launch. Play anytime for free.
References:
Best muscle growth steroids
References:
https://beshortlisted.com/employer/best-testosterone-booster-expert-recommendations-in-2026/
Roblox Download https://www.delta-roblox.com.az Download the game, learn about Roblox Studio features, and learn about security settings. Play, create your own worlds, and protect your account. A complete guide to installing, playing, and using the platform safely.
Выгодно купить кварцевый песок для пескоструя – 100% очистка без забитых сопел! Забудьте о засорах: очищайте металл в разы быстрее. Ваш аппарат скажет спасибо, а результат поразит клиента. Купить кварцевый песок!
References:
Best time to take steroids
References:
http://www.jobaaty.com/employer/stanozolol-oral-liquid
References:
Anabolic-androgenic steroids
References:
https://buyandsellhair.com/author/rosaura83y/
https://mine-drop1.com/
References:
How to get big fast without steroids
References:
https://winesandjobs.com/companies/buy-clenbuterol/
References:
Testosterone steroids
References:
http://xn--289a6fl1aq39i.com/wave/board.php?bo_table=nanum&wr_id=2554
References:
Legal pills
References:
https://fancybox.qa/2026/04/06/can-you-buy-hgh-a-guide-to-safe-and-legal-purchases/
https://mine-drop1.com/
Ultimate playlist resource playlist for running helps you match your current vibe with the perfect Spotify collection.
Нужен кондицинер установка кондиционера пик профессиональный монтаж сплит-систем под ключ. Быстро, аккуратно и с гарантией. Подбор оборудования, установка и настройка с соблюдением всех норм и стандартов.
Обзор червячных хомутов https://teletype.in/@da_revanta/sMB0_AOMqxv как выбрать лучший вариант для надежного крепления. Сравнение материалов, размеров и производителей. Полезные советы по выбору, установке и применению для разных задач.
нужен бот? сделать чат бот бесплатно создавайте ботов для продаж и поддержки клиентов. Интеграции, сценарии, автоответы и аналитика. Простое решение для бизнеса без навыков программирования.
References:
Trusted online steroid suppliers
References:
https://www.demilked.com/author/napkinnapkin3/
Your source https://365sportia.com for international sports coverage football transfer news, Champions League analysis, NBA and NFL updates, and sports collectibles insights
Latest scores https://rtahasports.com game highlights, and player news from the NFL, NBA, NHL, and MLB. Get up-to-date statistics, transfers, and analysis. Follow the games and learn everything about teams and players in real time.
Лучшие бесплатные нейросети 2026 https://vc.ru/aihub/2842546-luchshie-besplatnye-neyroseti-2026-goda
Любишь музыку? музыка рэтро музыка с душой, тексты и композиции. Слушайте онлайн, открывайте новые треки и погружайтесь в атмосферу искреннего творчества.
Любишь музыку? песни российская эстрада музыка с душой, тексты и композиции. Слушайте онлайн, открывайте новые треки и погружайтесь в атмосферу искреннего творчества.
Любишь читать но нет времени? слушать аудиокниги огромный выбор жанров, удобный поиск и качественная озвучка. Наслаждайтесь любимыми произведениями в любое время.
Нужен займ? https://srochno-zaym-online.ru оформление онлайн без справок и поручителей. Быстрое решение, удобная подача заявки и получение денег на карту. Подберите выгодное предложение и получите средства в короткие сроки.
Плоские шайбы нужны для распределения нагрузки и защиты поверхности при затяжке соединения Такой крепеж помогает сократить количество переделок и сохранить стабильный результат на объекте https://metizy-optom-moskva.ru/
Товар или услуга? https://бурза.рф публикуйте объявления и находите товары, услуги и вакансии. Удобный поиск, категории и быстрый доступ к актуальным предложениям.
Только свежие актуальные новости свежие новости политики, экономики, общества и технологий. Актуальные события, аналитика, обзоры и мнения экспертов. Следите за главными новостями страны и мира онлайн в удобном формате каждый день.
References:
Safest anabolic steroid for beginners
References:
https://output.jsbin.com/negacikodo/
Строительные технологии https://universalstroi.su выгодные инвестиции в доступное жилье. Стабильный доход, перспективные проекты и высокий спрос. Получайте прибыль от инновационных решений в строительстве.
Монтажные работы https://montazhstroy.su услуги по установке инженерных систем и конструкций. Быстро, качественно и с гарантией. Выполняем задачи любой сложности для частных и коммерческих объектов.
ответственное хранение вещей стоимость ответственного хранения паллетоместа
Оживить фото нейросетью — главная, нейросеть делать оживленное фото
ответственное хранение оформить сколько стоит ответственное хранение
После установки капсульного дома стало понятно, что даже небольшое пространство может быть максимально функциональным и при этом оставаться уютным https://super-domiki.ru/
заказать дизайн квартиры студия дизайн проект жилой квартиры
заказать интерьер квартиры разработка дизайн проекта интерьера квартиры
References:
Natural steroids pills
References:
http://toxicdolls.com/members/pimplemimosa28/activity/140647/
Effektiver Guide akne behandlung leitfaden hilft bei der Bekampfung von Pickeln und Hautunreinheiten. Ursachen verstehen und Pflege optimieren. Mit dem Akne Behandlung Leitfaden finden Sie passende Losungen fur klare Haut.
References:
Effects steroids have on the body
References:
https://wikimapia.org/external_link?url=https://www.infreiburgzuhause.de/wp-content/pags/trenbolon_kaufen_2.html
https://metallicheskiy-shtaketnik.ru/
Открываешь кейсы KC? промики изи дроп актуальные бонусы и скидки для пользователей. Получайте выгодные предложения, дополнительные возможности и экономьте при использовании сервиса. Все действующие промокоды в одном месте.
References:
Most effective legal steroid
References:
https://adsintro.com/index.php?page=user&action=pub_profile&id=785545
Открываешь кейсы KC? изи дроп промокоды пополнения актуальные бонусы и скидки для пользователей. Получайте выгодные предложения, дополнительные возможности и экономьте при использовании сервиса. Все действующие промокоды в одном месте.
Выбирал новый смартфон и решил заказать именно здесь по совету знакомых. Не пожалел, потому что всё прошло чётко и без лишних хлопот. Сотрудники вежливые, доставка быстрая, товар качественный. Осталось ощущение надёжности и профессионального подхода – сайт где можно купить телефон
Займы онлайн без отказа на https://credit-world.ru – это удобный способ быстро получить деньги без лишних проверок и сложных условий. У нас собрано более 50 МФО, где можно получить деньги практически каждому. Изучите доступные варианты, найти лучший вариант и оформить займ онлайн быстро, получив решение практически сразу.
References:
Buy steroids cycles
References:
https://squareblogs.net/flareband6/buy-trenbolone-a-comprehensive-guide-to-purchasing-and-usage
References:
Are steroids illegal?
References:
https://doc.adminforge.de/s/lHsxal-gUC
bonus code 1win
Office for rent https://rentofficetoday.com/en/ business premises in business centers and commercial buildings. Compare office for rent, private office space for rent, and offices to rent in prime locations. Find the best office rental solutions and rent office space that fits your business needs
противопожарные двери https://dveri-ot-zavoda.ru с доставкой и профессиональной консультацией, посмотрите актуальные решения для разных типов помещений.
References:
Anabol 10
References:
https://topbookmarks.site/item/601283
Сломалась машина? служба эвакуации и помощи на дороге техпомощь на дорогах СПб и Ленобласти: эвакуация, подвоз топлива, запуск двигателя, вытаскивание авто — 24/7. Круглосуточная мобильная служба техпомощи в Санкт?Петербурге и Ленинградской области. Оказываем выездную помощь в любое время: эвакуируем авто, подвозим топливо, помогаем завести двигатель и вытаскиваем застрявшие машины.
Универсальный прецизионный преобразователь давления jumo delos s02 для контроля температуры, давления и других технологических параметров. Удобный интерфейс, точные измерения и возможность интеграции в системы мониторинга.
I really like reading an article that can make people think. Also, many thanks for permitting me to comment!
Нужен промокод? https://prazdnikvrn.ru актуальные бонусы, скидки и акции для пользователей. Используйте рабочие коды, получайте дополнительные преимущества и экономьте при использовании сервиса. Все свежие предложения в одном месте.
Нужна брендированная продукция? https://2ymedia.kz/category/vneshnie-akkumulyatory-power-bank/ ваш надежный партнер в сфере брендинга в Алматы. Мы специализируемся на производстве сувенирной продукции с нанесением логотипа и корпоративной полиграфии. В нашем каталоге вы найдете всё для продвижения бренда: бизнес-сувениры, промо-мерч, текстиль и полиграфическую продукцию. Мы принимаем заказы оптом от 50 единиц, что делает нас доступными как для крупного бизнеса, так и для небольших компаний.
References:
Best steroid to build muscle
References:
https://www.generation-n.at/forums/users/babiesblow4/
Гранитные памятники https://allgranit.ru от производителя в Москве: надёжность и красота на века. Компания Allgranit предлагает гранитные памятники напрямую от производителя — без посредников, переплат и долгих ожиданий. Мы создаём мемориалы, которые сохраняют память о дорогих людях на долгие годы.
Нужен ремонт? ремонт с поэтапной оплатой под ключ, быстро и качественно. Дизайн, отделка, электрика и сантехника. Гарантия на работы и прозрачная смета. Выполняем проекты любой сложности.
References:
Testosterone stack
References:
https://dreevoo.com/profile.php?pid=1055689
If some one needs expert view about running a blog after that i propose him/her to pay a visit this weblog, Keep up the pleasant job.
References:
Risks of using anabolic steroids
References:
http://kriminal-ohlyad.com.ua/user/beltscreen24/
Проблемы с алкоголем? https://www.narkolog-na-dom-vizov.ru срочная помощь при алкогольной и наркотической интоксикации. Вывод из запоя, капельницы и поддержка 24/7. Анонимно, быстро и безопасно с выездом врача на дом.
Лучшее путешествие Джиппинг Ялта горы, каньоны и побережье. Увлекательные маршруты, опытные гиды и яркие впечатления от путешествий по Крыму.
Do you trade cryptocurrencies? bitkelttrade official platform automate your transactions and earn passive income. Smart algorithms analyze the market and help you make decisions. Increase your income and reduce risks with modern technology.
References:
What is a legal steroid
References:
https://pad.stuve.de/s/VGlmx8OzS
Оптовый магазин масло моторное бочка 200л масел и смазок предлагает лучшие цены на бочки 200 литров.
Do you trade cryptocurrencies? bitkelttrade.com ai trading automate your transactions and earn passive income. Smart algorithms analyze the market and help you make decisions. Increase your income and reduce risks with modern technology.
https://starcasino-au.com/
Marka Vavada pojawiła się na scenie w 2017 roku z garścią slotów w ofercie. Od tamtej chwili przeszła długą drogę – dziś w jej katalogu znajdziesz nie tylko automaty, lecz także klasyczne gry stołowe, jackpoty i rozbudowane kasyno na żywo. Z lokalnego debiutanta Vavada stała się graczem globalnym, a w Polsce zdobyła sympatię użytkowników dzięki prostym zasadom, licencji Curaçao oraz wygodnym płatnościom w złotówkach. To konsekwentne podejście sprawia, że marka systematycznie wzmacnia swoją pozycję w świecie iGamingu.
ישבה על מושב הנוסע שלה, אחותי, חייכה, הביטה בי ושאלה אותי בעדינות: ובכן, המתח הוסר? לאחר מכן ניגבתי את שפתיה במפית והתחלתי למרוח שוב את השפתון. כן, המתח הוסר לחלוטין לפחות במשך מכיוון שהוא ידע סוד אחד… לאחר שהעביר את אצבעותיו על שפתיה של נערת ליווי, הוא הכניס את אצבעותיה לפה, אצבעות היד השנייה הושיטו יד לתחת שלה כאשר אצבעותיו חדרו לתוך פי הטבעת הצמוד של https://gaytorontocity.com/