How to Install phpMyAdmin on Ubuntu
Requirements for Installing phpMyAdmin on Ubuntu
Before installing phpMyAdmin, we need to meet some basic requirements:
- A LAMP stack (Linux, Apache, MySQL, and PHP) installed
- PHP 5.2.0 or newer
$ php -v PHP 5.5.9-1ubuntu4.6 (cli) (built: Feb 13 2015 19:17:11) Copyright (c) 1997-2014 The PHP Group Zend Engine v2.5.0, Copyright (c) 1998-2014 Zend Technologies with Zend OPcache v7.0.3, Copyright (c) 1999-2014, by Zend Technologies - The PHP mysql or mysqli extensions
$ php -m | grep mysql mysql mysqli - MySQL 5.0.1 or newer
$ mysql -v Welcome to the MySQL monitor. Commands end with ; or g. Your MySQL connection id is 39 Server version: 5.5.41-0ubuntu0.14.04.1-log (Ubuntu)
Install phpMyAdmin from Ubuntu Packages
The default Ubuntu repositories stay up-to-date with the latest stable releases of phpMyAdmin, and this is the recommended installation process for a production environment.
Step 1: Update Package Index
First, we need to make sure our local server is pulling the latest updates.
sudo apt-get updateStep 2: Install phpMyAdmin Package
Now we can install the latest version of phpMyAdmin.
sudo apt-get install -y phpmyadminStep 3: Configure phpMyAdmin Package
After installing phpMyAdmin, you will be presented with the package configuration screen.
Press the SPACE bar to place an “*” beside “apache2.”
Press TAB to highlight “OK,” then hit ENTER.

Select “apache2” and hit OK.
The installation process will continue until you’re back at another package configuration screen.
Select “Yes” and then hit ENTER at the dbconfig-common screen:
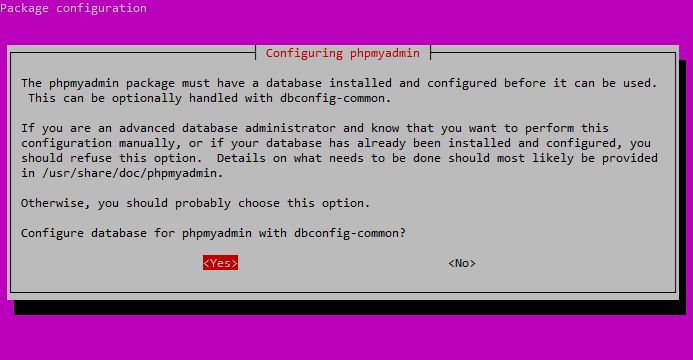
Select “Yes” and hit ENTER.
You will be prompted for your database administrator’s password.
Type it in, hit TAB to highlight “OK,” and then press ENTER.
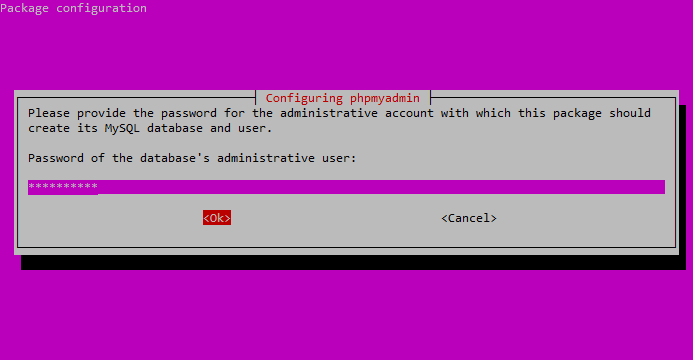
Enter your DB administrator’s password.
Next, enter a password for the phpMyAdmin application itself.
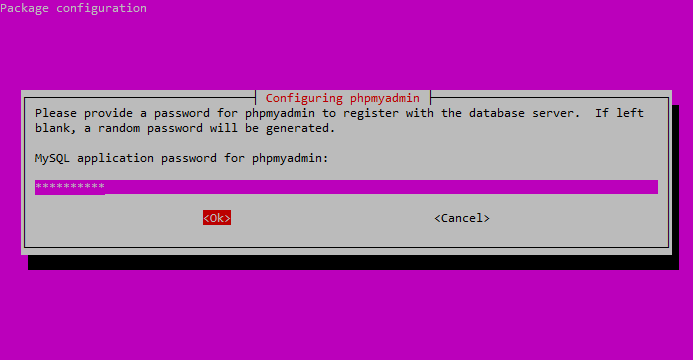
Enter the password you’d like to use to access the phpMyAdmin interface.
Confirm the phpMyAdmin application password.
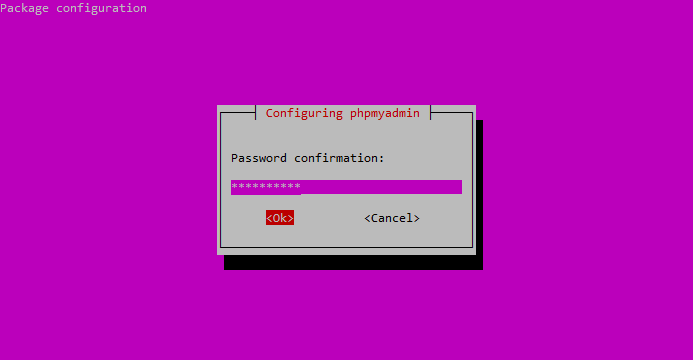
Confirm your phpMyAdmin password.
After the installation process completes, it adds the phpMyAdin configuration file here:
/etc/apache2/conf-enabled/phpmyadmin.conf
Enable PHP mcrypt Module
Check if the PHP mcrypt module is already in use:
php -m | grep mcryptIf you don’t get any results, install the PHP mcrypt module with:
sudo php5enmod mcryptNow when we check, you should see mcrypt enabled:
$ php -m | grep mcrypt
mcrypt
Restart Apache
Now we should restart the Apache web server for changes to take affect:
sudo service apache2 restartAccess phpMyAdmin for the First Time
Now you can log in to phpMyAdmin by going to your server followed by /phpmyadmin.
You can just use http://YOUR_SERVER_IP/phpmyadmin if you don’t have domains set up yet.
Log in with the root user and the password you set for the phpMyAdmin application.

Log in to phpMyAdmin as the root user.
Now you’ll see the phpMyAdmin dashboard.
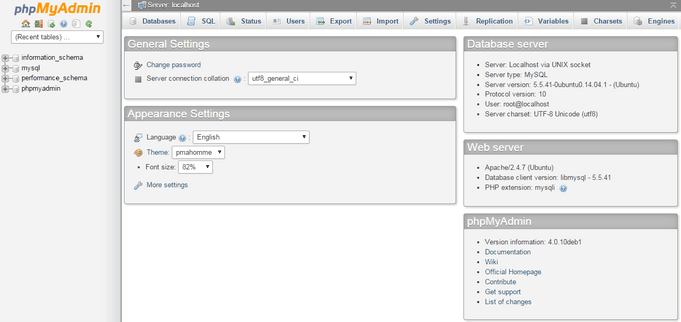
You should now see the phpMyAdmin dashboard.
Secure and Lock Down phpMyAdmin Interface
Naturally, because phpMyAdmin is such a common application installed on many web servers, it is a popular target for unauthorized access attempts. We can easily secure our phpMyAdmin installation by using Apache’s built-in .htaccess authentication.
Step 1: Edit phpMyAdmin’s Apache Config
We want to edit the phpMyAdmin Apache config that was created earlier:
sudo vi /etc/apache2/conf-available/phpmyadmin.confAdd AllowOverride “ALL” directive below the DirectoryIndex:
        Options FollowSymLinks
        DirectoryIndex index.php
        AllowOverride ALL
        ...
Step 2: Restart Apache to Accept Config Changes
Restart Apache so our changes take affect:
sudo service apache2 restartStep 3: Create an .htaccess File
Now that we’ve enabled overrides for our phpMyAdmin application from Apache, we need to actually create an override with an .htaccess file.
sudo vi /usr/share/phpmyadmin/.htaccessAdd this text:
AuthType Basic
AuthName "phpMyAdmin Users Only"
AuthUserFile /etc/phpmyadmin/.htpasswd
Require valid-user
Step 4: Create an .htpasswd File for Authentication
First we need the htpasswd utility. If you don’t already have this installed, use the following:
sudo apt-get install apache2-utilsNow we can create a secure user for our phpMyAdmin application with the command:
$ sudo htpasswd -c /etc/phpmyadmin/.htpasswd phpmyadmin
New password:
Re-type new password:
Adding password for user phpmyadmin
If for some reason you wanted to give others access to the phpMyAdmin login screen but didn’t want them using your .htaccess credentials, you can create additional secure users with:
sudo htpasswd /etc/phpmyadmin/.htpasswd anotheruserNow if you try to access the phpMyAdmin login, you’ll get the .htaccess password prompt first.
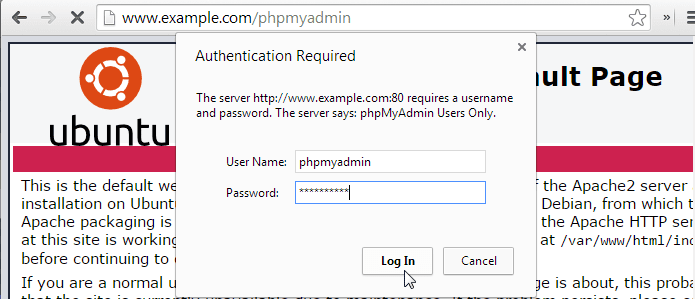
You should now see the .htaccess password prompt we created
Install phpMyAdmin from Source
While it’s not recommended for production servers, because you have to manually ensure your install of phpMyAdmin is kept up-to-date, you can also install phpMyAdmin from source.
Step 1: Identify Apache’s DocumentRoot
We need to find Apache’s DocumentRoot so we know where to place our phpMyAdmin files:
$ grep DocumentRoot /etc/apache2/sites-available/000-default.conf
        DocumentRoot /var/www/html
In this case, we’ll need to put the phpMyAdmin files in /var/www/html.
Step 2: Download Latest Version of phpMyAdmin
The stable version of phpMyAdmin at the time this article was written: phpMyAdmin 4.3.11.1 (released 3/4/2015).
Visit the phpMyAdmin download page to grab the latest version of phpMyAdmin.
I ended up with a phpMyAdmin-4.3.11.1-english.tar.gz file in my /var/www/html directory.
$ cd /var/www/html
$ ls
index.html phpMyAdmin-4.3.11.1-english.tar.gz
Step 3: Unpack phpMyAdmin Files
sudo tar xvzf phpMyAdmin-4.3.11.1-english.tar.gzNow rename the phpMyAdmin-4.3.11.1-english directory:
sudo mv phpMyAdmin-4.3.11.1-english phpmyadminRemove the phpMyAdmin files:
sudo rm phpMyAdmin-4.3.11.1-english.tar.gzStep 4: Secure /phpmyadmin Directory
We want to set up a specific user for our phpMyAdmin install.
$ sudo adduser phpmyadmin
Adding user `phpmyadmin' ...
Adding new group `phpmyadmin' (1001) ...
Adding new user `phpmyadmin' (1001) with group `phpmyadmin' ...
Creating home directory `/home/phpmyadmin' ...
Copying files from `/etc/skel' ...
Enter new UNIX password:
Retype new UNIX password:
passwd: password updated successfully
sudo chown -R phpmyadmin.phpmyadmin /var/www/html/phpmyadminStep 5: Update phpMyAdmin config.inc With Install Wizard
To use the phpMyAdmin install wizard, we first need to set up the config.inc file.
cd /var/www/html/phpmyadmin
sudo mkdir config
sudo chmod o+rw config
sudo cp config.sample.inc.php config/config.inc.php
sudo chmod o+w config/config.inc.php
Step 6: Run phpMyAdmin Install Wizard
To begin the installation of phpMyAdmin, access the installation URL at:
http://example.com/phpmyadmin/setup/index.php
Under the “Servers” section, click on “New Server.”
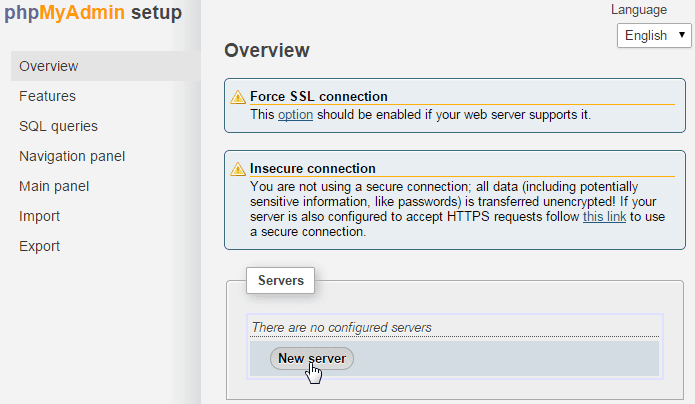
Under the “Servers” section, click on “New Server.”
Under the “Authentication” tab, type in your MySQL root password in the “Password for Config Auth” box and then click “Apply.”
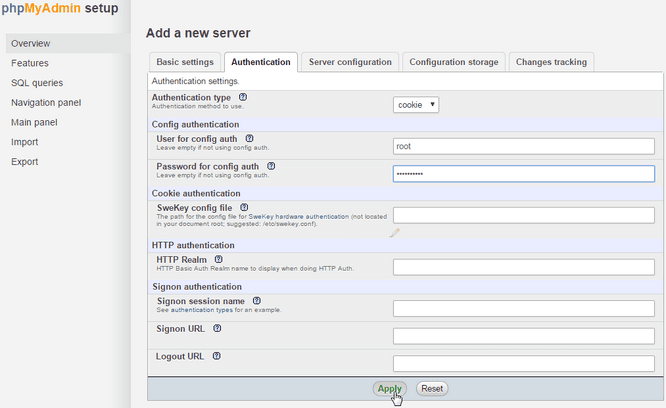
In the “Password for Config Auth” box, type in your MySQL root password.
Remove the phpMyAdmin /config directory for security.
sudo rm -rf /var/www/html/phpmyadmin/configFinal Thoughts on phpMyAdmin
Now that you’ve successfully installed phpMyAdmin on Ubuntu, you can start playing around with some of its more advanced features.
One thing we recommend taking a look at is the “Status” tab, which will display any current MySQL queries that are running on the server, as well as server uptime and the number of connections to the MySQL server.
Ahaa, its pleasant discussion about this article here at this blog, I have read all that, so
at this time me also commenting here.
Also visit my page nordvpn coupons inspiresensation
350fairfax nordvpn special coupon code 2025
Oh my goodness! Awesome article dude! Thank you so much, However I am going
through problems with your RSS. I don’t know the reason why I cannot join it.
Is there anybody else having identical RSS issues? Anybody who knows the answer will you kindly respond?
Thanks!!
The play doesn’t maintain back in terms of
the messier components of love. One jaw-dropping second
comes when a stay podcast proposal flips right into a
prenup bombshell—leaving the viewers (and the characters) gasping.
Might is a month of allowing your self to trust the timing of the universe and never giving
up hope that things are going to turn out fantastically for you.
On Might 12, there’s a Full Moon in fellow water signal, Scorpio, and this
is a time to get inspired and see the advantages of closure.
Many ladies also discover their libido peaks proper earlier than they begin their
interval, as progesterone is naturally falling relative to
testosterone. Your genitals shall be more delicate and it’s easier to orgasm during progesterone withdrawal.
Serotonin is dopamine’s partner – together they’re the 2
major neurotransmitters within the brain. Serotonin can influence your sex
drive whether or not it’s too high or too low.
Sure medications (like SSRIs) may cause excessive levels of serotonin. Dieting and chronically low energy can cause low serotonin, too.
This Full Moon is all about letting go of what doesn’t really feel genuine or
resonate with you emotionally, and about experiencing more closure
and healing within relationship issues. Pluto goes retrograde in Aquarius from Could four till October 13, and this
might be a time of remembering your power when it comes to
your purpose, innovations, and the flexibility to draw
assist into your life. Mercury strikes into Taurus on May 10, making
this a great time for negotiations, creating new plans financially, and sticking to your word on one thing that holds worth to you.
The Full Moon of the month occurs in Scorpio on May 12, and that is the Flower
Moon of the 12 months, signifying growth and seeing the beauty in your life.
Talking of maintaining a wholesome gut, it’s going to
be a lot simpler so that you can do it when you take a probiotic.
These small stressors accumulate, overwork our HPA axis, and
erode our capacity for pleasure and connection. One of an important players here is the limbic system, particularly the amygdala, which
processes fear and security cues, and the nucleus accumbens, which processes pleasure and reward.
When we face a perceived threat—a lion on the
savannah or an overflowing inbox—our our bodies activate
the hypothalamic-pituitary-adrenal (HPA) axis, releasing stress hormones
like cortisol and adrenaline. Again, through the precise
physical act of sex, you should start to see some advantages.
You may be someone who will get anxious during intercourse or is confused throughout it for whatever reason. Of course, dietary
supplements don’t work right away; you’ll have to take
them over some time on your physique to begin getting used to them and adapting to
the modifications. That means you will not only be more up
for having intercourse if a associate wants to, but you
may really feel more enticed to begin the proceedings.
Saturn makes a significant transfer from Pisces into Aries at the end of the
month and enters your ninth home. With Saturn here, you’ll be learning extra about
what mental progress and readability imply to you, and it is a good time to
dedicate yourself to larger education, traveling, gaining a
model new perspective, and honoring your integrity and values.
The Model New Moon of the month is on Might 26, creating magic within your friendships and community.
Food and Drug Administration (FDA) formulated particularly for
girls. Keep reading below to learn extra in regards to the unwanted side effects of testosterone dietary supplements.
You’ll be familiar with estrogen, which is the main female intercourse hormone, however testosterone helps
a woman together with her muscle development, upkeep, cognitive function, musculoskeletal health and might
even work to repair the reproductive tissues, in addition to bone mass.
Your menstrual cycle is like the conductor of
all these hormones and chemicals. As the cycle progresses, hormone ranges naturally rise
and fall, resulting in a shift in your sex drive. When testosterone is deficient or becomes imbalanced—commonly throughout perimenopause,
menopause, or because of sure medical conditions—women can expertise
points like decreased libido, fatigue, temper swings, and lowered muscle tone.
It also can occur early for medical causes, similar
to surgery to take away the ovaries.
Regardless Of the supraphysiological doses of testosterone they administered and their lack of placebo controls, Salmon and Geist (1943) impressed an early interest in testosterone as a remedy for
low libido in girls that continues to this present day.
Five years later, William H. Perloff, a medical
doctor with an curiosity within the mechanism of human sexual behavior, provided early proof that
estradiol steroids Effect on body
its own was additionally capable of growing women’s sexual desire (Perloff, 1949).
Perloff (1949) administered varying dosages of estradiol to his naturally and surgically postmenopausal
patients, who constantly reported elevated sexual want in response to estradiol therapy.
And what are some telling signs that you are low on this particular hormone?
You might really feel a bit depressed;you could
really feel more anxious; you may notice that you just don’t wish to communicate and/or be affectionate with others; you may have less
of an curiosity in sex, and/or it may be tougher so that you can orgasm.
From what I’veread and (briefly) researched, cortisol has
the flexibility to dam your progesterone receptors, which signifies that it could possibly lower them
in case you are too stressed out. And that’s the reason a method you could enhance your progesterone levels is to meditate.Since
meditation can reduce anxiousness, lower stress, and
help you to sleep better, I’m sure you get the way
it can work to get your progesterone levels where they
need to be. Two issues that aren’t the most effective of associates
are testosterone and cortisol (the hormone that creates your
pure stress response). This is a lot the case that when your cortisol levels are excessive, that
may hinder your system from producing all the testosterone
that it wants. Although analysis remains to be ongoing,
there are findings that state that a variety of the properties in black tea will assist
to elevate estrogen levels.
Van Goozen et al. (1997) collected daily sexual activity
data and 12–14 blood samples from 20 feminine members across 1–2 menstrual cycles.
These studies demonstrated that women’s sexual want
persistently exhibited a properly outlined midcycle peak, no matter the measure used to estimate ovulation. Stanislaw and Rice (1988) requested
1,066 ladies to note every day of the month on which they experienced noticeable sexual desire (irrespective of
whether they really engaged in sexual activity on that day).
The authors collected sexual want knowledge for a
outstanding 22,365 menstrual cycles, and found a hanging
midcycle peak in the incidence of women’s self-reported sexual need.
However, we are additionally going through a time
of unsuitable habits, by which ladies are more and more uncovered to emphasize,
little physical exercise, few hours of sleep, unbalanced food plan,
results of these same sources and/or the crucial must entry them.
Lack of sleep or poor quality sleep can disrupt hormone production, including testosterone.
Goal for 7-9 hours of high quality sleep per night time to
make sure optimal hormone stability. Alternatively,
greater testosterone may replicate higher stress in girls.
Testosterone is secreted by the adrenal glands, which go into
overdrive during tense times. She then compared low-versus-high testosterone individuals and their self-reported
levels of need. In males, she discovered, ranges of testosterone had nothing
to do with how a lot guys considered intercourse,
solitary or partnered.
Ein Testosteronmangel kann sich demnach negativ
auf die Libido auswirken. Die Testosteronersatztherapie ist die anerkannte Behandlung eines
niedrigen Testosteronspiegels. Wenn die Anpassungen deines Lebensstils deinen Testosteronwert nicht erhöhen, könnte dein Arzt eine
der folgenden Therapien für dich vorschlagen. Jede dieser
Behandlungen sollte deinen Testosteronspiegel
wieder auf den gewünschten Wert bringen. Du kannst in deinem Alltag Schritte ergreifen, um
deinen Testosteronspiegel zu fördern. Teste diese Veränderungen aus,
um deinen Testosteronwert auf natürliche Weise zu erhöhen.
Bleib dran und sei geduldig mit dir – die Ergebnisse werden sich zeigen. Durch gezieltes Krafttraining
und die Anpassung seiner Ernährung konnte Klaus seinen Testosteronspiegel natürlich steigern. Zinkreiche
Nahrungsmittel wie Fleisch und Nüsse sowie Vitamin D (hier ein hilfreicher Artikel von Gesundheitsinformation.de) wurden Teil seiner täglichen Routine.
Langfristige Einnahme von Steroiden kann zu dauerhaften hormonellen Schäden führen, einschließlich Hodenatrophie,
Unfruchtbarkeit und Herzerkrankungen. Zink, Magnesium
und Vitamin D sind häufig genannte natürliche Supplements,
die bei einem Mangel den Testosteronspiegel fördern können. Pflanzliche Präparate wie Ashwagandha oder Tribulus terrestris werden auch
oft empfohlen, ihre Wirksamkeit ist jedoch nicht eindeutig bewiesen. Es
ist offenbar wichtig, dass du deine Alkoholmenge im Auge behältst und nicht zu viel trinkst,
um deinen Testosteronspiegel zu schützen. Obwohl Testosteron als das „männliche” Geschlechtshormon betrachtet wird, produzieren auch Frauen kleine Mengen in den Eierstöcken und Nebennieren. Höhere Testosteronspiegel bei Frauen können zu einer Verbesserung der Libido, Stimmung und Muskelmasse beitragen. Testosteron hilft auch bei der Regulierung des Stoffwechsels und des sexuellen Verhaltens.
Zwei Arten von Coaching, die besonders effektiv sind, sind Kraftsport und hochintensives Intervalltraining (HIIT). Magnesium unterstützt laut Studien ebenfalls deine Testosteronproduktion (3), indem es die Bioverfügbarkeit deines Testosterons verbessert. Dies schafft Magnesium, indem es das Testosteron dabei hindert, sich mit dem SHBG (Sexualhormon-bindendes Globulin) zu verbinden.
Das wirkt sich auf Grund unserer gesteigerten Lebenserwartung drastisch aus. Durch den Fortschritt der Medizin, dem Besiegen vieler tödlicher Krankheiten und dem Verbannen natürlicher Gefahren, leben wir immer länger. Sport und ausreichend Bewegung sind ginseng für mehr testosteron (Boyd) das Allgemeinwohlbefinden äußerst
empfehlenswert, das gilt auch, um den Testosteronspiegel zu
erhöhen.
Eine optimistic Lebenseinstellung und ein gutes Selbstwertgefühl sind weitere wichtige Faktoren, die
für eine harmonische Hormonverteilung im Körper
sorgen. Wobei besonders fettreiche Nahrungsmittel mit
ungesättigten Fettsäuren, Vitamin C und Vitamin D die Testosteronproduktion nachweislich positiv beeinflussen. Männer produzieren natürlicherweise viel höhere Mengen an Testosteron als Frauen – etwa 10-mal mehr.
Ein niedriger Testosteronspiegel kann bei beiden Geschlechtern negative
Auswirkungen auf Energie, Stimmung und körperliche Funktionen haben, jedoch sind die Symptome bei Frauen oft subtiler.
Beispielsweise in der Welt der Sportergänzungsmittel gibt es eine Vielzahl
von Produkten, die behaupten, den Testosteronspiegel zu erhöhen und
die sportliche Leistung zu steigern.
Eine gesunde Ernährung, Bewegung und Stressmanagement können ebenfalls helfen, den Testosteronspiegel natürlich zu unterstützen. Ein niedriger Testosteronwert kann auf verschiedene Ursachen zurückzuführen sein. Mit gezielten Maßnahmen wie Ernährung, Bewegung und gegebenenfalls medikamentöser
Unterstützung lässt sich der Testosteronspiegel oft steigern.
Hierzu zählt eine ausreichende Zufuhr von Proteinen, gesunden Fetten und Gemüse.
Ausreichend Schlaf ist ebenfalls entscheidend für
die Steigerung von Testosteron. Schlafmangel führt schlimmstenfalls zu einem Mangel an Testosteron. Ob Intercourse wirklich das Testosteron steigern lässt,
ist eine viel diskutierte Frage. In der Tat belegen neue Studien einen Zusammenhang zwischen Geschlechtsverkehr und Testosteronproduktion.
Dès 30 ans, sa production naturelle diminue, ce qui entraîne des conséquences sur l’ensemble de l’organisme.
D’autres facteurs aggravants, comme une mauvaise alimentation, un stress accru ou encore un manque d’exercice physique, peuvent accélérer ce déclin. Voici, selon nous, les booster
testostérone les plus efficaces à l’heure actuelle.
Les booster de testostérone se présentent comme des compléments alimentaires naturels, capables de soutenir la manufacturing de cette hormone et d’en rééquilibrer les niveaux dans l’organisme.
Les boosters de testostérone sont une resolution efficace pour les
hommes qui cherchent à augmenter naturellement leurs niveaux de testostérone, que ce soit pour améliorer leur efficiency physique, leur libido ou
leur bien-être général. En choisissant un produit de qualité avec
des ingrédients efficaces, vous pouvez optimiser vos résultats.
Un utilization prolongé, même de produits naturels, doit idéalement s’accompagner d’un suivi médical, notamment si des troubles hormonaux sont suspectés ou si l’utilisateur présente des pathologies sous-jacentes.
Enfin, le zinc, la vitamine D et les vitamines B5 et B6 assurent un bon équilibre hormonal, en réduisant la
fatigue et en soutenant les défenses immunitaires.
La racine de maca, quant à elle, est traditionnellement utilisée pour soutenir la libido, renforcer la vitalité et améliorer la résistance au stress,
avec un effet global sur l’énergie physique et mentale.
Il est necessary d’avoir une alimentation variée, à base
de légumes crucifères, de viandes rouges, de poissons gras, d’aliments riches en nutriments, en lipides et en protéines, pour soutenir l’action de l’organisme.
Toutefois, leur efficacité requiert des doses parfois élevées, difficile à atteindre avec une alimentation classique.
Les ingrédients proposés dans le commerce sont parfois traités et cultivés dans des circumstances qui
ne permettent pas d’obtenir tous les bénéfices
souhaités.
En prenant un complément, les hommes n’ont pas à passer par le processus rigoureux et invasif des exams sanguins et autres procédures médicales pour simplement confirmer que
leurs hormones diminuent. Mieux vaut souvent anticiper le problème et avoir recours à des boosters de testostérone.
La plupart des hommes associent directement leur masculinité à la capacité
naturelle de produire de la testostérone. Les hommes qui font fréquemment
de l’exercice ont tendance à avoir un taux de testostérone plus élevé que les autres.
Elle facilite le développement de votre masse musculaire et
aussi de votre force. Les deux sont intrinsèquement liées et nécessaires à
une bonne évolution dans le bodybuilding. Avant de vous aventurer dans l’univers complexe de ces produits,
laissez-nous vous guider.
Après avoir recommandé TestoPrime à des centaines
de clients et observé leurs résultats, je
peux affirmer sans hésitation qu’il s’agit Mutation Du Gene
Recepteur A La Testosterone 1 Svt (Jobdoot.Com) booster de testostérone le plus efficace actuellement disponible.
Sa formule scientifiquement optimisée offre des résultats inégalés sur tous les aspects de la santé masculine, sans les effets secondaires des alternatives synthétiques.
Le zinc est connu pour aider à maintenir un bon niveau mais ne l’augmente pas directement.
Testo-Max vous promet des positive aspects musculaires significatifs, d’améliorer vos performances physiques, et de faciliter la récupération sportive.
Comme notre corps ne les fabrique pas, il faudra les trouver dans l’alimentation. Toutefois, les compléments alimentaires
procurent une dose plus importante pour bénéficier de leurs bienfaits.
On voit tout de suite le lien avec les boosters de testostérone et leur
fonction anabolisante. De plus, les BCAA sont aussi excellents pour améliorer la récupération et augmenter le niveau d’énergie des
athlètes.
L’acide D-aspartique peut également aider
à améliorer la qualité et à la production du sperme. Une étude de ninety jours a examiné
les effets de l’acide D-aspartique sur des hommes dont la production de sperme
était altérée. Le nombre de spermatozoïdes
a doublé, passant de 8,2 hundreds of thousands de spermatozoïdes par ml à 16,5 millions de spermatozoïdes par ml.
Lorsque vous voyez un produit contenant les ingrédients
ci-dessous, vous savez qu’il peut réellement aider à augmenter votre taux de testostérone automobile il
utilise des ingrédients testés.
De plus, au niveau sexuel, il stimule le cerveau et améliore
son appétit sexuel. Pour éviter la carence, ces vitamines sont essentielles
pour permettre de bien stimuler l’organisme. En cas
de symptômes ou d’inquiétudes, il est essentiel de consulter un médecin. Enregistrer mon nom, mon e-mail et
mon site dans le navigateur pour mon prochain commentaire.
🥈 Testo-Max s’impose comme le choix idéal pour les sportifs et bodybuilders
grâce à sa concentration report en D-Aspartic Acid et sa formule spécifiquement conçue
pour maximiser la croissance musculaire et la pressure.
L’acide D-aspartique est un ingrédient qui a cliniquement
prouvé sa capacité à soutenir la libération et la synthèse
de l’hormone lutéinisante et favoriser les taux endogènes de testostérone pendant l’entraînement.
Jouant un rôle necessary dans le soutien métabolique,
l’acide D-aspartique peut conduire à augmenter la taille des muscle tissue ainsi qu’à l’augmentation des processus de combustion des graisses naturelles.
Les principaux ingrédients de Check HD ont montré
en laboratoire et lors des essais cliniques une capacité soutenue d’augmenter de manière significative les niveaux de cette hormone androgène.
Ce booster de testostérone est formulé avec des ingrédients scientifiquement confirmés tels que
le shilajit et le bore.
Some studies have proven a rise in testosterone ranges in animals and cell cultures treated with onion extract or quercetin, whereas others have
proven no vital effect. Onions contain a big selection of compounds
that have been suggested to probably influence testosterone ranges.
One such compound is quercetin, a flavonoid that’s found in excessive concentrations in onions.
Quercetin has been proven to have anti-inflammatory,
antioxidant, and anti-cancer properties, however its results on testosterone ranges are nonetheless
being researched. Quercetin has been shown to have anti-inflammatory results and should assist assist a healthy immune system.
Some people claim to have experienced a rise in power, libido, and muscle energy
after consuming onions regularly. Including these meals within the best anabolic steroids
(cementjobbank.com) food regimen might help ensure an sufficient intake of zinc, which in turn can assist wholesome testosterone levels.
It can be worth noting that whereas onions may have potential benefits for
testosterone levels, incorporating a variety of other meals into
your food plan is essential for general health.
Enough protein consumption, common train, and sufficient
sleep are all necessary components in supporting testosterone production. It was demonstrated
that that onion has hypoglycemic effects and can be used as
a dietary complement to manage the progression in patients with type 1 and sort 2 diabetes [61].
Incorporating onions as a part of a balanced diet may be one facet of
maintaining sexual well being. Including onions to your meals can naturally enhance your testosterone ranges and produce alongside
a bunch of other well being perks. They help keep your coronary
heart healthy and scale back inflammation, making them an all-around nice choice for higher wellness.
If you are interested in trying onions as a natural way to enhance your testosterone levels, it’s necessary
to seek the advice of with a healthcare skilled. They
can offer you personalized advice primarily based on your individual health and medical history.
It can differ from individual to individual, however including onions
in your regular food plan can result in a gradual and constant enhance in testosterone ranges.
More research is needed to determine whether or not onions have the identical impact on testosterone ranges in humans.
So a full sex life is not only good for the soul, it can additionally hold the male hormone steadiness in full swing.
Sport not only boosts the body’s personal testosterone manufacturing, it additionally reduces the cortisol stage, which is
considered to be a testosterone “brake”.
Each power and endurance coaching have a stimulating impact – however only as lengthy as they don’t appear to be exaggerated.
Quercetin, a compound found in onions, has been shown to increase testosterone ranges in animal research.
In addition, their total nutritional profile could support hormone production and regulation. Nevertheless, extra research is needed to totally understand the consequences of onions on testosterone in humans.
It is always best to consult with a healthcare professional for personalised recommendation on hormone regulation.
Onion supplements, usually marketed as onion extract or quercetin capsules, might present a variety of the useful compounds present in uncooked onions.
Nonetheless, complete meals contain a fancy
matrix of vitamins that work synergistically, which
is tough to copy in complement type. While some supplements declare to support
testosterone ranges, their effectiveness can range based on dosage, high quality, and absorption rates.
For the most reliable advantages, consuming whole,
recent onions in a balanced food plan is beneficial over relying solely on supplements.
Yes, there are several meals which were instructed to potentially support healthy testosterone ranges.
Moreover, foods wealthy in vitamin D, corresponding to fatty
fish and fortified dairy products, may play a role in testosterone production.
Cooking onions could slightly scale back their capacity to support testosterone manufacturing.
Some of the helpful compounds present in onions, corresponding to phytochemicals and antioxidants, may be partially destroyed or diminished when cooking at high temperatures.
Together With a variety of uncooked and cooked onions in your food plan may help ensure you obtain the potential advantages for testosterone manufacturing together
with other essential nutrients. That being stated, incorporating onions into your
diet can supply various potential health benefits beyond
simply testosterone manufacturing.
Larger studies and extra analysis are required to
verify if consuming raw onions or ingesting onion juice will really influence Testosterone.
Onions can be combined with other testosterone-friendly meals like lean meats and leafy greens
to create a balanced food regimen that helps
hormonal health. Consuming onions provides extra advantages than just potentially growing
testosterone levels. The anti-inflammatory properties of onions come from their sulfur compounds and quercetin.
These can help alleviate inflammation within the body, providing reduction for situations like arthritis and contributing to general health.
As we uncover the truth of this declare, do not overlook
that your path to understanding and managing your testosterone levels is a private one.
Nevertheless, you will want to notice that this examine was conducted on animals and should not directly translate to people.
Nonetheless, you will need to notice that the effects of raw onion consumption on testosterone ranges
alone haven’t been extensively studied. Most studies linking
onion consumption with testosterone have targeted on the potential
health advantages of quercetin supplementation or onion extract somewhat than uncooked onion consumption alone.
Due To This Fact, it is difficult to conclude whether uncooked
onion alone can significantly increase testosterone levels.
Quercetin is a flavonoid found in onions that has been linked to potential testosterone-boosting effects.
TRT supplements Testosterone to revive hormone balance and alleviate low T symptoms corresponding
to fatigue, low libido, and sexual dysfunction. So far,
most studies centered on animals, and further analysis is important to find a
definite link between onions and Testosterone in humans.
And hey, when you’re worried about the scent, simply remember – somewhat unhealthy breath
is a small price to pay for the various benefits of this testosterone-boosting powerhouse.
As a guy who’s all the time looking for ways to keep my testosterone
ranges in examine, I stumbled upon this little-known secret weapon. There’s additionally
some research about both compounds and cancer discount, however more studies are needed, Rizzo
notes.
70918248
References:
what are products that are consumed rapidly and regularly classified as?
(bbs.medicalforum.cn)
Trenbolone enhances nitrogen retention in muscle tissues, resulting in substantial power positive aspects. Customers often report noticeable will increase in their lifting capacity, allowing for extra intense and productive exercises. And I’m not simply speaking about the truth that these guys often increase muscle mass inside a few weeks with no change to their routines. As a personal fitness coach, I have discovered to establish the most typical side effects of steroid use. All anabolic steroids will suppress natural testosterone manufacturing, as the administration of exogenous testosterone causes the body to stop endogenous manufacturing. Trenbolone shouldn’t be stacked with any oral steroids, corresponding to Dianabol, Anadrol, or Winstrol, as a result of their devastating results on levels of cholesterol. Trenbolone acetate and different tren esters are clinically intriguing because of their lesser androgenic and greater anabolic exercise than testosterone esters, like testosterone propionate and cypionate [5].
Nonetheless, when you already battle with mental side effects of steroids (http://www.jindoushiqi.com/bbs/home.php?mod=space&uid=159386) well being or have had a heart attack, proceed with excessive warning. This is frequent whenever you inject Tren acetate and it hits a blood vessel, causing you to uncontrollably cough for around a minute. If you’re a reasonably regular dude, these psychological effects are solely prone to be mild; making Tren very manageable. As a results of this alteration, your actual body temperature can also increase. This is why you can feel hotter and begin to sweat greater than usual (particularly within the night). Turbocharging DHT to unbelievable levels is going to come with a couple of consequences.
I’ll clarify what Trenbolone is, the way it works in the physique, and why it’s useful to make use of it in a cycle. You’ll also get recommendations for Trenbolone cycles based mostly on completely different goals, including bulking, chopping, and lean muscle acquire. Plus, I Will cover dosage suggestions and the best Trenbolone stacks to make use of. Evaluations of Trenbolone point out the severity of effects, a powerful enhance in muscle mass and strength indicators. Whether Or Not bulking or cutting, Trenbolone Acetate for sale in USA might be stacked in your steroid cycle. Doses of Trenbolone Acetate can range relying on the person in addition to his tolerance degree, goal of the cycle and what other steroids are being used inside the cycle. Those who’re in a place to tolerate this potent drug would possibly inject between 500 and 700mg per week.
Consequently, they required post-cycle remedy remedy to resurrect natural endogenous production. Conversely, Anavar is predominantly utilized for its potent fat-burning properties and skill to expel water, growing vascularity and muscle tone. Throughout testosterone supplementation, the pituitary gland alerts the testes to stop producing testosterone, contributing to hypogonadism (3). This process occurs because of supraphysiological ranges of serum testosterone and the body attempting to maintain homeostasis. Testosterone is androgenic in nature; thus, we commonly observe irritation of the prostate, pimples vulgaris, and male sample baldness in patients.
A PCT plan will stimulate natural testosterone restoration and ensure you have sufficient testosterone for correct bodily operate whereas your ranges continue to naturally rise. This will not promote a full restoration by itself, that will still take time, however it will shorten the process. It may also ensure cortisol doesn’t become the dominant hormone when testosterone levels are low for an extended period of time. Regardless of the aim of use, all who complement with Trenbolone Acetate will discover their muscular endurance is tremendously enhanced.
Such androgenicity is harmful to hair follicles because of elevated ranges of dihydrotestosterone (DHT), inflicting receding and thinning on the scalp. Trenbolone possesses one of many highest androgenic scores of the anabolic steroid family, at 500. During this transition period, where testosterone ranges are shut down, our patients have skilled melancholy, erectile dysfunction, diminished libido, low energy levels, and decreased total well-being. Additionally, bear in mind that exogenous AAS use will suppress your physique’s capacity to provide testosterone and other androgens, so you might have to be put on testosterone substitute remedy (TRT) after a cycle. It Is prudent to have a bodily examination earlier than utilizing any drugs, particularly if you have a preexisting well being situation.
With this stack, you’re uncovered to a higher threat of elevated blood pressure, suppression of testosterone, and extra. We never recommend using anabolic steroids because they can cause critical unwanted effects. Have you ever questioned why the price of Trenbolone can range so significantly?
Outdoors of labor, Jack loves spending time together with his family and maintaining with the latest well being developments and research. Using Trenbolone can be a secure and effective approach to achieve your bodybuilding goals. By following a Trenbolone cycle and utilizing it responsibly, you may get probably the most out of this highly effective steroid while minimizing the dangers to your health. Hi, I Am Dave Moffat the founder and Chief Editor of steroidsourcetalk.com and certified Worldwide Private Coach and Certified Nutritionist. My passion has always been bodybuilding but with 15 years’ experience in weight reduction packages too, it is hard to not mention all that if you’re working at your fitness degree fullest (I hope). When Im not in the fitness center or spending time away from my family i usually think about what advice would help others obtain theirs goals just like these inspired mine.
Nonetheless, the approximate half-lives that are recognized for all our commonly used anabolic steroids present a strong base to plan your cycles on. We observe that stacking trenbolone with different anabolic steroids will increase its risks. Nevertheless, most customers report seeing significant features in muscle mass and strength throughout the first few weeks of starting their cycle.
While some steroid users make the excuse that short-term consumption could not trigger much injury and that the problems are reversible, this isn’t all the time the case. Tren can be still obtainable in pellet form and could be purchased from a feed supply store and converted to injectable Tren very easily with a simple kit. When offered in this form it’s not a controlled substance as this is ready to harm the livestock market, however it is something many provide shops keep a watchful eye on.
Views expressed by users are positive and a few users even report different physiological improvements, similar to better post-workout recovery speeds. With important positive aspects in muscle mass, Trenorol is a highly rated legal steroid within the UK that has been used by each novice and professional athletes. It is a legal various to Trenbolone and it is designed to mimic anabolic steroids, nevertheless it doesn’t have the identical unwanted facet effects. This makes it a a lot safer choice, and makes it legal to buy with no prescription. The authorized standing of those substances, mixed with their easy availability, makes them a gorgeous option for people in search of to reinforce their athletic performance or physical look. In the pursuit of achieving your health objectives, exploring pure alternatives like those mentioned on this article can present a promising path to constructing muscle.
Similar to anabolic steroids, human progress hormone (HGH) is also thought-about a prescription medicine in Mexico. This means that it is legal to purchase and use HGH in Mexico, offered that you’ve got got a sound prescription from a licensed medical professional. It is important to notice that some forms of HGH usually are not approved for use in Mexico, and it’s important to verify the particular product and its legality earlier than purchasing or utilizing it. There are many unlawful steroids that some folks use to construct muscle rapidly. Nevertheless, it’s important to note that using unlawful steroids with no prescription may be harmful to well being and is in opposition to the law in many places.
More importantly and it’s already been mentioned however is price repeating, you’re within the line of the regulation and that’s price greater than you’ll have the ability to potential know. Some of it is feasible for you to to cover some of the price through your insurance and virtually always age will play a large position on this issue. Even if you do not qualify for insurance coverage help the benefits are worth it and in terms of prescription steroids you will be onerous pressed to find something on this earth that may begin to compare. One of the most common questions among athletes is how can they get hold of physician prescribed steroids and imagine it or not obtaining doctor prescribed steroids may not be as hard as you think. As it stands, in locations similar to the united states anabolic steroids are unlawful and not utilizing a prescription. Further, to obtain a prescription there must be a viable medical function. As is common, many individuals who are suffering from muscle wasting ailments are sometimes prescribed anabolic steroids however more and more are the practices of prescribing anabolic steroids for rejuvenation purposes.
You’re going to have legal steroids that immediately and not directly allow you to construct extra muscle http://newslabx.csie.ntu.edu.tw:3000/wilmafiller831/wilma1996/wiki/Anavar-Oxandrolone%3A-Benefits%2C-Side-Effects%2C-Dosage%2C-And-More. These legal steroid supplements are most likely to focus on testosterone levels to set off extra muscle development. Are you looking for the strongest legal alternatives to illegal anabolic steroids that include quite a few side effects?
It can generally take a couple of months after stopping your PED cycle before your normal menstrual cycle resumes. Some ladies will find a fast recovery of normal cycles; this will depend upon the person and which PEDs had been taken. Your dosage and the way long you utilize a steroid will decide your danger of voice modifications and, specifically, simply how deep your voice could get. It starts slowly, with a noticeable but usually intermittent crackling or hoarseness of the voice, which you would possibly mistake for an illness. However different folks will soon start to notice your vocal change if it progresses with continued steroid use. Steroids which have extra powerful androgenic properties will be the steroids that will trigger virilization faster and more severely than steroids that have a decrease androgenic ranking. Some steroids are utterly off-limits to females because of this; they’re too androgenically powerful to be of any optimistic profit to ladies.
You start by taking a low dose of one or more anabolic steroids, after which improve your dosage over time. Once you get to a maximum dose, you cease taking them for a rest period earlier than beginning once more. That’s the burning query on the minds of many bodybuilders and athletes trying to improve their efficiency.
If you would possibly be dealing with a seller who just isn’t displaying up wherever, they might be fake distributors, and you want to cease the transaction immediately. The first step to verify if the steroids you’re nearly to purchase are faux or actual is to look at the expiration dates. For the fakes, the expiration dates might be printed on the original printing on the package. However for real steroids, this will by no means be the case, because the expiration date might be added later to the unique printing on the packaging utilizing a stamp. To wrap it up, doping ties docs to many moral challenges, privacy issues, and the push for better training and prevention efforts. They should work through these points with out inflicting harm and by keeping sports activities clear.
There’s nothing incorrect with enthusiasm, however diving in with zero information or thought of what might go incorrect, let alone HOW you ought to be utilizing steroids, goes to show your steroid expertise into a living nightmare. Some steroids shall be extra fat-soluble than others and so detectable for longer intervals due to them remaining in the fat tissue. Anabolic compounds are very fat-soluble compounds, which means these are substances that are absorbed with fat after which saved in fatty tissue. Injectable steroids have an connected ester that controls how quickly the hormone is launched, and these steroids (and their metabolites) will always remain detectable for for much longer.
You can take Rebirth after a cycle to increase testosterone and promote muscle mass. It also works as a standalone T-booster for lean mass and drive, with 30 servings per bottle. The potent formulation has 10 scientifically backed components which are secure and natural, providing a authorized steroid with out antagonistic unwanted effects. These authorized steroids are easy to take if you’re a morning person, as the model recommends having 4 capsules 20 minutes before breakfast. Selective Androgen Receptor Modulators, generally known as SARMS, exist in a authorized grey space within the United States. As of 2021, SARMS usually are not accredited by the Food and Drug Administration (FDA) for medical use, however they are not explicitly illegal. They are sometimes bought as dietary dietary supplements, though the FDA has issued warnings about this, stating that they have the potential for severe unwanted effects and that they should be prevented by members of the common public.
We have a large group of experienced specialists that may help you choose the drugs and give you advise on the method to take advantage of out of them. Therefore, if you have some questions on any of the products on provide, do not doubt and switch to us for advice. Additionally, we shall be glad to assist with any technical points regarding ordering procedures or supply. Our procedures have been simplified to make it simple so that you can Buy Steroids Online DUBAI.
At gearstore.biz, we stock a big assortment of anabolics for individuals who want to look within the mirror and see a gorgeous determine. Authorized steroids might offer delicate advantages such as improved workout efficiency, restoration, and well-being due to legal steroid natural ingredients. Nonetheless, the effects of best legal steroid on the market (http://genome-tech.ucsd.edu/LabNotes/index.php?title=Understanding_Anavar_Half-Life:_How_Long_Does_This_Popular_Steroid_Rea) steroid use are delicate and vary between individuals. Bodybuilders resort totestosterone injections or anabolic steroids to artificially increasetheir testosterone ranges beyond what the physique naturally produces. But the precise fact is that SARMs can certainly trigger hair loss in some individuals, just like steroids can. This side effect is generally a priority when taking SARMs at excessive doses – just as most efficiency athletes will. If you expertise hair loss when taking SARMs, the unhealthy information is that it will be permanent except you’ve some efficient hair restoration plan.
Additionally, your body’s protein synthesis and talent to retain nitrogen will be further enhanced. On the other hand, when oral steroids are taken, they’re first metabolised by your liver and/or kidneys. This is before they are absorbed into your bloodstream and into your skeletal muscle tissues. Just like different medicines, injectable steroids on the market also have their disadvantages and side effects. However, if you persist with a really helpful cycle and dosage plan, your publicity to side effects shall be minimal.
A transdermal patch (Intrinsa) for hormone substitute in girls is under investigation; the day by day dosages utilized in women are a lot lower than for merchandise used in males. The FDA dominated in late 2004 that it would delay the approval of Intrinsa women’s testosterone patch and has required extra knowledge relating to security, particularly in relation to cardiovascular and breast well being. Welcome to our premier on-line store, where you’ll find a wideselection of anabolic steroids on the market and associated products. Our goalis to provide you with a complete range of things, includinganabolic steroids on the market, post-cycle remedy medication, HCG, and fatburners, all conveniently available in one place. No, legal steroids aren’t as effective as anabolic steroids in selling muscle progress and enhancing performance. Real steroids have powerful hormonal results that lead to important muscle positive aspects, whereas legal steroids provide milder advantages. Our web site and domain are emblematic of very effective dietary and dietary anabolic supplements, which aren’t narcotic or unlawful medicine in any method.
Nevertheless, the draw back is water retention, that means some weight might be misplaced after the cycle. Fish oil, NAC, vitamin B6 (P5P), and Berberine are all beneficial ancillaries to assist the potential unwanted effects of ldl cholesterol, liver, blood sugar, and prolactin. Whereas there are some similarities to steroids in phrases of the anabolic properties of SARMs, their androgenic exercise is way weaker. Anabolic steroids bind to many androgen receptors all through the physique. This is how we get such a major discount in androgenic-type unwanted effects whereas nonetheless getting advantages like muscle growth. Every SARM is different, however most are designed to bind to skeletal muscle tissue receptors. Your weight will finally depend on your food regimen and exercises, but shedding 10% or extra body fat just isn’t impossible.
Consuming a quality electrolyte formula will also assist (avoid extra added sugar). Whereas any SARM could cause some individuals to expertise dehydration, RAD-140 is especially famous as a extra widespread wrongdoer. Heart palpitations (increased or irregular heartbeat) are a rare SARM impact that you just would possibly see mentioned by users. There’s no means of figuring out whether or not those individuals have an underlying situation, similar to anxiety or high blood pressure, which could cause modifications to their heartbeat. The full range and severity of attainable side effects from SARMs are not understood. Most identified unwanted facet effects come from personal experiences that SARM customers report. This means you would potentially have adverse effects22 that haven’t been reported by anyone else, or you would use SARMs and not experience the unwanted effects that others have.
However, because of their mode of administration, steroid injections offer higher and faster bodybuilding advantages than oral steroids. It is possible to experience CTS during or after excessive interval intensity coaching (HIIT). But with the help of injectable steroids on the market and physiotherapy, you will quickly recuperate from CTS. The intravenous use of steroid injection may help boost your muscle mass by selling amino acid production, nitrogen retention, and protein synthesis. Inside a brief time frame, you’ll experience development in your skeletal muscle tissue.
Extra critically, LGD-4033 poses a excessive danger to cholesterol well being, with studies exhibiting that HDL levels can reduce considerably, so these with present cholesterol problems should rethink utilizing this SARM. Still, detailed information isn’t but available – due to this fact, keeping your dose as little as attainable is one of the simplest ways to minimize that threat. Specifically, relating to SARMs, we’d be most involved in the selective receptors in the muscle that stimulate muscle growth10. And as a result of a selective modulator is “selective,” unwanted side effects are minimized as a end result of non-targeted receptors usually are not (in theory) going to be activated. After being absorbed within the intestine, Oral Steroids essentially then fall with the move of blood to the liver and adversely have an effect on its condition.
S4 is a SARM that has seen a large take-up by athletes in numerous disciplines. I may say that this is a SARM that is both loved and hated for several reasons, including that it’s not as highly effective in either anabolic or androgenic results in contrast with many different SARMs. Many trials weren’t revealed, making this SARM extra of a thriller than others. The compound has a 24-hour half-life (up to 60 hours in accordance with some users), so the dosing frequency is as quickly as a day (preferably within the morning) to make sure it’s always lively in the physique. Ligandrol will usually be used at 5-10 mg/day for about eight weeks.
70918248
References:
what does steroids mean (https://redrakegaming.us/features-that-elevate-the-casino-heist-megaways-slot/)
70918248
References:
anabolic steroids illegal (https://adnium.in/navigating-the-unknown-a-journey-discovery/)
70918248
References:
buy steroids com (https://tarisgear.com/services/wow-classic-20th-anniversary-scholomance-dungeon-boost/)
70918248
References:
popular steroid (https://fintechzoompro.co/fintechzoom-pro/)
70918248
References:
reliable steroid sources (https://www.osbornehotel-devon.co.uk/from-ballroom-to-beach-a-nostalgic-look-at-events-hosted-at-the-osborne-hotel/)
70918248
References:
https://jumpingsun.com/eloquent-concrete-patio-installation-in-my-area-of-fort-worth-stockyards-texas/
70918248
References:
https://fachrihelmanto.com/3362/pendekatan-deep-learning-berbasis-proyek-pembelajaran-untuk-pengembangan-keterampilan-siswa-sd-dalam-era-digital/
70918248
References:
https://www.tsallos.net/en/top-10-green-sustainable-products-of-the-year/
70918248
References:
none (https://expectacao.projetocimm.com/sessao-hora-curta-o-cinema-entremares-de-valerio-fonseca/)
70918248
References:
internet Casino usa (https://partyblog24.com/travel-house-your-gateway-to-memorable-adventures/)
70918248
References:
None (https://sman2sragen.sch.id/2022/02/21/pendampingan-individual-ke-2-calon-guru-penggerak-cgp-angkatan-4-sma-negeri-2-sragen/)
70918248
References:
none – https://dairyofamom.org/2024/06/28/meet-the-latest-celebrant/,