How to enable https on Apache CentOS
For some businesses, serving up websites via HTTPS is a must-have. Here’s how to configure secure http Apache on CentOS.We may be compensated by vendors who appear on this page through methods such as affiliate links or sponsored partnerships. This may influence how and where their products appear on our site, but vendors cannot pay to influence the content of our reviews. For more info, visit our Terms of Use page.

If you are starting to migrate your web servers over to Linux (or have already done so) and are looking to serve those pages up over secure http (aka https), you’re going to need to know how to make this happen. Although https does will not guarantee security for your web server, it is a solid first step in the process. Configuring Apache for https on CentOS isn’t difficult, but there are a few steps. Let’s walk through the process, so you can start serving your pages up to your clients/customers more confidently.
This walkthrough will use CentOS 7 and work with a self-signed certificate. The self-signed option works great for personal sites or testing purposes. For your official business rollouts, you’ll want to purchase an SSL certificate from a reputable company (such as Digicert, Network Solutions, or GlobalSign). I will also assume you already have Apache running on the server.
Must-read security coverage
- Top cybersecurity threats for 2023
- Best IT asset management software of 2022
- Meet the most comprehensive portable cybersecurity device
- How to secure your email via encryption, password management and more (TechRepublic Premium)
With that said, let’s begin the process.
Installing and using OpenSSL
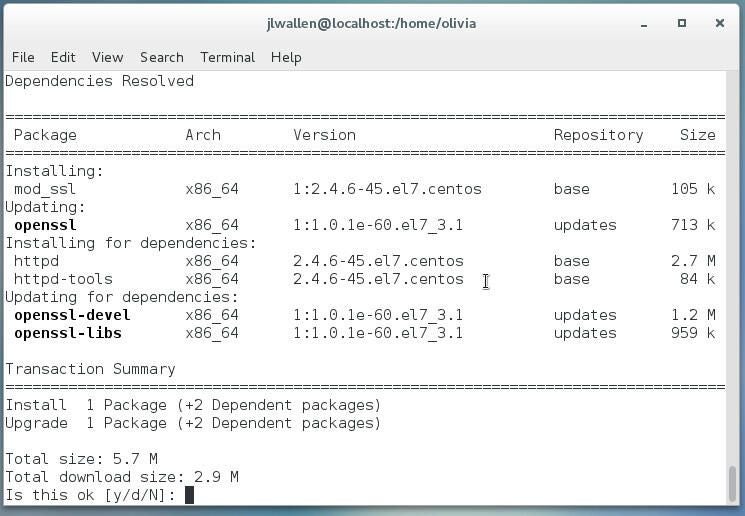
The first step in the process is the installation of OpenSSL and the generating of the certificate to be used. To install OpenSSL, open a terminal window and issue the command:
sudo yum install mod_ssl openssl
Issuing the above command will pick up all the necessary dependencies (Figure A).
Figure A
Now we generate the SSL key with the following commands:
Generate private key and CSR
openssl req -new -newkey rsa:2048 -nodes -keyout ca.key -out ca.csr
Generate Self Signed Key
openssl x509 -req -days 365 -in ca.csr -signkey ca.key -out ca.crt
Now we need to copy the newly generated files to the correct locations with the following commands:
sudo cp ca.crt /etc/pki/tls/certs
sudo cp ca.key /etc/pki/tls/private/ca.key
sudo cp ca.csr /etc/pki/tls/private/ca.csr
When you issue the command to generate the CSR, you will be asked a number of questions for the key (such as Country Name, State or Province, Locality, Organization Name, Organizational Unit, Common Name, Email Address, etc.). OpenSSL will also require you to enter a challenge password for the CSR.
The next step requires the editing of the /etc/httpd/conf.d/ssl.conf file. Open that file for editing and locate and change the following lines:
SSLCertificateFile /etc/pki/tls/certs/localhost.crt
changes to:
SSLCertificateFile /etc/pki/tls/certs/ca.crt SSLCertificateKeyFile /etc/pki/tls/private/localhost.key
changes to:
SSLCertificateKeyFile /etc/pki/tls/private/ca.key
Finally, restart the Apache daemon with the command:
sudo systemctl restart httpd
Create a virtual host
Let’s create a virtual host that makes use of SSL. To do this we’ll create the necessary directories with the following commands:
sudo mkdir -p /var/www/html/adorkable
âsudo mkdir -p /etc/httpd/sites-available
âsudo mkdir -p /etc/httpd/sites-enabled
I’m using “adorkable” as an example. You can use whatever name you like/need.
Next we must edit the httpd.conf file, so that it becomes aware of the sites-enabled directory. To do this, open up /etc/httpd/conf/httpd.conf and add the following line to the bottom of the file:
IncludeOptional sites-enabled/*.conf
Save and close that file.
Now we need to create our virtual host file. We’ll do this in /etc/httpd/sites-available/adorkable.conf. Again, swap “adorkable.conf” with the name of your virtual host. In that file we’ll add the following contents (customize as needed):
ServerAdmin email@address
DocumentRoot "/var/www/html/adorkable/"
ServerName AdorkableDesigns
ServerAlias adorkable
ErrorLog /var/www/html/adorkable/error.log
<directory “=”” var=”” www=”” html=”” adorkable=””>
DirectoryIndex index.html index.php
Options FollowSymLinks
AllowOverride All
Require all granted
Save and close that file.
In order for Apache to be aware of the new virtual host, we must create a symbolic link, from sites-available to sites-enabled, with the command:
sudo ln -s /etc/httpd/sites-available/adorkable.conf /etc/httpd/sites-enabled/adorkable.conf
Restart Apache with the command:
sudo systemctl restart httpd
Your virtual host should now be visible to the server. All you have to do is add content to the /var/www/html/adorkable directory and you’re good to go.
A quick test
That’s all there is to the setup of https on Apache with CentOS. You can do a quick test by pointing a browser to https://IP_OF_SERVER. You should receive a security warning (since we are using a self-signed certificate. Okay that warning and Apache will serve up your site using https. Point your browser to https://IP_OF_SERVER/adorkable to visit the newly created virtual host. Depending on what type of site you are serving up, you might have to do a bit of extra work with that particular platform.
Easy peasy https
You have officially set up your Apache server to work with https. As I mentioned earlier, if you plan on using this for public-facing, business sites, I highly recommend purchasing your SSL certificates from a reputable dealer (or using Let’s Encrypt).
Config firewall Add port 80 – 443 to firewall centos
Add port 80 to the firewall rule and reload the firewall service
firewall-cmd --zone=public --permanent --add-service=http
firewall-cmd --zone=public --add-port=80/tcp --permanent
Add port 443 to the firewall rule and reload the firewall service
firewall-cmd --zone=public --permanent --add-service=https
firewall-cmd --zone=public --add-port=443/tcp --permanent
firewall-cmd --reload
firewall-cmd --list-all
Check port open firewall centos
Check whether or not the port has been added to the iptables and check whether or not port 443 is listening
iptables-save | grep 443
netstat -plnt | grep ':443'
The only assumption in this blog is that you have a admin/root permission
That’s it for today I hope you find this blog post informative!